Cutscene/ru
| Ролик |
| Начало / Русская DA Builder Wiki / Поделиться ВКонтакте
|
Катсцена – это заранее заскриптованная кинематографическая последовательность, которая воспроизводится используя движок игры и игровые объекты.
Contents
Приступая к работе
Есть две вещи, которые необходимо сделать перед тем, как приступить к работе с катсценой.
- Необходимо создать новый ресурс – катсцену
- К катсцене необходим творческий подход.
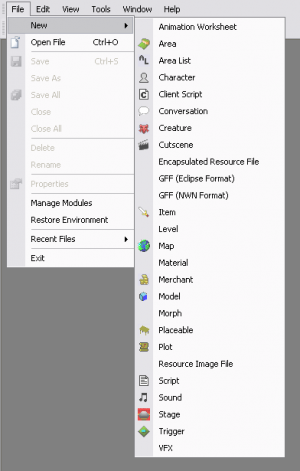
Для создания нового ресурса катсцены, перейдите в меню File и віберите New-> Cutscene. Введите уникальное имя для катсцены. Нажмите ОК. Новый ресурс катсцены появится в закладке для катсцен в окне палитры.
Паралельно, катсцены могут быть созданы из существующей кинематографической линии в conversation(диалоге). Это позволяет редактировать кинематографичность диалогов в более искусные способы.
Когда вы впервые открываете ресурс катсцены, окно Object Inspector отобразит несколько отличающиеся между собой полей данных. Одно из них – «Area» (область). Кликните на строке и, затем, кликните на кнопку “…”. Это откроет окно, отображающее все доступные игровые области. Выберите одну, кликните ОК и вы сможете увидеть ее через экраны видов.
Вы также можете назначить сцену stage катсцене. Это позволит сделать доступным действие «jump to stage», которое позволит вам моментально переместить камеры и объекты в заданные места место в сцене, возможно упрощающее создание катсцены, если у вас уже есть хорошая сцена для работы, которую вы намерены делать. Сцена не есть строго необходимой для создания катсцены, но в некоторых случаях, она может помочь сделать вещи более удобными, посредством создания опорных точек для дальнейшей работы.
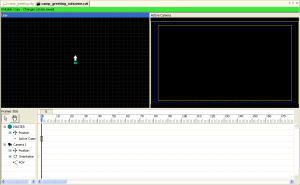
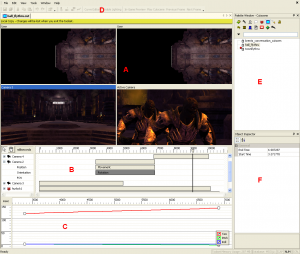
Редактор катсцены имеет два главных раздела: Видовые экраны (сверху), и шкала хронологии (внизу). Также существует curve editor (редактор кривых) , который может быть отображен ниже шкалы хронологии, корда кнопка «show curve editor» (показать редактор кривых) доступна на панели инструментов.
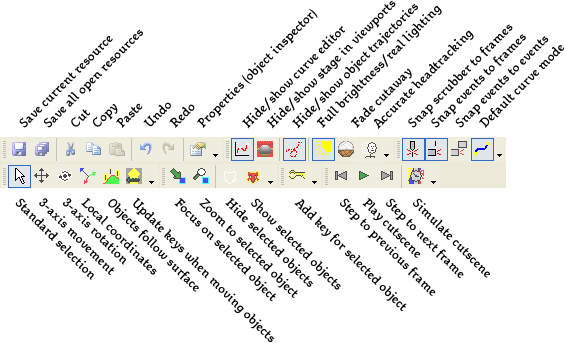
Панель инструментов
- "Show trajectories" показывает путь, траекторию, вдоль которой объекты с позиционным ключом будут перемещаться. Ключевые позиции показаны маленькими белыми квадратиками вдоль линии траектории.
- When "Curve mode" is enabled, key curves are bezier by default. When not selected, key curves are stepped by default.
- See 3D control for information on standard selection, 3-axis movement, 3-axis rotation and local coordinates
- Objects follow surface: selected objects snap to walkmesh when they're moved.
- "Update keys" update position and orientation keys when you rotate/translate cutscene objects
- The "add keys for selected object" (position, orientation, and other) command has the keyboard shortcut "K"
- "Simulate cutscene" Causes the cutscene engine to fully simulate the cutscene up to the point currently selected by the timeline scrubber and update the view to that state. This is useful to ensure that all visual effect elements are in the state they would be in if you played the cutscene normally to that point. For efficiency reasons some complex visual effects aren't updated in this way when you move the scrubber around.
Viewports
The viewports are where the scene can be viewed, and where objects in the scene can be manipulated.
See 3D control for information on how to control the view within a viewport.
View types
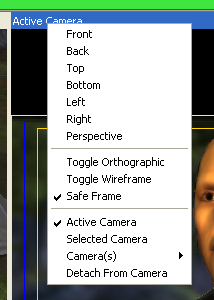
To change the type of view for a viewport right-click on the line above the viewport. This will show a context menu that allows the viewport type to be changed.
The top portion of the context menu lists the following options: Front, Back, Top, Bottom, Left, Right, Perspective. These are predefined user views, and will move the camera to those positions. The bottom portion of the context menu allows the viewport to be attached to a camera.
- User — This is the default view type. The camera can be moved around to view the scene from any angle. This is the most useful view type for manipulating objects in the scene.
- Active Camera — This view type will attach the viewport camera to the camera that is currently active. This view is the one to use to preview how the scene will look in the game.
- Selected Camera - This view type will attach the viewport camera to the camera that's currently selected in the timeline window.
- Camera(s) — This view type will attach the viewport to a specific camera. In the context menu move the mouse over the Camera option, and a sub-menu will open listing all the available cameras in the scene. This view will preview how the scene will look from that camera. Also, if the viewport camera is moved via camera controls the actual camera will also be moved.
There is one more option of note in the context menu: Detach Camera. If a viewport is attached to a camera (either a specific camera or the active camera) this option will switch the viewport back to the User mode, but the viewport camera will remain where it is.
Other options here include:
- Toggle Orthographic — Turns on or off perspective view.
- Toggle Wireframe — Turns on or off the display of textures and shading. Can be useful when the topography of an area is obscured by complex texturing.
- Safe Frame — Restricts the camera's view to a frame that shows what will be visible when the cutscene is viewed in-game. Useful for previewing.
Viewport layout
By default there are four viewport windows, allowing the user to view the scene from many different angles at once. However this can be customized to suit the user's needs.
All of the viewports can be resized by dragging the separating lines between the viewports.
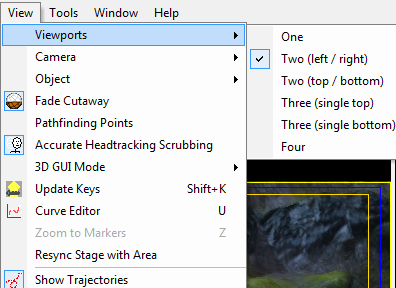
Also, the number of viewports can be changed. Between one and four viewports can be visible at once, in a variety of different configurations. This can be changed using the View -> Viewports menu or by right-clicking on the title bar of the active viewport.
Working with objects in viewports
For a complete list of the types of objects that can be placed in a cutscene, and their properties, see cutscene objects.
Placing a creature or placeable
To place a creature or placeable object in the cutscene you simply need to select the object in the palette window and then click in the viewport to place the object.
- Go to the Creatures or Placeables portion of the Palette Window.
- Find the creature or placeable that you wish to use in the cutscene, and select it.
- Once selected when you move the cursor over a viewport window it will change to a crosshair.
- Select a spot to place the object, and click.
The object will then be placed in the scene, and it will also be listed in the timeline.
Placing a camera or light
Go to the Edit menu -> Insert -> Camera/Light. From here it is the same as placing a creature or placeable — the cursor will change to a crosshair and clicking will place the camera or light.
An alternate method is to right-click anywhere in a viewport. This will show a context menu that has the same Insert menu option.
Proxies and visual effect objects can be placed in the same manner.
Editing object properties
Select the object — either in the viewport, or click its name in the timeline — and the Object Inspector will display the valid editable properties for the object.
All timeline objects have a Name field. This simply changes the name as it is displayed in the timeline, which is useful to keep things organized.
You can also type in the Orientation and Position values, though most of the time it isn't necessary to enter the values in directly.
Some objects have special fields that can be keyed and edited with the curve editor. Cameras have a FOV (field of view) field, which sets the default FOV for that camera. Lights have a Color and a Radius field.
Activating pre-placed area objects
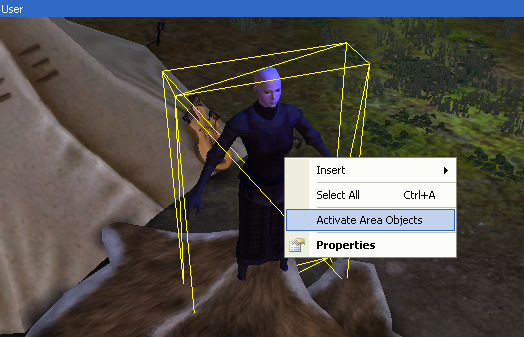
Objects that are pre-placed in the area (via the area editor) are inactive by default, meaning they can't be controlled by the cutscene engine and will carry on doing whatever ambient behaviour they would normally do. They can be selected in standard mode, however, and activated by right-clicking the selected object and selecting "Activate Area Objects". The object will then get an entry in the timeline.
To deactivate an area object, simply delete it. The timeline entry for the object will be removed and it will go back to its original position and inactive state.
If you want to hide an area object during the cutscene, activate it and then give it a "Change Visibility" cutscene action to make it disappear.
Timeline
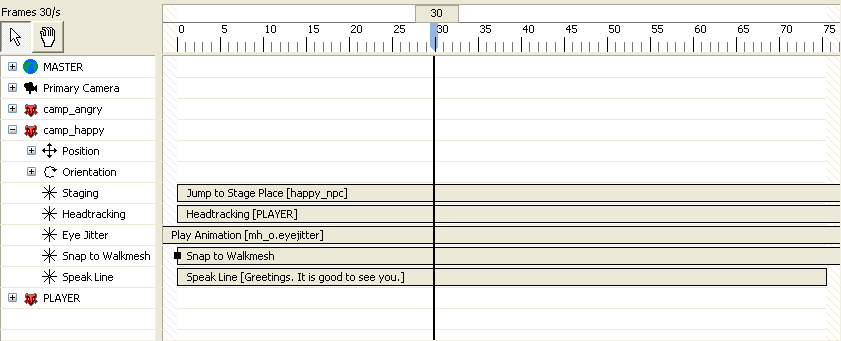
The timeline consists of a list of all the active objects in the cutscene, each with a set of "tracks" that contain various actions and events that occur to those objects over time. The bar along the top of the timeline shows the location of those events in time, and a marker (or "scrubber") with a vertical line running through the tracks shows what moment in time is currently being displayed in the viewports.
Tool Buttons
- Selection Tool - This tool allows you to select the objects, events, and their respective tracks.
- Hand Tool - Left-clicking and dragging in the Track Pane with this tool will allow you to scroll rapidly through the Timeline. If you have the Selection Tool selected, you can temporarily switch to the Hand Tool by simply holding the SHIFT key.
- Units Indicator - This indicates what the numbers on the timeline mean. The default is “frames”. To change the units, open the properties of the timeline window by right-clicking anywhere in the timeline area and selecting "properties". The options under the "Time Scale" property are seconds (100 FPS) or frames (30 FPS).
- Timeline Bar - An indication of the cutscene’s progression in linear temporal units. To stretch or shrink the timeline place the mouse cursor over it and use the mouse wheel (you may need to click it once to give the timeline focus).
- Timeline Marker - This shows the precise point in the timeline that the scene is at. Left-clicking and dragging it will allow you to cycle back and forth through the Timeline, as the actions play out in the viewports. Any keys or actions you place will appear at the point in time occupied by the Time Marker.
- Track List - This section lists all of the objects in the scene. When the + sign beside the object is clicked it will expand and list all of the tracks associated with that object.
There is always a "MASTER" object. Global actions are assigned to a track on the MASTER object. This would include things like fades and other frame buffer effects. The MASTER object cannot be deleted. All other objects can be added and deleted at will.
Each object has Position and Orientation track sets with each set having three sub-tracks (X, Y and Z, and roll, pitch, and yaw). In addition, there are the following special tracks:
- Cameras have a "FOV" (field of view) track.
- Lights have "radius", "intensity", and "color" tracks (the latter having one sub-track each for red, green, and blue).
- MASTER lacks an Orientation track set.
- Sounds have a "Sound" track
To add a new generic track right-click an object and select “Add Track”. All actions not covered by the Position, Orientation, or FOV tracks (like animations) are placed on generic tracks.
For a complete list of the actions and effects that can be added to generic tracks, see:
- cutscene actions - these affect how objects in the cutscene behave.
- cutscene effects - these modify the view through the camera, for example adding motion blur.
To rename an object select it and change the “Name” field in the Object Inspector. The same can be done for generic tracks (but not the Position, Orientation, or other special tracks).
Objects can be re-ordered by dragging the name up and down in the list.
- Track Pane - This pane displays all the actions (keys, curves, other actions) that are occurring within the scene, in their related points in Time.
Actions can be shuffled around by left-clicking and dragging while using the Selection Tool. They can also be cut/copied from one track and pasted to another track.
Objects can be multi-selected by left-click dragging in an open area of the pane. Another method is to use CTRL-click on multiple objects to select them.
- Keys and Curves - To make objects move around during the cutscene they need to have keys assigned to them on the timeline. For example, if a creature is supposed to be at a specific point at a specific time he will have a position key placed at the appropriate time on the timeline.
A single key will immediately snap the object when that point in time is reached. For a position key this means the object will jump to that point. For an orientation key the object will snap to the new orientation. For a FOV key the camera will snap to the new FOV.
Keys can also be combined to create a curve. When this is done a Bezier curve or linear curve is generated to fill the gaps between the keys. The curve can then be adjusted in different ways to create the exact movement the user needs.
Creating keys and curves is pretty much the same for all types (position, movement, FOV) though there are differences in how to work with them once they are created.
Creating a Key
- Position the time marker to the point on the timeline where the key should be created.
- Adjust the object to the desired setting.
- Position: Move the object to the proper place in the level.
- Orientation: Rotate the object.
- FOV: Change the FOV field in the Object Inspector.
- Right-click the object name in the timeline and select either “Add Position Key”, “Add Orientation Key”, or “Add Camera FOV Key”.
- The keyboard shortcuts "P", "O", and "F" can also be used.
- The shortcut "K" creates a key on all three sets of tracks simultaneously.
Position Keys and Curves
Once placed, position keys and curves are visible in User viewports. Moving keys and curves around the layout works the same as moving any other object.
Individual keys are shown in viewports as white squares (yellow when selected). To change the position of a key simply drag it around the layout.
Curves can also be adjusted in the curve editor. See curve editor for more details.
Orientation and FOV keys/curves
Orientation and FOV keys/curves cannot be easily represented in the viewport. The result will be displayed (for example, a creature will turn), but the keys and curves themselves will not be visible.
To adjust them the Curve Editor must be used. Refer to curve editor for more information.
VFX
See VFX list for a list of visual effects available in Dragon Age's library.
To use a VFX object in the cutscene editor, right-click in the user viewport and select "insert/VFX". Find the desired VFX in the popup browser window. If you know the exact VFX you need, filter for it by copying the name over. Use " * " as wildcard if needed. Filtering by entering "*x*" in the "name" field and hitting "enter" should eliminate most other animations from the list. You can also filter by type of VFX, using the prefixes listed above. Select the VFX you want and hit "ok".
Now left-click in the scene to place the VFX. You will see a new "VFX" item added to your timeline.
- If the VFX is a crust effect, select it and designate a crust target in the "actor" field of the object inspector.
- If the VFX is a placeable effect, use the 3 Axis Movement tool to place it at the desired coordinates.
You can click on the "+" next to the VFX on the timeline to view its info, including assigned animations.
VFX animations can be chopped and looped if needed.
Most VFX are made up of 3 separate stages: Impact, Duration, and cessation. These are indicated using a ".impa", ".dura" or ".cess" extension in the animation name on the timeline.
If you want a VFX to play for a specific time, manipulate the "Duration" stage of the animation in the timeline.
Previewing in editor:
To get a frame-accurate preview of the VFX at any given frame when scrubbing the timeline, click the "Simulate Cutscene" button at the top of the screen.
Titles and text
Since all text comes from conversations, this is how we add a title for DA:
- Create a conversation line (the way we do thing is: some stand alone cutscenes have their own conversation; you could also create one conversation with all your area titles or whatever)
- Flag the line in the conversation as “No VO In Game” – this will cause the subtitle to always show and it won’t try to play or generate VO
- Add the conversation line to the cutscene via a Speak Line action. It is usually most convenient to add this to the MASTER object.
This will create a title which works just like a subtitled VO line. There is no way to change the font or have any kind of title other than a VO subtitle (with or without actual VO).
Note that subtitles have a different appearance in the toolset editor than in the game.
Cutscene properties
| ⊟ | General | |
| Cutscene Length | How long the cutscene plays for. | |
| End Script | The script that will be fired when the cutscene completes. This field is only considered during stand-alone cutscenes. Cutscenes that are part of a conversation ignore this field. | |
| Play Until VO Completes | If true the cutscene will continue playing past the end if non-english VO extends beyond the end of the scene. If false the cutscene always ends at the end of its runtime. This flag only applies to cutscenes played as part of a conversation. | |
| Resource Name | A unique string identifier the toolset and the game both use to refer to this resource | |
| Time Scale | The time scale that the cutscene uses. | |
| ⊟ | Debug | |
| Animatic | A temporary bink movie that will be played instead of this cutscene. This field is intended to allow hookup of cutscenes before they are ready. It should never be used in the final game. | |
| ⊟ | Game | |
| Play Sound Events | If true any sound events associated with animations will be played. If false these events will not be played. Sound events can only be played in the game, you will not hear them in the toolset. | |
| Use Master For LOD | If true the master object will be used to determine the center of level LOD for the cutscene. If false the LOD is centered around the mid point of the scene and never moves. | |
| ⊟ | Setting | |
| Area | The area in which the cutscene takes place. | |
| Enable Level Effects | If true the effects from the level will be applied. If false only those effects defined in the cutscene will be applied. | |
| Stage | The stage on which the cutscene will be played. If set, stage actions are allowed. | |
| Stage Orientation | The orientation of the stage within the area. Only shown when a stage is selected. | |
| Stage Position | The position of the stage within the area. Only shown when a stage is selected. |
| Язык: | English • русский |
|---|
