Terrain mesh
| Level editor topics |
|---|
|
The terrain mesh is a deformable surface used in exterior levels to provide a "ground". This toolbar contains the tools that deals with the terrain mesh:
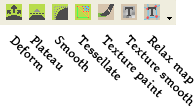
Each of these buttons brings up a "brush" that's used for various tasks.
-
 "Deform" allows the terrain mesh to be raised or lowered, or it can extrude the ground "outward" or "inward" along its surface normal. In other words, if you were to apply the brush to the side of a cliff in extrude mode you could create a cave-like hollow or a bulging overhang. Note that the walkmesh used by the game is two-dimensional, ie, it doesn't allow pathfinding both over and under an overhang. The walkmesh will always be generated on the overhanging part of the land. Also note that you cannot have an overhang from one terrain chunk into another terrain chunk - turn on "view chunk boundaries" to check if this has happened and reposition any overhangs that violate these boundaries.
 "Plateau" flattens out the land the brush is applied to, removing bumps or dips and making the ground level. It grabs the height at the center of the brush and makes the terrain inside the brush radius that same height. It can go faster or slower depending on the max strength. This is a good tool for making a path through rough terrain, or for smoothing out a flat field.
 "Smooth" is a more generic form of flattening tool. It doesn't force the ground toward a horizontal plane, instead just averaging out the nearby terrain in whatever orientation it averages out to.
 "Tessellate" changes the resolution of the terrain's mesh, increasing or decreasing the number of triangles a given region. This allows for a more fine-grained control of the shape of the land and prevents small features from being given obvious straight edges caused by the underlying triangle mesh. Left-clicking increases the number of triangular subdivisions and right-clicking reduces it. The "max level" and "min level" settings on the tool constrain these values - lower numbers indicate a coarser mesh with fewer, larger triangles.
 "Texture paint" paints materials from the material palette onto the terrain. The material palette for any given level can hold up to eight materials, and they can be blended together seamlessly.
 "Texture smooth" blurs the boundaries between different material types, allowing them to fade more gradually from one terrain material type to another.
 "Relax map" causes stretched ground textures to relax back toward their default resolution. Terrain texture stretching can occur when you deform the ground. For example, if you were to stretch the ground upward in a small area to form a tall cliff, the texture on the cliff's face would be vertically stretched and could look unrealistic as a result.
| ⊟ | General | |
| Brush type | ||
| Deform mode | ||
| Grid Opacity | ||
| Visible level | ||
| ⊟ | Deform Tool | |
| Distance | This is the strength of the deform, a higher number makes it deform by larger increments. | |
| ⊟ | Round Brush | |
| Enable Noise | When this is enabled it enters noise into the deform, so instead of smooth it will appear rough. | |
| Inner Radius% | This is the percentage of the radius that extrudes. For example, if it is set to 100%, all the mesh in the radius rises (or falls) the same amount. | |
| Max Strength | This controls the rate at which the deform is applied. Set it to a smaller number to allow for finer control. | |
| Noise Frequency | This controls how bumpy the noise brush is, the higher the number the bumpier it is. | |
| Outer Radius | This controls how big the deform brush is. | |
| ⊟ | Tessellation Tool | |
| Max level | is the maximum level that the brush will tessellate the terrain. | |
| Min level | is the minimum level that the brush will tessellate the terrain. | |
| ⊟ | Painting Tool | |
| Max Contribution | This is the maximum contribution that this material will contribute to the texel, even with continued painting. The number is a percentage of the total value of the texel, with 100% being full and 0% being none. | |
| Smoothing Passes | This is the number of smoothing passes that the editor applies after each paint. A smoothing pass is basically smoothing the current values with the texels on each side, in order to minimize the visible lines in between each one. Keep in mind that smoothing is expensive on the CPU so the higher this number is, the slower painting will be. There is also a tool that allows the artist to do this manually, the Texture Smooth Tool. |
Material Palette
The Material Palette has 2 parts, the floating palette shown above that shows a picture of the diffuse channel of the material, and allows the artist to quickly choose materials to paint with. There is also the material editor. If you open up the palette in the hierarchy list, under Terrain World/Terrain Mesh, you will see a list of the materials in the palette. By default there are 4. Click on a material and you will see the material editor.
In the material editor you can see an entry for each of the parts of the terrain material, Diffuse, Heightmap, Normal, and Specular. This editor allows you to click on the ![]() button and select from a list of textures in resources. It also shows a preview of this texture.
button and select from a list of textures in resources. It also shows a preview of this texture.
You can add new materials by right clicking on the Palette in the hierarchy.
| ⊟ | General | |
| Material ID | ||
| Name | ||
| Selection Lock | ||
| Sound Material Type | ||
| Visible | ||
| ⊟ | Scales | |
| Relief | This is the strength of the relief (height) map. | |
| UVTile | This specifies the number of times the material tiles on a sector, the higher the number the smaller the material will show up. | |
| ⊟ | Textures | |
| Diffuse | The diffuse texture defines the material's color at each pixel. | |
| Normal | Normal maps are used to add shading to the texture, faking the effect of "bumpiness" | |
| Specular | Specular maps define how shiny the texture is. the Level Editor simply takes the image you assign to the specular Texture and converts it to grayscale and writes it to the alpha channel of your LAYOUT__pal.dds texture | |
| Specular Color | Tints the reflected light | |
| Specular Exponent |