Introductory tutorial
The Dragon Age end-user toolset contains a number of specialized tools for creating particular types of game resources wrapped within a common interface. This tutorial is intended to introduce you to that common interface; subsequent tutorials will focus more specifically on the tools used for creating specific resources and performing specific tasks.
Contents
How resource data is organized
The raw data you'll be working with in the toolset is for the most part stored in a database.
!! A very little bit on DB administration and builder-to-builder here !!
The main exceptions to this are Art Resources such as the model files that define how a creature looks or the area layout files that define a landscape or dungeon. These are not stored directly in the database, though of course many resources in the database will make reference to them. They are instead stored as ordinary files in your file system. We have not included many art tools in the current build of the end user toolset.
Resources created in the toolset must be exported before the game can make use of them. Exporting converts a resource into the binary file formats used by the game itself, and places the files into the "override" directory where the game looks for new content.
See also: Source directory priorities
In addition, resources are organized within the database into one of several different kinds of group: Core, Module, Package, and PRC.
Core resources are support resources that are common to virtually all sorts of games, such as default event-handling scripts and common items such as swords and armor. Resources in Core are accessible by any other resources in the game.
Packages are add-on collections of resources that don't form a game in themselves but that may be used by one or more other add-ons. For example, a package containing a collection of nautical-themed placeables might be used by several different adventures that are set on or near the ocean.
Modules contain adventures or entire campaigns that a player can play through. A module can also contain resources that are used by other modules - the difference between "Module" and "Package" is not actually all that great at a programmatic level.
PRC is Post-Release Content, generally released by BioWare itself and often intended to add on to the main single-player campaign itself. Again, this is a distinction that's somewhat irrelevant at a programmatic level.
When you want to create a new adventure using the toolset it's common to create a new module to contain it. See creating a module for information on how to do this.
Common toolset user interface components
Palette
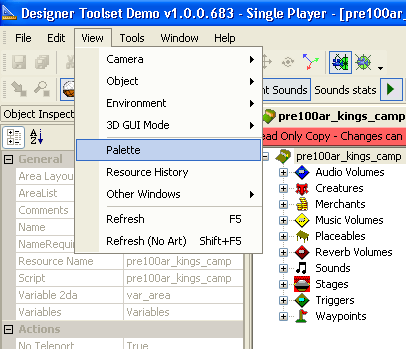
- The palette pane can be opened from the "View" menu.
- The object inspector
The central resource navigation GUI in the toolset is the resource palette. The palette can be opened (if it is not already open by default) using a command in the "View" menu:
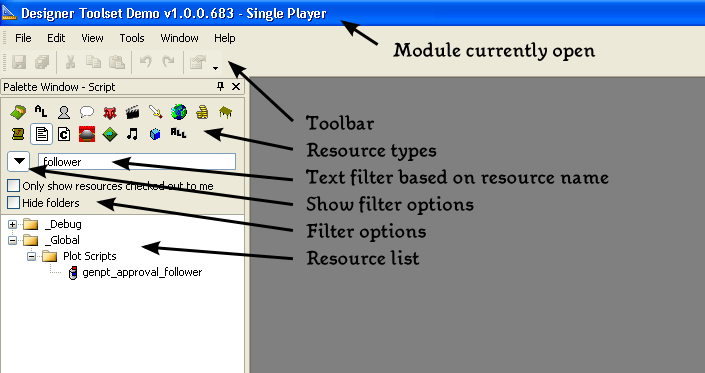
The palette has a set of icons across the top that allows you to select which type of resource is to be displayed, as well as an ![]() icon that shows all resources. There's a filter text field that allows you to filter based on a partial string; only resources whose names include the string entered here will be displayed.
icon that shows all resources. There's a filter text field that allows you to filter based on a partial string; only resources whose names include the string entered here will be displayed.
It's also possible to create folders in the palette view to group resources. The folders here are purely for the benefit of the human builder and have no other function within the toolset itself; when the game makes reference to a resource it doesn't need to know what folder it's in. Resource names must therefore be unique, you can't have two different resources with the same name in different palette folders. It's a good idea to use a resource naming convention that includes a prefix of some sort to distinguish your resources from others. For example, a three-letter abbreviation of the name of your module - see Prefixes in use.
Some of the more important resource types are:
 Areas
Areas Conversations
 Creatures
 Cutscenes
 Items
Items Merchants
 Placeables
  Plots
Plots Scripts
 Stages
 Triggers
 Sounds
Object Inspector
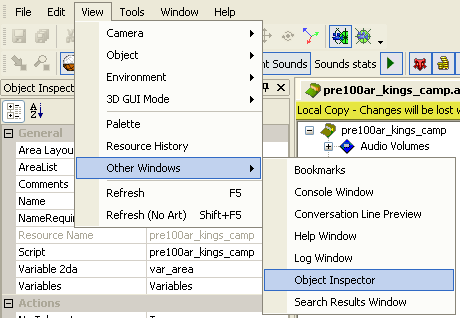
Once you've opened a resource, the most common interface used for editing its properties is the object inspector. If it is not already open you can open it with a command under the "Other Windows" submenu of the "View" menu.
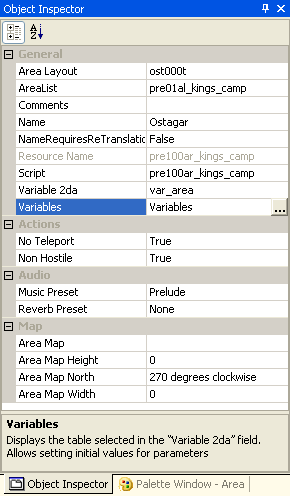
Here's an example of what the object inspector looks like:
The properties can be grouped by category (in this case General, Actions, Audio and Map), with each group being collapsible by clicking on the ⊟ symbol. They can also be set to a simple alphabetical list of all properties. The name of the property is listed in the left-hand column and the value of the property is in the right-hand column.
Some properties actually consist of more than just a single simple value. The "Variables" property is one such; in this example you can see that when it's selected a button with an ellipsis (![]() ) appears, and when you click on the ellipsis button a specialized editing window appears for that property.
) appears, and when you click on the ellipsis button a specialized editing window appears for that property.
When a property cannot be edited at the current time, for whatever reason, this is indicated by greying out both the name and the value. In this example the "Resource Name" property cannot be changed.
At the bottom of the object inspector is an area where a bit of text describing the currently selected property appears. Help text is not available for all properties and it is of somewhat inconsistent quality, however, so be prepared to refer to other documentation when you hit a particularly unclear example.
Managing screen layout
As you work with the toolset you'll likely wind up with multiple windows open. There are two principal ways that they can be organized.
Most simply, when there are multiple different resources open they'll be displayed with a tabbed selection bar in the main resource display pane.
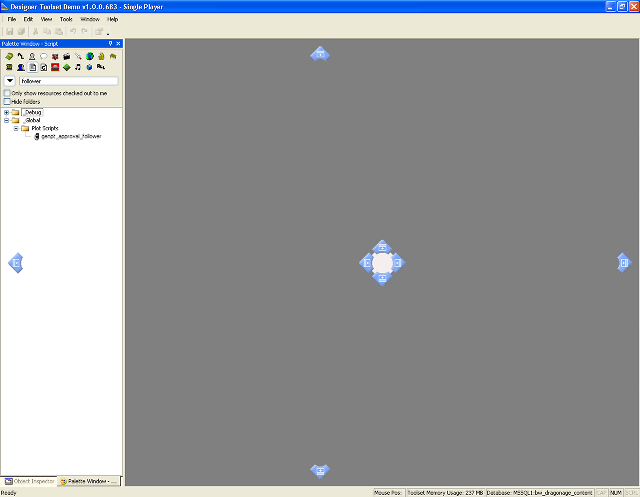
Other windows can be moved around and placed in different parts of the interface by clicking and dragging on their title bars. When you're dragging an interface window a set of docking arrows will appear; if you drag the window to one of these arrows it will "snap" into that position. Alternately, if you drop the window somewhere other than an arrow, it will detach from the main GUI and become a floating window.
