Placeable tutorial
In Dragon Age, "placeables" are objects that a player can interact with or are objects simply added to the area to create greater detail. They are added to areas simply by dropping them into the area landscape. Once placed, they can easily be moved into position or rotated on their axis to achieve the look you want.
In general, placeables can serve a wide variety of functions. They can render popup text. They can be destroyed or bashed or hold inventory or treasure within. They can be holders of conversations. In this tutorial we'll mainly stick to the basics, but placeables are an important part of any area design.
Creating A Placeable
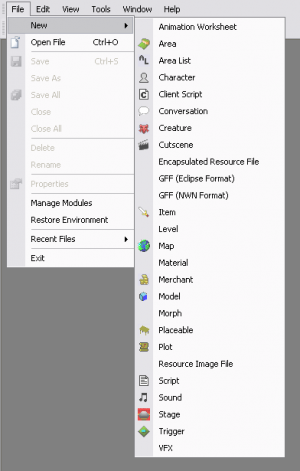
Similar to creating anything within the toolset, go to File > New > Placeable or right click in the Palette Window to access the New Placeable option.
The first step is naming the placeable. We'll need a door for the tutorial so lets start with a door that will serve as an area transition. Name the placeable "transition_door". Luckily and unluckily, the default object is a door. The lucky part is that it is a door. The unlucky part is that this is a non-area transition door. There are two types of doors, ones that open and allow for an area transition and ones that simply open. For the upcoming area tutorial we need a door that will allow the player to move from outside the hut to inside the hut.
Doors that allow transitions are all grouped under the Appearance beginning with "Area Transition". Change the appearance to be "Area Transition, Ferelden, Small". The placeable has the exact same appearance it had but now it will be able to function as an area transition. For more detail on doors, please see doors. They are a bit unique within the placeable world so it is important to understand how the two types function as well as some of the finer options that are available.
Note that when you are placing an area transition door, the arrow should point in the direction you are going to travel. When placing a standard door the arrow points in the direction the door will open.
As you can see, placeables are straightforward and easy to create. Let's build one more for our module before moving along with the tutorial. Again create a new placeable and let's name it "statue". Any good exterior can always use a statue. For this lets set the appearance to "Statue, Giant" and rename the placeable "Huge Statue". By default, the placeable is "Interactive" so let's toggle that setting to false: Scroll down to Stats; locate Interactive; Use the drop down menu OR just double click on TRUE to toggle the state. Now our statue is ready to be placed. It is basically an addition to the landscape. It won't be something you can interact with but it can add detail to your area and to your story.
While we are in the tutorial, let's quickly cover checking in and checking out resources which is a new concept for Dragon Age. For a more detailed summary, please see Resource palette. Briefly, in Dragon Age resources are stored within databases. When you work on a module and alter any existing work or create new work, you are creating an instance of the object (be it a placeable, item, creature, area etc.). There are a number of benefits for this that are beyond the scope of this tutorial but when you edit something, it has to be "checked out" (or never checked in) with you working on an instance.
For example, select your new statue and right click and you will see that many common tasks are NOT available because it has not been "checked in" to the database. For example, you can't rename or delete the placeable. In order to rename the placeable, we'll need to check in the placeable. Right click and select check in. Check the box for no comment or enter a comment and hit ok. At this point, the resource has been written to the database. Once the object is "checked in" you can adjust the name or delete it if you so choose (assuming it doesn't have other dependent resources).
Placing / Adjusting your Placeable
That is a brief overview of how to create your first placeables. Now let's cover putting them into your module. To place a placeable, simply bring up an area (which we will make in the Area Tutorial), then highlight the placeable (which can be found by clicking on the table image in the palette window) and left-click within the region.
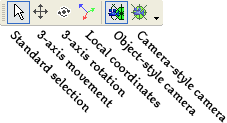
To adjust the position or orientation of the object, you'll need to use the Camera and Movement Toolbar:
To adjust the x,y,z position either activate the Local Coordinates button ![]() or use the keyboard shortcut 'q'. With this activated, you can mouse over any axis (notice the change to the yellow highlight) and the object will move only in the selected dimension.
or use the keyboard shortcut 'q'. With this activated, you can mouse over any axis (notice the change to the yellow highlight) and the object will move only in the selected dimension.
To adjust the rotational orientation, highlight the 3 Axis Rotation button ![]() or use the keyboard shortcut 'e'. In a similar fashion, you can easily select and adjust the rotational orientation of the placeable.
or use the keyboard shortcut 'e'. In a similar fashion, you can easily select and adjust the rotational orientation of the placeable.
'R' is the keyboard shortcut to return to the standard selection tool ![]() .
.
(For much more detail regarding 3D controls please see the 3D control page).
Of course, you can use the Object Inspector to type in exact numbers for any of these parameters you choose. Simply ensure the object is selected within the area viewer and type in your changes.
Field Notes
- Character: Mapping a character to a placeable is done for VO when a placeable owns a conversation.
Codex
Create examinable item on your level (area) like book (gen_ip_book or similar in core resources). Create new plot, or use DAO Codex Plots (like "lpt_codex_my_book") and add main flag like MY_CODEX _BOOK (it really could be anything here, just make it meaningful). Under journal part of plot create text which you want to be displayed in codex. Under properties of plot look for "entry type" and select in example: codex - books & songs . Select your item from level (area) and choose Variable_2da under it's properties:
- under PLC_CODEX_FLAG insert NUMBER of your flag (in this case it's 0 - coz it's only one flag inside)
- under PLC_CODEX_PLOT insert NAME OF YOUR PLOT (lpt_codex_my_book)
now when you examine book in game, new codex entry will be added and displayed.
NOTE: If you choose invisible onject in Apperiance you will be able to add it in some parts of level.

