Creature tutorial
Now the player can navigate around between the various areas you've set up, but he's got nothing he can actually do there. Other tutorials will cover how to add interactive quests, conversations, and other such things, but for now to make things just a little more interesting, we can add a couple of monsters for the player to slay. We'll put them in the hut_interior area so the player won't be instantly thrust into combat.
Contents
Creating a monstrous creature's template
- The "Group" property determines who is hostile to whom
- "Resource Name" and "Tag" are only seen by developers
- "Name" may be seen by players
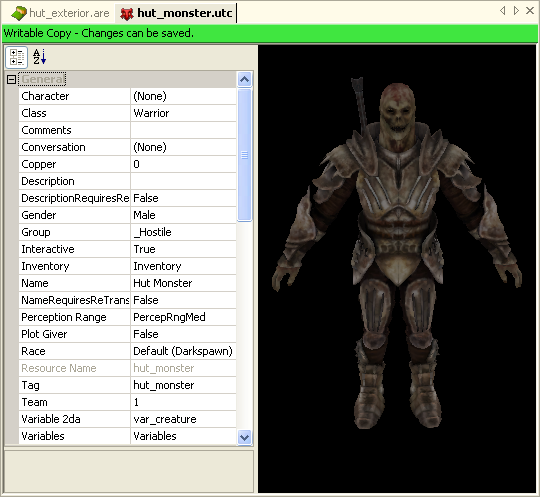
First, create a new creature template. (File->New->Creature) You can leave most of its properties at their defaults for starters. To make it fight the player when it sees him, set the "Group" property to "_Hostile". Give it a name in the "Name" property ("Hut Monster" in this example) and change the "Appearance" property to something appropriate (a normal Hurlock in this case). You might also want to add a head and eyes. Set them to whatever you find suitable (in this case "Hurlock").
- Put weapons in inventory and set them as "equipped"
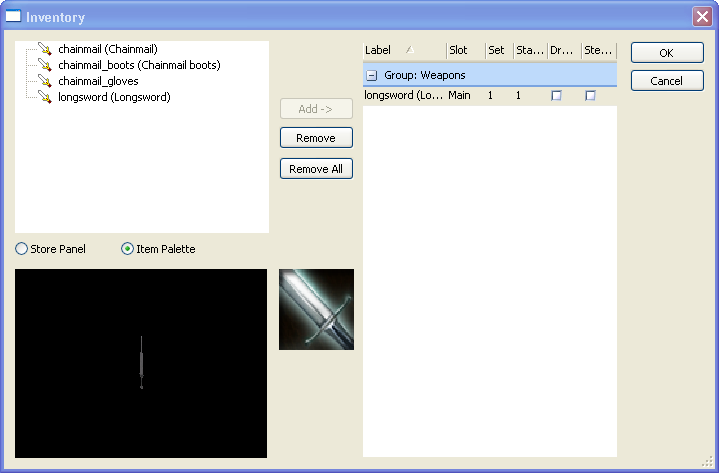
To make our monsters a bit more of a challenge for the player to fight, we'll add a sword to the creature's inventory and set it as "equipped". This will put the sword on the creature's back, where it will draw it from when it enters combat. To prevent the player from being laden down with hundreds of looted swords over the course of the game we'll leave the "Droppable" and "Stealable" flags unset - when the creature dies the sword will be unrecoverable.
- "Package" determines what sorts of abilities the creature will have
- "Package AI" determines how it will behave
- "Rank" determines how strong the creature will be and how much loot it drops
- "Treasure category" determines what type of loot it drops
Finally, we'll want to set the creature's stats so that it will be the correct level of toughness to challenge the player when he meets him. The game has two basic parameters that need to be set for this; package (determines what general sorts of abilities the creature has) and rank (determines how good the creature is at what it does, and how tough it is).
We set the general package type to "Darkspawn" (this tells the game what general type of creature it is), the package to "Darkspawn weapon + shield (Hurlock)" since that's the closest match to a Hurlock weilding a one-handed sword that's available, and the package AI to "AIP_DS_WPN_SHLD_Hurlock" (since this is the only AI available for the selected package the choice is obvious. For some creatures there may be other AIs available, for example making the creature behave in a more "cowardly" fashion).
The rank of the creature tells the game's autoscaling system how good the creature should be at using its abilities and how tough it is. Since we want these creatures to be an interesting fight but not a serious challenge for our demo, we'll set the hut monster to "Critter". Rank also determines the quality of the treasure that is automatically generated for the player to loot from the monster's corpse; tougher monsters have higher-quality loot. To determine what kind of loot is generated, set the treasure category property. Different types of monsters will generally carry different types of loot, for example the Darkspawn are more likely to have vials of poison in their possession.
Creatures in Dragon Age have a level range that scales to the player's current level. For example, if a darkspawn had a level range of 3-8, then it would spawn around level 4 if the player encountering it was level 4. The level range defines the creatures minimum and maximum levels for these encounters. The default level range is 0-0, and must be changed to a positive number if the creature is hostile to the player at any point.
Note that the level of creatures spawned in a given area is further limited to the range specified in areadata.xls. Unless the area variable AREA_ID is set manually in the toolset to a valid line id in that table, creatures spawn at level 1.
Placing creatures
- See 3D control for camera and movement controls
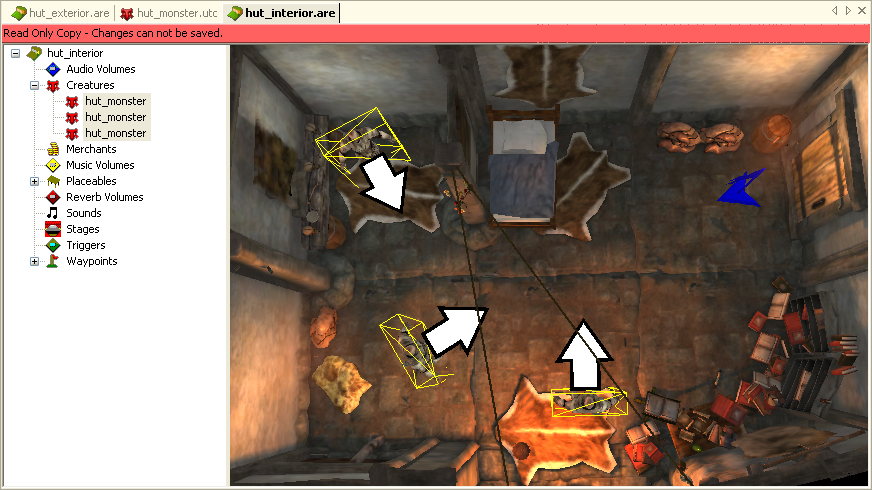
Now that we have the basic template for the horrible hut monsters defined, we can place some in the hut's interior. The creature we've designed in the creature editor is a template from which many identical copies can be spawned and placed within the area, much like the placeable doors we've inserted previously. Open the area in the area editor, select the hut monster from the palette, and click on the area in the places you want to put copies of the creature.
We've put three monsters in the hut. If we play the game now the monsters will attack the player as soon as they perceive him, which the small size of the hut will make almost instantaneous. Once slain the player will be able to loot their corpses for a small amount of treasure.
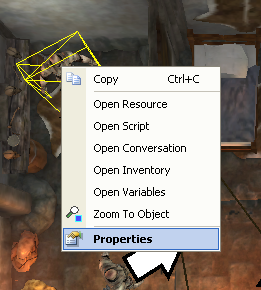
If you want to customize the individual monsters you've placed, you can right-click on the creature (either in the area map or on the area's object list to the left of the area display) and select "properties" from the menu.
- Some creature properties can be customized on a per-creature basis, others are fixed with whatever value you set in the creature template it's based on.
This will open the object inspector with a subset of the creature's properties that can be customized on a per-creature basis. Not all of the properties of the creature can be modified; some of them are defined by the template and can only be modified there. The properties that can be modified on a per-creature basis are:
- Active (useful for placing monsters that only "appear" later on when a script changes their active status)
- Interaction Radius (if not zero, overrides the default distance the PC needs to be to interact with this object)
- Platform (used when developing a game that can be ported to multiple different platforms with different capabilities)
- Rank (how tough the monster is, described above)
- Tag (a label the creature can be referred to by with scripting)
- Team (an identifier for grouping several monsters together, useful for keeping track of quests and for coordinated behavior)
- Trackable
- Treasure Category (type of treasure dropped, described above)
- Variables
- WeaponsDrawn
- Orientation (Don't bother manually setting orientation and position unless you need high-precision control, the area editor's positioning controls are generally easier)
- Position
So, for example, we could pick a particular one of these hut monsters and make him tougher than his fellows, or give him a different team ID (we'll see one way team IDs can be used later in the tutorial when we set up a quest for the player to slay all three of the monsters we've put in the hut).
Creating an NPC quest giver
- Some humanoid creatures don't have clothing built in and need it to be added to their inventory and equipped for it to appear.
- Some humanoid creatures can have their appearance customized by selecting head morphs.
The module is now vaguely playable, but not really all that interesting - it's hard to tell a story with nothing but area transitions and meaningless combat. The easiest way to add some depth to the adventure is to include some people that can be talked with. Conversations are complex and will be dealt with in a separate section of the tutorial, but we can lay the foundation here by creating and placing a neutral human to talk to. By putting him in the "_Neutral" group he won't attack the player and won't get involved in the player's fights. If he were in the _Friendly group he'd attack any _Hostile-grouped creatures he perceived, but for now we'll be putting him in an area with no other creatures so that won't make a difference.
The default new creature is human, but is unclothed and unequipped. It also has a very bland default appearance. To dress the creature we'll need to create some clothing as done in the Item tutorial, add it to the creature's inventory, and equip it (if you cannot see your newly-created items in the inventory dialog, try checking them in first).
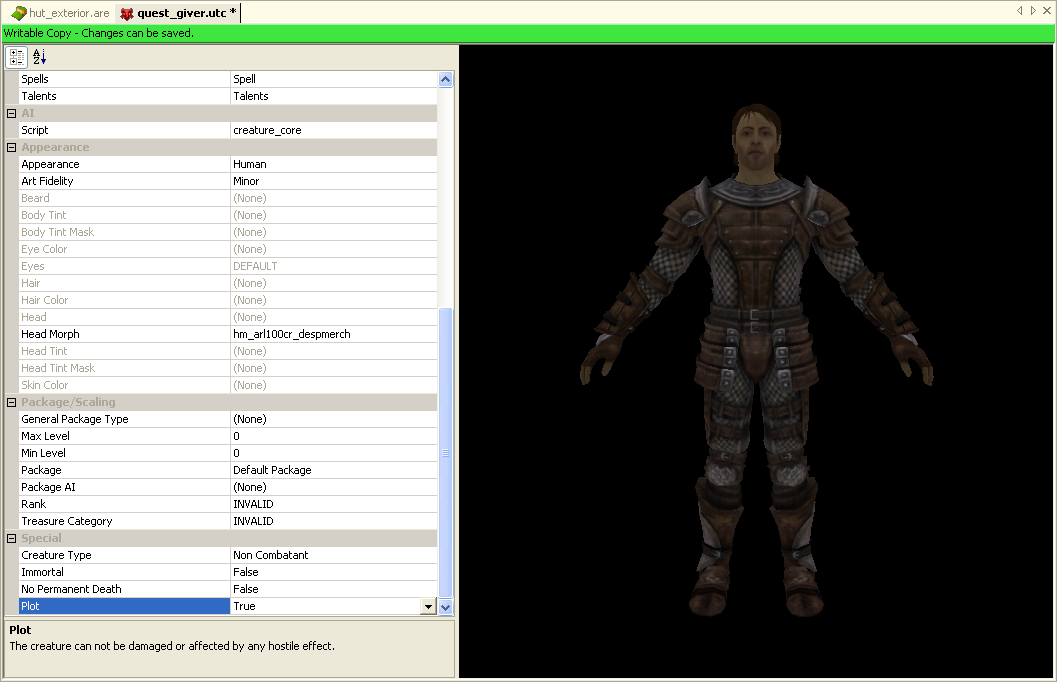
Next we're going to want to replace that bland default head with a different appearance. Dragon Age allows head appearance to be customized through the use of head morphs, a process with sufficient sophistication and scope that there's a separate editing tool dedicated to it. We won't cover that in this tutorial, however, and instead simply use one of the prefabricated head morphs that comes with the game.
Under the "Appearance" section of the object explorer is the "Head Morph" property. When you click on the ellipsis (![]() ) button you'll be presented with a file picker to choose a head morph from. Once you've selected a head morph most of the other options under Appearance will be disabled, since the head morph customizes all of those parameters in a much more fine-grained manner.
) button you'll be presented with a file picker to choose a head morph from. Once you've selected a head morph most of the other options under Appearance will be disabled, since the head morph customizes all of those parameters in a much more fine-grained manner.
Since this NPC is not intended to ever enter or even respond to combat, the package and scaling is not particularly important. It can be left with the defaults.
- There are several different ways to make a creature "permanent," if needed
The "Special" section is relevant in this case, on the other hand. Since this NPC is going to be the source of our quest, it wouldn't do to allow even the possibility that he might get himself killed early. If you set the "Plot" flag to true the creature will be immune to damage by any hostile effect. The "Immortal" flag allows the creature to be damaged, but it will never lose its last hit point - useful if you want a creature to get involved in a fight in a realistic manner but guarantee that it will survive the encounter. "No Permanent Death" tells the game engine not to dispose of the creature's body after it's killed and is used primarily for the player's companions.
Here is the NPC in his final form, ready to be placed in the hut_exterior area to tell the player about the monsters inside:
Ambient behaviour
If you spawn an NPC using the above technique, he/she will stand still with some idle animations. If you want the NPC to perform some ambient animations like crossing arms, or sitting at a table (these are looped, so no one-shot animations can be assigned here), then you need to do 2 things. Go into the Variables, and look for 2 locals. First you need to set is AMBIENT_SYSTEM_STATE. The default value is 0, which corresponds to disabled, so no custom ambient animations other than the idle animations will be played. Set this to 1, which enables custom ambient animations. The second local variable is called AMBIENT_ANIM_PATTERN. This needs to be an integer that corresponds to an animation ID (first column) in ambient_ai.xls. Just open the spreadsheet, look up the animation you want your NPC to have (they have very descriptive labels), and put its ID into AMBIENT_ANIM_PATTERN. Note: the toolset has no way to show you ambient animations, you will only see these in-game.
Note: if you set the variables in the creature editor, all instances of the creature will have the custom animations assigned to them by default. You may want to do this in the area editor for this reason where you may assign custom ambient animations to each individual creature instance in that area.
Next is the Conversation tutorial
