Basic follower tutorial
The basic follower tutorial provides a step-by-step guide on how to create a follower that will:
- Can be chosen from the party picker
- Can gain XP and level up with a default package
The tutorial assumes you know how to create a creature; compile a 2DA and are comfortable with basic scripting.
The approach in the tutorial is intended as an introduction and should only be used if you are sure there will be empty slot in the active party when your follower is recruited. For a more comprehensive approach see the other follower tutorials.
Contents
Create the creature
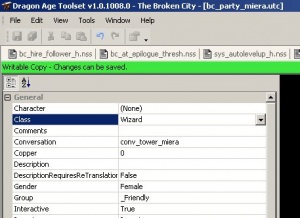
Create a creature to act as your follower. Set its name, appearance, gender, head morph, conversation, inventory, etc. as you want them to behave in-game.
Set an appropriate Tag (you'll be using it a lot). I suggest "party_charname".
Make sure you choose a Class. For most followers this should be Rogue, Warrior or Wizard.
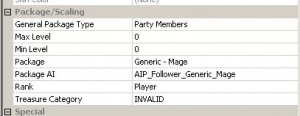
Under Package/Scaling set:
- General Package Type to be Party Members
- Package to be an appropriate value (probably "Generic - Wizard" or similar)
- Package AI (there should only be one choice)
- Rank to be Player
Save and export your character as normal.
Overlay the party picker
In the official campaign, the party picker uses a special area called char_stage. Whether you're extending the official campaign or making a standalone campaign, there is a function that allows you to overlap the official stage with your own, so that both stages are active simultaneously in game.
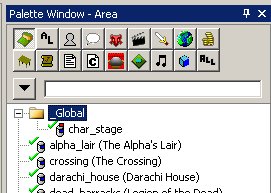
In your resource palette, right-click char_stage under the Global folder and select Duplicate to make a copy of the stage with a new resource name, for example, bc_char_stage. In the resource properties, ensure that both Module and Owner Module are set to your module, and the folder of your choice.
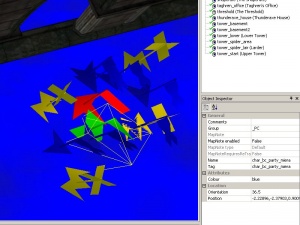
Create a new waypoint for your follower to appear on the party picker. This waypoint must have a tag in the form of "char_" followed by the exact tag of your follower.
In this example the tag of my follower is bc_party_miera so her waypoint tag must be char_bc_party_miera
For a standalone module (such as in this example), put your waypoint wherever you please. The one illustrated is directly on top of Morrigan's. For an add-in to the main campaign, you should position your waypoint appropriately relative to the core party members.
Save and export the area.
Add the following to your module event script:
case EVENT_TYPE_MODULE_GETCHARSTAGE:
{
   // Overlay the existing stage with my stage "bc_char_stage" is the resource name of the overlay area
   // "partypicker" is the name of the default GDA
   SetPartyPickerStage("bc_char_stage", "partypicker");
   break;
}
Create the party picker M2DA fragment
You will need to create two m2da fragment:
- partypicker_*
- party_picker_*
The worksheets for these can be created in the same workbook or different workbooks.
Once you have completed the worksheets, use the ExcelProcessor to compile the GDA files and move/copy them to your module's override directory. Make sure they are included in the builder to player (DAZIP) file when the time comes to build your module.
partypicker m2da
The first worksheet should be named partypicker_ with a unique suffix. For example example adding a "bc" suffix to produce "partypicker_bc".
Set up your columns as follows:
- The ID for your follower must be 12 or higher. 11 is the highest value used in the base 2DA. 12 is fine for standalone modules, add-ins will probably want to use an arbitrarily high number to avoid potential conflicts.
- The Label should be the follower's name as you wish it to appear on the party picker.
- The Tag must be your follower's tag.
All other values are non-functioning defaults and should be specified as in the image above unless you know explicitly what you're doing.
Animations
Add Animation and Remove Animation are actually ID numbers of different animations, taken from ANIM_base m2da file.
Enter and exit version of animations are generally the best ones to use, although others may work. Note that not all animations will work as some require special conditions.
Here are some examples you can use:
| ID | Description |
|---|---|
| 255 | Flying in place |
| 277 | Dance |
| 247 | Cast area spell |
| 500 | VFX cast |
| 600 | Surprised |
| 603 | Praying |
| 607 | Head bow |
| 609 | Standing at attention |
| 651, 652 | Crouch pray (enter and exit) |
| 808 | Point forward |
| 811 | Fist pounding |
| 825 | Nodding |
| 840 | Hand chop or frustration |
| 819 | Talk cursing |
| 844 | Hands behind back (848 and 849 are enter and exit) |
| 850 | Chest pounding salute |
| 905, 906 | Crouch (enter, exit) |
| 919, 920 | Sit on ground (enter, exit) |
| 965 | Kneel down loop |
| 972 | Wipe nose |
| 976, 977 | Squat (enter, exit) |
| 986 | Wipe eyes |
| 998, 999 | Hands clasped (enter, exit) |
| 3029 | Inspect nails |
| 3031, 3032 | Playful (enter, exit) |
| 3054, 3056 | Slouch (enter, exit) |
Visual effects
The VFX column is the ID of the visual effect taken from VFX_Base m2da file. This one is a bit more tricky, since it also references the BlendTreeName value from the same file. Find the ID of the visual effect and look for the BlendTreeName column and enter BOTH into the respective columns for your character in the party picker file.
Here are some examples you can use:
| ID | BlendTreeName | Effect |
|---|---|---|
| 1076 | fxa_spi_aur_mht_c | Aura of Might crust |
| 1549 | fxa_hly_imp_c | Holy Impact crust |
| 3009 | fxc_succubus_c | Succubus crust |
| 3054 | fxc_lotf_c | Lady of the Forest - swirling leaves |
| 6039 | fxm_energy_up_p | Lady of the Forest pillar of light |
| 6040 | fxm_power_in_p | Branka - power in |
party_picker m2da
The second worksheet should be named party_picker_ (note middle underscore) with a unique suffix. For example example adding a "bc" suffix to produce "party_picker_bc".
Set up your columns and data like so:
- ID and Tag should match what you did in the first spreadsheet.
- Portrait should be INVALID COLUMN.
Handle the Party Member Added Event
The Party Picker does not actually add followers to the party. Instead it raises an event that allows you to do so. Your module script needs to capture this event and execute some code.
The following example shows what to do with the event. The full script would work as a module script for an add-in (assuming it didn't need to do anything else), but otherwise you'll have to incorporate the event into your own module script.
#include "utility_h"

void main()
{
    event ev = GetCurrentEvent();
    int nEventType = GetEventType(ev);

    switch(nEventType)
    {
        case EVENT_TYPE_PARTYMEMBER_ADDED:
        {
            object oFollower = GetEventObject(ev, 0);

            // Allow the follower to gain XP.
            SetLocalInt(oFollower, CREATURE_REWARD_FLAGS, 0);

            // Ensure follower appears at PC's location.
            AddCommand(oFollower, CommandJumpToLocation(GetLocation(GetHero())));

            // Add follower to the active party.
            WR_SetFollowerState(oFollower, FOLLOWER_STATE_ACTIVE);
            break;
        }
    }

}
WR_SetFollowerState(oFollower, FOLLOWER_STATE_ACTIVE) is the key statement to add the follower to the active party. You must have this.
SetLocalInt(oFollower, CREATURE_REWARD_FLAGS, 0) is a bug-fix, as followers hired with UT_HireFollower do not receive XP by default. This statement fixes that, and I consider it best practice to keep it in this event to ensure it is always set. You will not wish to do this if you want a follower that should not gain XP to be on the party picker.
Note that you do not need to intercept the corresponding event for a party member being removed: the party picker handles spawning/despawning, and thus will successfully remove members.
Remember to save and export your module script.
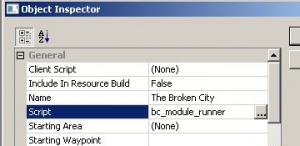
If you're not sure how to set a module script, go to File then Manage Modules, select your module and click Properties. The module script is in the General category, as seen below:
You can set this to any script you've created. See the scripting tutorial and character generation for more background and some simple examples of event-handling scripts. In general, you will want to make sure standalone module scripts pass events through to module_core (as in the character generation examples) and add-in scripts do not (as in the example above).
Create the Hiring Script
Now all that remains is to actually hire the follower :)
Create a script to handle the hiring (which will most likely be fired from a conversation). The script is quite simple:
#include "utility_h"

void main()
{
    // Use CreateObject() if the creature isn't present in the module yet.
    object oFollower = GetObjectByTag("bc_party_miera");

    // Hire the follower.
    UT_HireFollower(oFollower);

    SetPartyPickerGUIStatus(2);

    // Shows the Party Picker (necessary for the follower to gain XP).
    ShowPartyPickerGUI();
}
Make sure you use your own follower's tag and not the example one.
This script fires the party picker after hiring the follower. That is absolutely necessary via this method, as we have put the XP fix onto an event fired by the party picker. You cannot put the XP fix into this script, it must be called from a later one (the bug is caused by an errant call to an event in player_core, which will be executed AFTER this script).
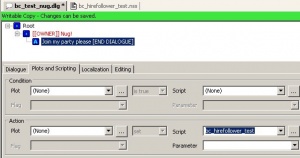
The easiest way to use this script is directly from conversation, putting it as an action on a line of dialogue where the PC invites the follower to join them. If you're not sure how to associate a script with a dialogue line, see the following image:
Create your dialogue as normal, select the line you want to fire the script, and click the Plots and Scripting tab. Use the Script file chooser in the Action section to browse to the script you created.
Conclusion
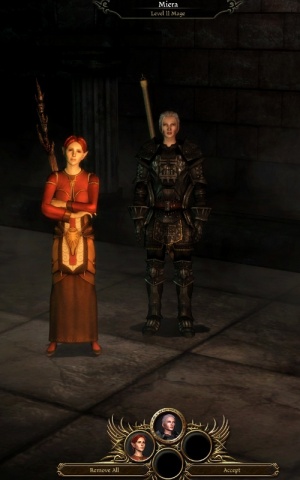
If everything worked, when you run your module you should see something like this:
