Difference between revisions of "Lighting Tutorial"
Ladyofpayne (Talk | contribs) (→Delete all the lightmap files) |
(Image formatting) |
||
| (2 intermediate revisions by the same user not shown) | |||
| Line 1: | Line 1: | ||
Author: by mikemike37 | Author: by mikemike37 | ||
| + | |||
Please also check out the [[Lighting]] information. | Please also check out the [[Lighting]] information. | ||
This is only one method of lighting your level - I suggest some experimentation, but given the lengthy lightmapping process, I'm sure you can use these guidelines to help prevent timewasting. | This is only one method of lighting your level - I suggest some experimentation, but given the lengthy lightmapping process, I'm sure you can use these guidelines to help prevent timewasting. | ||
| − | + | == Okay so I don't really care too much but I want some light. What's the fastest way to do that? == | |
| − | To have even and fairly bland lighting throughout your level and at the risk of some unexpected but not strong shadows | + | To have even and fairly bland lighting throughout your level and at the risk of some unexpected but not strong shadows: |
| − | + | # Create a new room named "Shared Lighting" | |
| + | # Select the Shared Lighting room and Click Room Properties | ||
| + | # Have every room lit by lights from this source (use Add, click the rooms from the left). | ||
| + | # Insert > New Light | ||
| + | #* Light type: Point Static | ||
| + | #* Affects Characters: True | ||
| + | #* Affects Levels: True | ||
| + | #* Colour: 0.5, 0.5, 0.5 | ||
| + | #* Colour Intensity: 0.8 | ||
| + | #* Point Radius: 500 or more for larger levels | ||
| + | # Place such that your entire level is about halfway from the light source and its edge and a little way up. | ||
| + | # Copy and paste so you have 4 surrounding the entire level. | ||
| + | # Insert > New Light | ||
| + | #* Light type: Ambient - Baked | ||
| + | #* Colour: 0.5, 0.5, 0.5 | ||
| − | + | == Lighting done "properly" == | |
| − | + | ||
| − | + | ||
| − | + | ||
| − | + | ||
| − | + | ||
| − | + | ||
| − | + | ||
| − | + | ||
| − | + | ||
| − | + | ||
| − | + | ||
| − | + | ||
| − | + | ||
| − | + | ||
| − | + | ||
| − | + | ||
| + | === Introduction to Lighting Types (baked versus in-game lighting) === | ||
The most important difference to understand is the difference between baked lighting and "in-game" lighting. In the game, your character is illuminated by lights from various angles... but your character moves, so it follows that the strength of the light reflecting from your character must be calculated on-the-fly. These calculations performed by your graphics processor are pretty intensive, so it makes sense to avoid them where possible and free up your graphics processor for other cool visual stuff, like high poly models and large textures. So how can we reduce this load? using baked lighting. | The most important difference to understand is the difference between baked lighting and "in-game" lighting. In the game, your character is illuminated by lights from various angles... but your character moves, so it follows that the strength of the light reflecting from your character must be calculated on-the-fly. These calculations performed by your graphics processor are pretty intensive, so it makes sense to avoid them where possible and free up your graphics processor for other cool visual stuff, like high poly models and large textures. So how can we reduce this load? using baked lighting. | ||
| − | |||
The principle of baked lighting is as follows: for lights which do not move and for objects which do not move, we can calculate the reflection and save the results for the graphics processor to read, and not have to calculate. In Dragon Age, we do this by lightmapping using baked lights and static props. Everything you place in the level editor (NOT area editor) must necessarily be unable to move in-game. | The principle of baked lighting is as follows: for lights which do not move and for objects which do not move, we can calculate the reflection and save the results for the graphics processor to read, and not have to calculate. In Dragon Age, we do this by lightmapping using baked lights and static props. Everything you place in the level editor (NOT area editor) must necessarily be unable to move in-game. | ||
| − | |||
I'll now explain the order in which I add lights, with an explanation of what I consider to be good practice. I write this with interior levels in mind. | I'll now explain the order in which I add lights, with an explanation of what I consider to be good practice. I write this with interior levels in mind. | ||
| + | === Buttons === | ||
| − | ''' | + | * '''Room Properties:''' allows you to describe to the engine which rooms are visible, are lit by and are connected to each given room. |
| − | + | * '''Render Lightmaps:''' will process all baked lights to the lightmaps. Time-consuming, good for finalising. | |
| − | + | * '''Render Lightmaps for selected Chunks or Rooms:''' select only the rooms you want to lightmap. Less time-consuming, good for experimenting. | |
| − | + | * '''Display Lightmaps On/Off:''' When enabled, this will show you the lightmap result. Always toggle off then back on to update the lightmap after processing. It will NOT show you "live" lighting, such as static lights. You have to sort of guess what that'll end up like. | |
| − | Render Lightmaps | + | * '''View Models Fully Lit:''' gives the same result as ambient at 1, 1, 1 - everything is well-illuminated. Good for moving things about. |
| − | + | * '''Render Light Probes:''' I'll look into this later. | |
| − | Render Lightmaps for selected Chunks or Rooms | + | |
| − | + | ||
| − | Display Lightmaps On/Off | + | |
| − | + | ||
| − | View Models Fully Lit | + | |
| − | + | ||
| − | Render Light Probes | + | |
| − | + | ||
| − | + | ||
| + | === Create a "shared lighting" room (interior only) - realtime, characters only === | ||
Using the method suggested on the builder's wiki, you can have all characters illuminated dimly in all directions in every room by using a "shared lighting" room. | Using the method suggested on the builder's wiki, you can have all characters illuminated dimly in all directions in every room by using a "shared lighting" room. | ||
| − | + | # Create a new room | |
| − | + | # Rename the room "Shared Lighting" | |
| − | Rename the room "Shared Lighting" | + | # Select the Shared Lighting room |
| − | + | # Click Room Properties | |
| − | + | # Have every room lit by lights from this source. | |
| − | + | ||
| − | Click Room Properties | + | |
| − | + | ||
| − | Have every room lit by lights from this source. | + | |
Adding the lights: | Adding the lights: | ||
| + | # Insert > New Light | ||
| + | #* Light type: Point Static | ||
| + | #* Affects Characters: True | ||
| + | #* Affects Levels: False | ||
| + | #* Colour 0.3, 0.3, 0.3 | ||
| + | #* Colour Intensity 0.8 | ||
| + | #* Point Radius: 500 | ||
| + | # Place such that your entire level is about halfway from the light source and its edge. You may like to place these above the level a little way since light typically comes from above (but not always...) | ||
| + | # Copy and paste so you have 4 surrounding the entire level. | ||
| − | + | === Ambient Light - baked, level only === | |
| − | + | ||
| − | + | ||
| − | + | ||
| − | + | ||
| − | + | ||
| − | + | ||
| − | + | ||
| − | + | ||
| − | + | ||
| − | + | ||
| − | + | ||
| − | + | ||
| − | + | ||
| − | + | ||
| − | + | ||
| − | + | ||
| − | + | ||
| − | + | ||
| − | + | ||
| − | + | ||
By adding this before any "specific" lighting, we can set the tone for the level and build up from there. You only need one ambient in the entire level and it affects all rooms regardless of any other settings. | By adding this before any "specific" lighting, we can set the tone for the level and build up from there. You only need one ambient in the entire level and it affects all rooms regardless of any other settings. | ||
| Line 96: | Line 72: | ||
As far as I can tell, Intensity is NOT used, so you're going entirely on colour here. Vary the colour and brightness to suit taste, but you don't want this to be too strong or you will lose the strength of contrast in your lighting since the dark areas won't be very dark. Below are suggested values. | As far as I can tell, Intensity is NOT used, so you're going entirely on colour here. Vary the colour and brightness to suit taste, but you don't want this to be too strong or you will lose the strength of contrast in your lighting since the dark areas won't be very dark. Below are suggested values. | ||
| − | + | # Select the Shared Lighting room | |
| − | Insert > New Light | + | # Insert > New Light |
| − | + | #* Light type: Ambient - Baked | |
| − | Colour 0.2, 0.2, 0.2 | + | #* Colour: 0.2, 0.2, 0.2 |
| − | Position, intensity does not matter at all. Leave at default is fine. | + | #* Position, intensity does not matter at all. Leave at default is fine. |
| − | + | === Static and animated Lights - realtime, characters and level === | |
You should try lightmapping your level at this point (Render Lightmaps) and exporting to try it out in-game. You should have a pretty dark, but visible level throughout. | You should try lightmapping your level at this point (Render Lightmaps) and exporting to try it out in-game. You should have a pretty dark, but visible level throughout. | ||
| Line 112: | Line 88: | ||
Next add in "genuine" light sources. By this I mean things which you understand to actually generate light. Torches, fires, glowing stuff. For fires, its nice to use the animated light types. Play with the settings, or try copying from one of the DA levels. Fire generally makes yellow glows, not bright orange. | Next add in "genuine" light sources. By this I mean things which you understand to actually generate light. Torches, fires, glowing stuff. For fires, its nice to use the animated light types. Play with the settings, or try copying from one of the DA levels. Fire generally makes yellow glows, not bright orange. | ||
| − | + | === Baked Lights === | |
If you've allowed a lot of static lights to illuminate your level, you may only need to add baked lights to things too small to warrant a static light, and to brighten up dark patches. However, you may want to make more extensive use of baked lighting since it allows for a greater control over your lighting by adding many baked lights without impacting the player's performance (since they're all calculated at the lightmapping stage). It also generally makes nicer, softer shadows. | If you've allowed a lot of static lights to illuminate your level, you may only need to add baked lights to things too small to warrant a static light, and to brighten up dark patches. However, you may want to make more extensive use of baked lighting since it allows for a greater control over your lighting by adding many baked lights without impacting the player's performance (since they're all calculated at the lightmapping stage). It also generally makes nicer, softer shadows. | ||
| − | + | === Adding shadows where they "shouldn't exist" === | |
This tip from !TimelordDC: Let's say you want to build a dark pit or a dark circular area within a big room. Place a model of the appropriate shape (doesn't matter which model) right above the area you want to darken and adjust the model properties to set Export To Game as FALSE and Lightmap as TRUE. Place a light directly above it to cast a strong shadow. Once you render lightmaps, you will see a dark shadow beneath the model but the model won't be present in-game. There is a bit of work to get it just right since the model can cast shadows from other lights too. | This tip from !TimelordDC: Let's say you want to build a dark pit or a dark circular area within a big room. Place a model of the appropriate shape (doesn't matter which model) right above the area you want to darken and adjust the model properties to set Export To Game as FALSE and Lightmap as TRUE. Place a light directly above it to cast a strong shadow. Once you render lightmaps, you will see a dark shadow beneath the model but the model won't be present in-game. There is a bit of work to get it just right since the model can cast shadows from other lights too. | ||
| Line 122: | Line 98: | ||
You can also darken areas using negative static lights. Experiment with these - you can see their effect in realtime. | You can also darken areas using negative static lights. Experiment with these - you can see their effect in realtime. | ||
| − | + | === Light Probes === | |
| − | Light Probes are used for reflections. This includes but is not limited to: reflections off of weapons/armour using fresnel and water. Place a Light Probe in each room of an indoor level, or one over each patch of water in an outdoor level. Currently, a bug prevents the light probes from generating more than one image. After Placing, use Render Lightprobes and toggle view lightmaps to ON to | + | Light Probes are used for reflections. This includes but is not limited to: reflections off of weapons/armour using fresnel and water. Place a Light Probe in each room of an indoor level, or one over each patch of water in an outdoor level. Currently, a bug prevents the light probes from generating more than one image. After Placing, use Render Lightprobes and toggle view lightmaps to ON to see what they look like. |
| − | + | === "Corruption" Fix === | |
Occasionally, the lightmap seems to become "corrupted". If you believe there is a mistake with it that shouldnt be there when you hit process lightmaps, but always is... then its possible you are using "two lightmaps". This is usually caused by having exported your level and then gone back to try and improve the lightmap. There are two ways to fix this: | Occasionally, the lightmap seems to become "corrupted". If you believe there is a mistake with it that shouldnt be there when you hit process lightmaps, but always is... then its possible you are using "two lightmaps". This is usually caused by having exported your level and then gone back to try and improve the lightmap. There are two ways to fix this: | ||
| − | Rename your layout | + | ==== Rename your layout ==== |
This will force the lightmap to start from scratch, but you will have to change the layout and will end up with a potentially messy set of folders all over the place. | This will force the lightmap to start from scratch, but you will have to change the layout and will end up with a potentially messy set of folders all over the place. | ||
| + | ==== Delete all the lightmap files ==== | ||
| + | My Documents\BioWare\Dragon Age\Toolset\LvlWorkspace\lightmaps\LAYOUT | ||
| − | + | My Documents\BioWare\Dragon Age\Toolset\ProbeLightMaps\LAYOUT | |
| − | My Documents | + | |
| − | My Documents | + | My Documents\BioWare\Dragon Age\Toolset\resourcepostintermediatewin32\processed\addins\MODULE\layouts\win32\layouts\LAYOUT |
| − | My Documents | + | My Documents\BioWare\Dragon Age\Toolset\resourcepostintermediatewin32\processed\addins\MODULE\layouts\win32\modelhierarchies\LAYOUT |
| − | My Documents | + | My Documents\BioWare\Dragon Age\Toolset\resourcepostintermediatewin32\processed\addins\MODULE\layouts\win32\textures\dds\LAYOUT |
| − | + | (path of your level file)\LAYOUT.erf | |
| − | (path of your level file) | + | (path of your level file)\LAYOUT.bak.erf |
| − | + | C:\DOCUME~1\Mike\LOCALS~1\Temp\DALightmap\LAYOUT (you can use Run... and type %TEMP% and hit OK) | |
| − | + | (if you have posted to local) My Documents\BioWare\Dragon Age\addins\MODULE\core\override\toolsetexport\LAYOUT | |
| − | + | ||
| − | (if you have posted to local) My Documents | + | |
== Troubleshooting == | == Troubleshooting == | ||
| Line 157: | Line 132: | ||
IMPORANT: if you have posted your layout to local, then the lightmap dds files in your override will start conflicting with those in your toolset. ALWAYS remove them whenever you change lighting, otherwise you will see the result of BOTH lightmaps being applied. | IMPORANT: if you have posted your layout to local, then the lightmap dds files in your override will start conflicting with those in your toolset. ALWAYS remove them whenever you change lighting, otherwise you will see the result of BOTH lightmaps being applied. | ||
| − | + | === Nothing I do seems to make a difference in-toolset === | |
Ensure you have disabled "view models fully lit" and you have enabled "Display Lightmaps On/Off?". If you have recently remapped, you will need to toggle display lightmaps off then back on again to refresh the display. | Ensure you have disabled "view models fully lit" and you have enabled "Display Lightmaps On/Off?". If you have recently remapped, you will need to toggle display lightmaps off then back on again to refresh the display. | ||
| − | + | If you have posted to local and restarted your toolset, you will need to close your toolset, delete the exported files and restart your toolset. | |
| − | + | ||
| − | + | ||
| − | + | === Nothing I do seems to make a difference in-game === | |
| − | + | Check your area file is using the correct name and that it has been exported. Also check that you have "done all local posts" in your level after changing the lightmap. | |
| − | + | === My character in-game is entirely black and I'm getting a warning about shadow maps === | |
| − | ' | + | If you haven't added any static lights, you will get an error saying "no static lights detected. Shadow maps will not be generated" (or similar). Its generally a good idea to have some static lights, since these will illuminate your character. |
| + | |||
| + | === I have dark shapes/symbols over many different models in different ways (corruption) === | ||
This is caused by a model trying to use a portion of your lightmap that it shouldn't be. This can be caused by having lightmaps in your override and lightmapping a second time. To remove your old lightmaps, delete the exported files in your core/override/toolsetexport. If this doesn't fix, try DeletingLightmapFiles. Finally, if you still get the issue, its a problem with the model you are using - it has a bad lightmap UV unwrap. | This is caused by a model trying to use a portion of your lightmap that it shouldn't be. This can be caused by having lightmaps in your override and lightmapping a second time. To remove your old lightmaps, delete the exported files in your core/override/toolsetexport. If this doesn't fix, try DeletingLightmapFiles. Finally, if you still get the issue, its a problem with the model you are using - it has a bad lightmap UV unwrap. | ||
| − | |||
| − | |||
[[File:Staticbunching.jpg|border]] | [[File:Staticbunching.jpg|border]] | ||
| − | I have some kind of corruption on my lightmap throughout an entire room or level | + | === I have some kind of corruption on my lightmap throughout an entire room or level === |
Same problem as above, but without the distinctive "shapes". This is much more likely to be because you need to delete the exported lightmaps from your override. | Same problem as above, but without the distinctive "shapes". This is much more likely to be because you need to delete the exported lightmaps from your override. | ||
| − | + | <gallery mode="nolines" widths=422px heights=600px> | |
| − | + | File:Corruptedshadowmap1.jpg|Extremely patchy lighting throughout level | |
| − | + | File:Corruptedshadowmap2.jpg|Fixed | |
| − | + | </gallery> | |
| − | + | ||
| − | + | ||
| − | + | ||
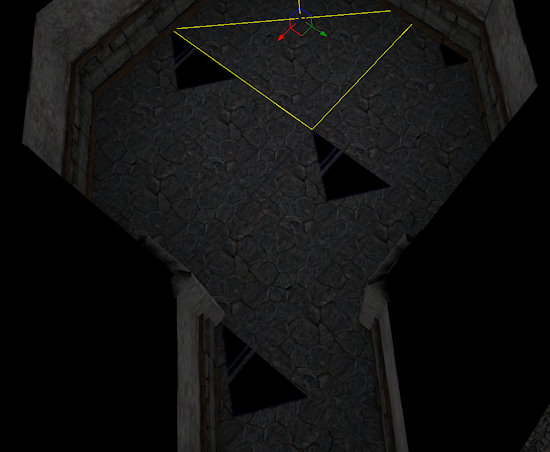
| − | + | === I have black patterns or triangles identically or similar over many of the same model === | |
Some models seem to have a problem with lightmapping. look for a fix here or try using a different model. | Some models seem to have a problem with lightmapping. look for a fix here or try using a different model. | ||
| − | + | <gallery mode="nolines" widths=550px heights=600px> | |
| + | File:Badmodellightmap.jpg|fca_floor02_0 | ||
| + | </gallery> | ||
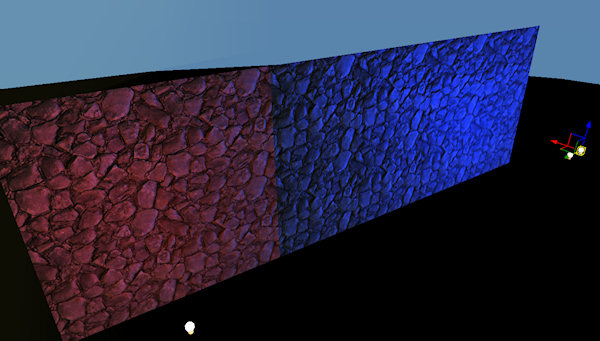
| − | + | === I have obvious seams between two or more models where they should be seamless === | |
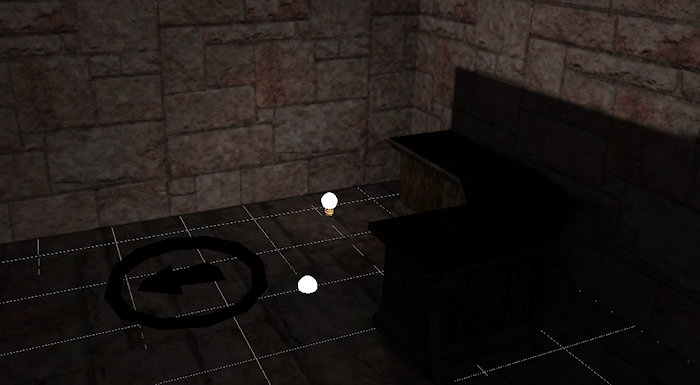
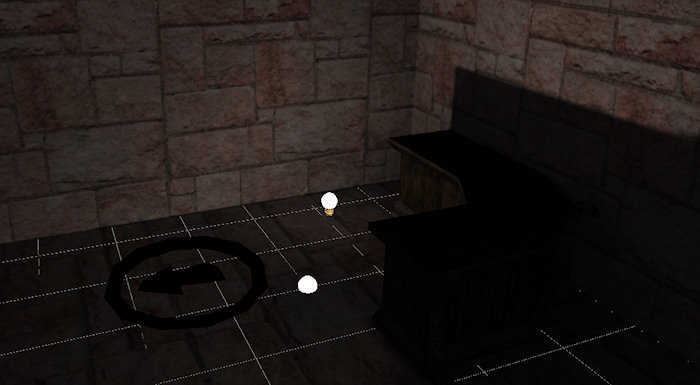
| − | + | This is caused by the fact that one object may receive static light from no more than 3 sources. In the example, I have three tiles. In the first screenshot, I have three blue lights and one red light. The middle tile does not receive the red light at all, and so a seam becomes apparent. The tile closest to the red light is receiving the red light and light from two of the blue lights. | |
| − | + | The fix here was to delete two of the blue lights and increase the intensity of the remaining blue light to compensate. Of course, this was a test setup, but the principle remains the same... ensure you have no more than three static lights overlapping ''anywhere'' in your level. Its a good idea to keep this down to just two lights where possible. | |
| − | + | <gallery mode="nolines" widths=600px heights=600px> | |
| + | File:BStatic_bunching11111.jpg|Four static lights in scene | ||
| + | File:Static_bunching_fixed.jpg|Two static lights in scene | ||
| + | </gallery> | ||
| − | + | === I have one unusual shadow (symmetrical pattern) caused by static lights and it doesn't make sense === | |
| − | + | ||
| − | + | ||
| − | + | ||
| − | + | ||
| − | + | ||
| − | + | ||
| − | + | ||
| − | + | ||
I am unsure if this was a problem with one particular model and/or the static light I was using, but if you get something like this try lightmapping after moving your lights to a new location. | I am unsure if this was a problem with one particular model and/or the static light I was using, but if you get something like this try lightmapping after moving your lights to a new location. | ||
| − | + | <gallery mode="nolines" widths=498px heights=600px> | |
| + | File:Onebigartifact.jpg|Bad shadow passing through prp_dni_torch03_0 (showing the result only - lights and problematic model are not shown) | ||
| + | </gallery> | ||
| − | + | === The lights seem to go off or change badly every time I change rooms === | |
| − | + | ||
| − | + | ||
You need to set up rooms to be visible and receive light from one another. Only adjacent rooms should receive light from one another, but always ensure all rooms which CAN be visible from a room ARE visible. You should also connect rooms. | You need to set up rooms to be visible and receive light from one another. Only adjacent rooms should receive light from one another, but always ensure all rooms which CAN be visible from a room ARE visible. You should also connect rooms. | ||
| − | + | === I want to illuminate my room generally without "spotty" lights all over the place but I don't want to increase my ambient lighting === | |
| − | + | ||
| − | + | ||
| − | + | ||
| − | + | ||
| − | + | ||
| − | + | ||
| − | + | ||
| − | + | ||
| − | + | ||
| − | + | ||
| − | + | ||
| − | + | ||
| − | + | ||
| − | + | ||
| − | + | ||
| − | + | ||
| − | + | ||
| − | + | ||
| − | + | ||
| − | + | ||
| − | + | ||
| − | + | ||
| − | + | ||
| − | + | ||
| + | Try adding a large light way outside of the room. You run the risk of getting unexpected shadows as the light shines through your walls/ceilings, but apparently you can reduce these by increasing the light size under "soft shadows". I haven't tested this technique. | ||
| − | + | === I have lots of tiny black dots all over my lightmaps === | |
| + | This problem seems to occur only in small rooms which have a ceiling. There are two solutions: accept the noise and use post-processing noise reduction on it... or take off the ceilings and render them separately. | ||
| − | + | For taking off the ceilings, please see this thread [http://social.bioware.com/forum/1/topic/74/index/4700291 here] | |
| + | To edit the lightmap file yourself AFTER exporting it out: | ||
| − | + | # Render Lightmaps | |
| + | # Post all to local | ||
| + | # Navigate to My Documents\BioWare\Dragon Age\addins\MODULE\core\override\toolsetexport\LAYOUT | ||
| + | # Find the erroneous lightmap dds | ||
| + | # Perform whatever surgery you deem necessary. I suggest using some sort of noise reduction filter. Ideally removing only "pepper" and not "salt". | ||
| + | # If you have photoshop I suggest creating an action, opening all erroneous dds files and automating the action on all opened files. | ||
| − | + | <gallery mode="nolines" widths=256px heights=256px> | |
| + | File:Noisylightmapdds.jpg|Lightmap before noise reduction | ||
| + | File:Noisylightmapdds2.jpg|Lightmap after noise reduction | ||
| + | </gallery> | ||
| + | <gallery mode="nolines" widths=700px heights=385px> | ||
| + | File:Noisylightmap.jpg|Before noise reduction | ||
| + | File:Noisylightmap2.jpg|After noise reduction | ||
| + | </gallery> | ||
| − | + | === My custom material does not seem to lightmap === | |
Ensure your material is set to static, has a lightmap texture line and has unique textures (diffuse cannot be used as both diffuse and specular), and your object has a second UV layer and meta data. For more information on materials, check Texture tutorial (condensed) | Ensure your material is set to static, has a lightmap texture line and has unique textures (diffuse cannot be used as both diffuse and specular), and your object has a second UV layer and meta data. For more information on materials, check Texture tutorial (condensed) | ||
| − | Credits | + | == Credits == |
Thanks to Semper for clearing up some questions I had. !TimelordDC provided the shadows tip. Oh and a couple of bits from CID-78. Also thanks to the guys on the bioware wiki who provided the information I started with. | Thanks to Semper for clearing up some questions I had. !TimelordDC provided the shadows tip. Oh and a couple of bits from CID-78. Also thanks to the guys on the bioware wiki who provided the information I started with. | ||
Latest revision as of 12:41, 8 July 2022
Author: by mikemike37
Please also check out the Lighting information.
This is only one method of lighting your level - I suggest some experimentation, but given the lengthy lightmapping process, I'm sure you can use these guidelines to help prevent timewasting.
Contents
- 1 Okay so I don't really care too much but I want some light. What's the fastest way to do that?
- 2 Lighting done "properly"
- 2.1 Introduction to Lighting Types (baked versus in-game lighting)
- 2.2 Buttons
- 2.3 Create a "shared lighting" room (interior only) - realtime, characters only
- 2.4 Ambient Light - baked, level only
- 2.5 Static and animated Lights - realtime, characters and level
- 2.6 Baked Lights
- 2.7 Adding shadows where they "shouldn't exist"
- 2.8 Light Probes
- 2.9 "Corruption" Fix
- 3 Troubleshooting
- 3.1 Nothing I do seems to make a difference in-toolset
- 3.2 Nothing I do seems to make a difference in-game
- 3.3 My character in-game is entirely black and I'm getting a warning about shadow maps
- 3.4 I have dark shapes/symbols over many different models in different ways (corruption)
- 3.5 I have some kind of corruption on my lightmap throughout an entire room or level
- 3.6 I have black patterns or triangles identically or similar over many of the same model
- 3.7 I have obvious seams between two or more models where they should be seamless
- 3.8 I have one unusual shadow (symmetrical pattern) caused by static lights and it doesn't make sense
- 3.9 The lights seem to go off or change badly every time I change rooms
- 3.10 I want to illuminate my room generally without "spotty" lights all over the place but I don't want to increase my ambient lighting
- 3.11 I have lots of tiny black dots all over my lightmaps
- 3.12 My custom material does not seem to lightmap
- 4 Credits
- 5 Useful links
Okay so I don't really care too much but I want some light. What's the fastest way to do that?
To have even and fairly bland lighting throughout your level and at the risk of some unexpected but not strong shadows:
- Create a new room named "Shared Lighting"
- Select the Shared Lighting room and Click Room Properties
- Have every room lit by lights from this source (use Add, click the rooms from the left).
- Insert > New Light
- Light type: Point Static
- Affects Characters: True
- Affects Levels: True
- Colour: 0.5, 0.5, 0.5
- Colour Intensity: 0.8
- Point Radius: 500 or more for larger levels
- Place such that your entire level is about halfway from the light source and its edge and a little way up.
- Copy and paste so you have 4 surrounding the entire level.
- Insert > New Light
- Light type: Ambient - Baked
- Colour: 0.5, 0.5, 0.5
Lighting done "properly"
Introduction to Lighting Types (baked versus in-game lighting)
The most important difference to understand is the difference between baked lighting and "in-game" lighting. In the game, your character is illuminated by lights from various angles... but your character moves, so it follows that the strength of the light reflecting from your character must be calculated on-the-fly. These calculations performed by your graphics processor are pretty intensive, so it makes sense to avoid them where possible and free up your graphics processor for other cool visual stuff, like high poly models and large textures. So how can we reduce this load? using baked lighting.
The principle of baked lighting is as follows: for lights which do not move and for objects which do not move, we can calculate the reflection and save the results for the graphics processor to read, and not have to calculate. In Dragon Age, we do this by lightmapping using baked lights and static props. Everything you place in the level editor (NOT area editor) must necessarily be unable to move in-game.
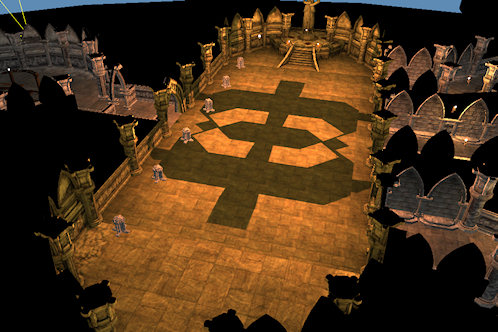
I'll now explain the order in which I add lights, with an explanation of what I consider to be good practice. I write this with interior levels in mind.
Buttons
- Room Properties: allows you to describe to the engine which rooms are visible, are lit by and are connected to each given room.
- Render Lightmaps: will process all baked lights to the lightmaps. Time-consuming, good for finalising.
- Render Lightmaps for selected Chunks or Rooms: select only the rooms you want to lightmap. Less time-consuming, good for experimenting.
- Display Lightmaps On/Off: When enabled, this will show you the lightmap result. Always toggle off then back on to update the lightmap after processing. It will NOT show you "live" lighting, such as static lights. You have to sort of guess what that'll end up like.
- View Models Fully Lit: gives the same result as ambient at 1, 1, 1 - everything is well-illuminated. Good for moving things about.
- Render Light Probes: I'll look into this later.
Using the method suggested on the builder's wiki, you can have all characters illuminated dimly in all directions in every room by using a "shared lighting" room.
- Create a new room
- Rename the room "Shared Lighting"
- Select the Shared Lighting room
- Click Room Properties
- Have every room lit by lights from this source.
Adding the lights:
- Insert > New Light
- Light type: Point Static
- Affects Characters: True
- Affects Levels: False
- Colour 0.3, 0.3, 0.3
- Colour Intensity 0.8
- Point Radius: 500
- Place such that your entire level is about halfway from the light source and its edge. You may like to place these above the level a little way since light typically comes from above (but not always...)
- Copy and paste so you have 4 surrounding the entire level.
Ambient Light - baked, level only
By adding this before any "specific" lighting, we can set the tone for the level and build up from there. You only need one ambient in the entire level and it affects all rooms regardless of any other settings.
As far as I can tell, Intensity is NOT used, so you're going entirely on colour here. Vary the colour and brightness to suit taste, but you don't want this to be too strong or you will lose the strength of contrast in your lighting since the dark areas won't be very dark. Below are suggested values.
- Select the Shared Lighting room
- Insert > New Light
- Light type: Ambient - Baked
- Colour: 0.2, 0.2, 0.2
- Position, intensity does not matter at all. Leave at default is fine.
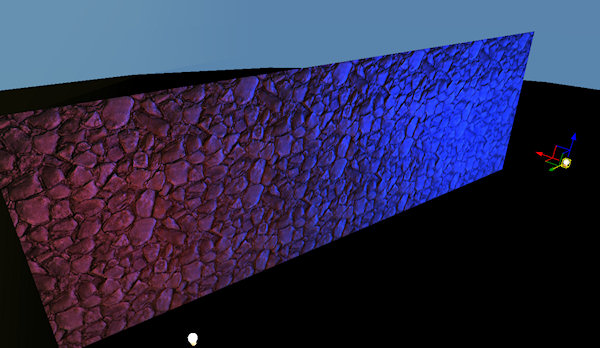
Static and animated Lights - realtime, characters and level
You should try lightmapping your level at this point (Render Lightmaps) and exporting to try it out in-game. You should have a pretty dark, but visible level throughout.
We now want to add in static and animated lights so that the characters are illuminated by things actually present in the level. With lighting, its a very good idea to start with the strongest lights first. With all of these lights, use Affect Characters: TRUE. Use Affects Level: TRUE sparingly - an object may only receive a maximum of 3 static lights. For this reason, avoid placing lights with an overlapping radius. Multiple static lights occupying the same space is to be avoided strongly.
The strongest lights, generally, will be natural light where you have it - so add light from windows and similar first. Use cool, pale colours (light blues) so as not to wash out the colour of the room.
Next add in "genuine" light sources. By this I mean things which you understand to actually generate light. Torches, fires, glowing stuff. For fires, its nice to use the animated light types. Play with the settings, or try copying from one of the DA levels. Fire generally makes yellow glows, not bright orange.
Baked Lights
If you've allowed a lot of static lights to illuminate your level, you may only need to add baked lights to things too small to warrant a static light, and to brighten up dark patches. However, you may want to make more extensive use of baked lighting since it allows for a greater control over your lighting by adding many baked lights without impacting the player's performance (since they're all calculated at the lightmapping stage). It also generally makes nicer, softer shadows.
Adding shadows where they "shouldn't exist"
This tip from !TimelordDC: Let's say you want to build a dark pit or a dark circular area within a big room. Place a model of the appropriate shape (doesn't matter which model) right above the area you want to darken and adjust the model properties to set Export To Game as FALSE and Lightmap as TRUE. Place a light directly above it to cast a strong shadow. Once you render lightmaps, you will see a dark shadow beneath the model but the model won't be present in-game. There is a bit of work to get it just right since the model can cast shadows from other lights too.
You can also darken areas using negative static lights. Experiment with these - you can see their effect in realtime.
Light Probes
Light Probes are used for reflections. This includes but is not limited to: reflections off of weapons/armour using fresnel and water. Place a Light Probe in each room of an indoor level, or one over each patch of water in an outdoor level. Currently, a bug prevents the light probes from generating more than one image. After Placing, use Render Lightprobes and toggle view lightmaps to ON to see what they look like.
"Corruption" Fix
Occasionally, the lightmap seems to become "corrupted". If you believe there is a mistake with it that shouldnt be there when you hit process lightmaps, but always is... then its possible you are using "two lightmaps". This is usually caused by having exported your level and then gone back to try and improve the lightmap. There are two ways to fix this:
Rename your layout
This will force the lightmap to start from scratch, but you will have to change the layout and will end up with a potentially messy set of folders all over the place.
Delete all the lightmap files
My Documents\BioWare\Dragon Age\Toolset\LvlWorkspace\lightmaps\LAYOUT
My Documents\BioWare\Dragon Age\Toolset\ProbeLightMaps\LAYOUT
My Documents\BioWare\Dragon Age\Toolset\resourcepostintermediatewin32\processed\addins\MODULE\layouts\win32\layouts\LAYOUT
My Documents\BioWare\Dragon Age\Toolset\resourcepostintermediatewin32\processed\addins\MODULE\layouts\win32\modelhierarchies\LAYOUT
My Documents\BioWare\Dragon Age\Toolset\resourcepostintermediatewin32\processed\addins\MODULE\layouts\win32\textures\dds\LAYOUT
(path of your level file)\LAYOUT.erf
(path of your level file)\LAYOUT.bak.erf
C:\DOCUME~1\Mike\LOCALS~1\Temp\DALightmap\LAYOUT (you can use Run... and type %TEMP% and hit OK)
(if you have posted to local) My Documents\BioWare\Dragon Age\addins\MODULE\core\override\toolsetexport\LAYOUT
Troubleshooting
IMPORANT: if you have posted your layout to local, then the lightmap dds files in your override will start conflicting with those in your toolset. ALWAYS remove them whenever you change lighting, otherwise you will see the result of BOTH lightmaps being applied.
Nothing I do seems to make a difference in-toolset
Ensure you have disabled "view models fully lit" and you have enabled "Display Lightmaps On/Off?". If you have recently remapped, you will need to toggle display lightmaps off then back on again to refresh the display.
If you have posted to local and restarted your toolset, you will need to close your toolset, delete the exported files and restart your toolset.
Nothing I do seems to make a difference in-game
Check your area file is using the correct name and that it has been exported. Also check that you have "done all local posts" in your level after changing the lightmap.
My character in-game is entirely black and I'm getting a warning about shadow maps
If you haven't added any static lights, you will get an error saying "no static lights detected. Shadow maps will not be generated" (or similar). Its generally a good idea to have some static lights, since these will illuminate your character.
I have dark shapes/symbols over many different models in different ways (corruption)
This is caused by a model trying to use a portion of your lightmap that it shouldn't be. This can be caused by having lightmaps in your override and lightmapping a second time. To remove your old lightmaps, delete the exported files in your core/override/toolsetexport. If this doesn't fix, try DeletingLightmapFiles. Finally, if you still get the issue, its a problem with the model you are using - it has a bad lightmap UV unwrap.

I have some kind of corruption on my lightmap throughout an entire room or level
Same problem as above, but without the distinctive "shapes". This is much more likely to be because you need to delete the exported lightmaps from your override.
Extremely patchy lighting throughout level
Fixed


I have black patterns or triangles identically or similar over many of the same model
Some models seem to have a problem with lightmapping. look for a fix here or try using a different model.
fca_floor02_0

I have obvious seams between two or more models where they should be seamless
This is caused by the fact that one object may receive static light from no more than 3 sources. In the example, I have three tiles. In the first screenshot, I have three blue lights and one red light. The middle tile does not receive the red light at all, and so a seam becomes apparent. The tile closest to the red light is receiving the red light and light from two of the blue lights.
The fix here was to delete two of the blue lights and increase the intensity of the remaining blue light to compensate. Of course, this was a test setup, but the principle remains the same... ensure you have no more than three static lights overlapping anywhere in your level. Its a good idea to keep this down to just two lights where possible.
Four static lights in scene
Two static lights in scene


I have one unusual shadow (symmetrical pattern) caused by static lights and it doesn't make sense
I am unsure if this was a problem with one particular model and/or the static light I was using, but if you get something like this try lightmapping after moving your lights to a new location.
Bad shadow passing through prp_dni_torch03_0 (showing the result only - lights and problematic model are not shown)

The lights seem to go off or change badly every time I change rooms
You need to set up rooms to be visible and receive light from one another. Only adjacent rooms should receive light from one another, but always ensure all rooms which CAN be visible from a room ARE visible. You should also connect rooms.
I want to illuminate my room generally without "spotty" lights all over the place but I don't want to increase my ambient lighting
Try adding a large light way outside of the room. You run the risk of getting unexpected shadows as the light shines through your walls/ceilings, but apparently you can reduce these by increasing the light size under "soft shadows". I haven't tested this technique.
I have lots of tiny black dots all over my lightmaps
This problem seems to occur only in small rooms which have a ceiling. There are two solutions: accept the noise and use post-processing noise reduction on it... or take off the ceilings and render them separately.
For taking off the ceilings, please see this thread here
To edit the lightmap file yourself AFTER exporting it out:
- Render Lightmaps
- Post all to local
- Navigate to My Documents\BioWare\Dragon Age\addins\MODULE\core\override\toolsetexport\LAYOUT
- Find the erroneous lightmap dds
- Perform whatever surgery you deem necessary. I suggest using some sort of noise reduction filter. Ideally removing only "pepper" and not "salt".
- If you have photoshop I suggest creating an action, opening all erroneous dds files and automating the action on all opened files.
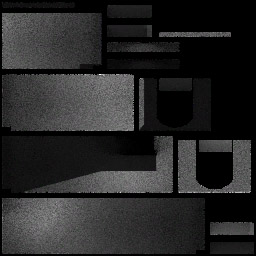
Lightmap before noise reduction
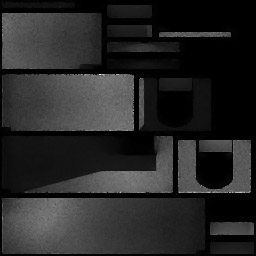
Lightmap after noise reduction


Before noise reduction
After noise reduction


My custom material does not seem to lightmap
Ensure your material is set to static, has a lightmap texture line and has unique textures (diffuse cannot be used as both diffuse and specular), and your object has a second UV layer and meta data. For more information on materials, check Texture tutorial (condensed)
Credits
Thanks to Semper for clearing up some questions I had. !TimelordDC provided the shadows tip. Oh and a couple of bits from CID-78. Also thanks to the guys on the bioware wiki who provided the information I started with.
Useful links
- Adding custom level tutorial - How to add your own level.
- Level Editor Tutorial and Level tutorial - General advises.