Difference between revisions of "Exporting and running a module/ru"
(Created page with 'In order export your edits and changes for a level to the game there are several steps involved. When working in a collaborative environment you should generally not check in res...') |
m (Edit) |
||
| (10 intermediate revisions by 3 users not shown) | |||
| Line 1: | Line 1: | ||
| − | + | {{rupage|Установка стартовой локации и точки входа|Модули}} | |
| + | {{Infobox module/ru}} | ||
| + | В этой статье описана последовательность действий, которая позволит вам экспортировать в игру вашу отдельную кампанию. | ||
| − | == | + | == Установка стартовой локации модуля == |
| − | + | Стартовые {{ulink|area|локация}} и {{ulink|waypoint|точка входа}} на неё устанавливаются в свойствах модуля. Для установки этих параметров сделайте следующее: | |
| − | + | <gallery> | |
| + | File:Module menu command.png|Выберите пункт "Manage Modules" в меню "File". | ||
| + | File:Module manage module window.png|В открывшемся окне управления модулями перейдите к вашему модулю и нажмите "Properties". | ||
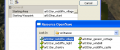
| + | File:Module properties.png|В окне свойств модуля установите стартовую локацию (Starting Area) и стартовую точку входа (Starting Waypoint). | ||
| + | </gallery> | ||
| − | + | == Подмена стартовой локации основной кампании == | |
| − | + | Если ваш моудль является расширенияем для основной кампании, то существует простой способ подменить её стартовую локацию, для этого: | |
| − | + | <gallery> | |
| + | File:DA_Audio_Design_Documentation_Ambience_Content_html_6e39c036.png|В меню "Tools" выберите "Export -> Export Options". | ||
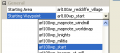
| + | File:DA_Audio_Design_Documentation_Ambience_Content_html_d7baf36.png|Укажите стартовую локацию. | ||
| + | File:DA_Audio_Design_Documentation_Ambience_Content_html_m5dbadeda.png|Укажите стартовую точку входа. | ||
| + | </gallery> | ||
| − | + | == Экспорт == | |
| − | + | По завершению работ экспортируйте ресурсы. Когда экспорт завершится можно сразу начинать новую игру, если вы заменили стартовую локацию основной кампании, в противном случае не забудьте выбрать вашу кампанию в меню "Другие кампании". Игра должна начаться в вашей локации на месте, которое вы выбрали стартовым. | |
| − | + | Более подробно про экспорт модуля читайте статью {{ulink|Exporting a module|"Экспорт модуля"}}. | |
| − | + | {{Languages|Exporting and running a module}} | |
| − | + | ||
| − | + | ||
| − | + | ||
| − | + | ||
| − | + | ||
| − | + | ||
| − | + | ||
| − | + | ||
| − | + | ||
| − | + | ||
| − | + | ||
| − | + | ||
| − | + | ||
| − | + | ||
| − | + | ||
| − | + | ||
| − | + | ||
| − | + | ||
| − | + | ||
| − | + | ||
| − | + | ||
| − | + | ||
| − | + | ||
| − | + | ||
| − | + | ||
| − | + | ||
| − | + | ||
| − | + | ||
| − | + | ||
| − | + | ||
| − | + | ||
| − | + | ||
| − | + | ||
| − | + | ||
| − | + | ||
| − | + | ||
| − | + | ||
| − | + | ||
| − | + | ||
| − | + | ||
Latest revision as of 01:00, 16 December 2011
| Установка стартовой локации и точки входа |
| Начало / Русская DA Builder Wiki / Поделиться ВКонтакте
|
| Модули |
|---|
|
В этой статье описана последовательность действий, которая позволит вам экспортировать в игру вашу отдельную кампанию.
Установка стартовой локации модуля
Стартовые локация и точка входа (en) на неё устанавливаются в свойствах модуля. Для установки этих параметров сделайте следующее:
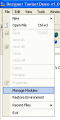
Выберите пункт "Manage Modules" в меню "File".
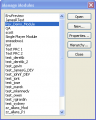
В открывшемся окне управления модулями перейдите к вашему модулю и нажмите "Properties".
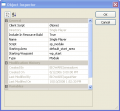
В окне свойств модуля установите стартовую локацию (Starting Area) и стартовую точку входа (Starting Waypoint).


Подмена стартовой локации основной кампании
Если ваш моудль является расширенияем для основной кампании, то существует простой способ подменить её стартовую локацию, для этого:
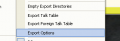
В меню "Tools" выберите "Export -> Export Options".
Укажите стартовую локацию.
Укажите стартовую точку входа.


Экспорт
По завершению работ экспортируйте ресурсы. Когда экспорт завершится можно сразу начинать новую игру, если вы заменили стартовую локацию основной кампании, в противном случае не забудьте выбрать вашу кампанию в меню "Другие кампании". Игра должна начаться в вашей локации на месте, которое вы выбрали стартовым.
Более подробно про экспорт модуля читайте статью "Экспорт модуля".
| Язык: | English • русский |
|---|