Area tutorial/ru
| Area topics |
|---|
|
Contents
Создание локаций
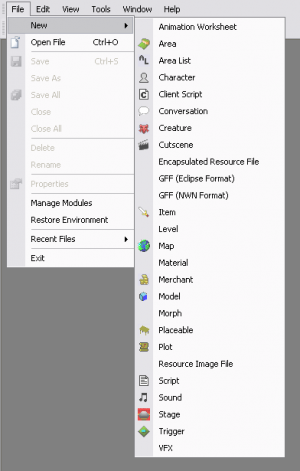
После создания модуля(см. создание модуля (en)), первое что вы захотите, это создать одну или несколько игровых локаций, где развернется приключение. Сделать это можно различными способами: можно, нажав правую кнопку в окне палитры (resource palette, справа), выбрать New -> Area; или обратиться к опциям главного меню File->New->Area.
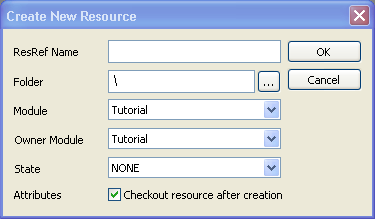
Локации обозначены иконкой ![]() . После нажатия появится окошко создания нового ресурса "Create New Resource":
. После нажатия появится окошко создания нового ресурса "Create New Resource":
- Resref names should be useful to the designer
- Set the "area layout" property to assign terrain to an area
- "Resource Name" и "Tag" видны только разработчикам
- "Name" смогут увидеть и игроки
Большинство полей уже заполнены стандартными значениями. Вам нужно лишь заполнить поле имени ресурса "ResRefName". Данное имя будет использоваться в основном лишь редактором и в игре вы его не увидите. Постарайтесь использовать имена, которые будут вам напоминать о том, что это за ресурс. Думайте о названии ресурса заранее, т.к. сменить позже будет проблематично. Назовем нашу локацию "hut_exterior".
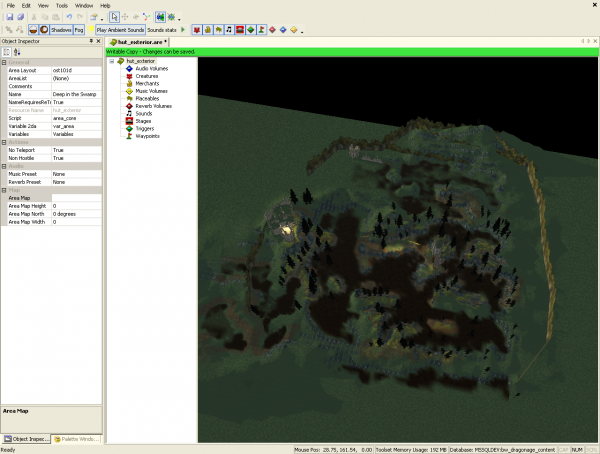
После создания перед вами появится совершенно пустое окно редактора. Чтобы выбрать на какой территории вы будете ставить объекты, перейдите в окно Object Inspector (если по умолчанию его нет, то вызовете его из главного меню View->Other Windows->Object Inspector), которое изначально находится под палитрой (Resource Palette). Там найдите свойство "Area Layout" и щелкните по кнопке с многоточием. Перед вами предстанут созданные разработчиками локации. Выберите "ost101d.arl". После загрузки перед вами будет представлена одна из локаций игры.
Чтобы дать локации имя, которое игрок сможет увидеть в игре, измените свойство "Name" и дайте любое имя какое хотите (в игре оно будет под мини-картой). Но в данном примере назовем локацию "Deep in the Swamp". Прочие настройки пока нас устроют и мы их трогать не будем.
Основы работы с локацией
- Смотрите 3D навигация(en) для настроек камеры и перемещения
- Увеличить объект вы можете двойным щелчком по нему в списке объектов локации.
Способы перемещения по локации могут быть непривычны и не интуитивно понятны для новичков. В редакторе существует несколько настроек управления, которые вы можете выбрать (подробнее см. 3D навигация(en)). Пока же рассмотрим стандартное управление:
- Приближение/отдаление колесиком мыши;
- Вращение камеры при нажатом колесике или с зажатым Ctrl и правой кнопкой мыши;
- Перемещение камеры левой кнопкой мыши с зажатым Ctrl;
Чтоб лучше разглядеть, где вы находитесь, стоит отключить реальное освещение или полную яркость. Кнопка с изображением солнца над отображением локации должна быть выключена, для отключения высокой освещённости;(для более полной информации об опциях Area Editor смотри Локация(en)).
Иногда Area Editor может отображать только рёбра и вершины вашей локации, когда вы её создали. Вы можете переключиться на нормальный режим отображения из меню View в выбрав View->Environment->Render Mode->Normal.
Прежде чем мы разместим стартовую позицию, важно вспомнить о точках поиска путей. Все локации BioWare включают сети путей или информацию поиска путей. Для её просмотра на вашей локации, откройте View->Environment и включите Pathfinding Points. Зелёные точки, обозначают локации, где персонажи могут ходить. Замете, что на данной карте проходимая зона составляет малую часть. Когда вы размещаете стартовую позицию, убедитесь, что она в проходимой зоне.
Установка стартовой позиции
- Создайте точку пути(waypoint), чтобы пометить место в игре, в котором появится игрок
This is going to be the starting area for the adventure, so we're going to want to define a spot within the area where the player will first appear. This is done by setting a waypoint. Waypoints are very simple objects that mark locations in an area that other objects in the game can refer to; they are not normally visible to the player. To create a waypoint, right-click somewhere in the area and select "Insert Waypoint" from the resulting menu. A waypoint will appear at the location of your mouse pointer and follow it around along the area's floor; move it to the approximate place you want to have the player appear and left-click to place it. By default the waypoint is named "Waypoint".
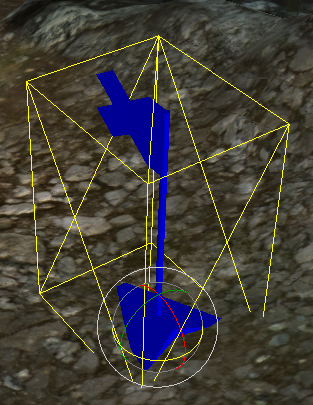
The waypoint will be automatically selected, indicated by a yellow wireframe box surrounding it. You'll also see the waypoint listed in the area's object list, to the left of the display window. If you lose track of the waypoint later a good way to find it again is to right-click on the waypoint in the list and select "Zoom to Object" in the resulting menu or double click on its tag to center the object in the display window. The waypoint's properties will be shown in the object inspector. We want to change the waypoint's name to something more informative, in this case to "start". More importantly for the game itself, though, we'll also want to change the waypoint's tag to "start" (it defaults to blank). An object's tag is how scripts and other resources will refer to the waypoint. Since this particular waypoint is never going to be visible to the player it's likely that the waypoint's name will never be seen at all.
The player will also start out facing in the same direction that the waypoint is facing (indicated by the arrow-shaped base of the waypoint object). If we don't want the player to start out facing in the default direction, we'll want to rotate the waypoint to point in a new direction. To rotate an object, use the toolbar to switch from standard selection mode ( ) to 3-axis rotation mode (
 ).
When you select the waypoint in this mode you'll see a set of circles around the waypoint's base with various orientations; clicking and holding the mouse button on one of them will allow you to rotate the waypoint around its center.
Now that we have an area and a waypoint to start at, we can now tell the module that this is where the player is to appear. Reopen the "Manage Modules" window (available via a command under the File menu), select your module, and click the "Properties" button. This opens the module's properties. For the "Starting Area" property, click on the ellipsis button (![]() ) and select the starting area from the areas available in the module; since we've only put one area in so far "hut_exterior" will be the only available option. Once the area has been selected we can then select the starting waypoint from the waypoints currently placed in the area. Note that the list will show waypoint tags rather than names. Again, we've only put in one so this will be easy. You can also set the player to appear at the origin of the map (coordinates 0,0,0), but this is generally a poor choice and available only as a default in case there are no waypoints defined yet.
) and select the starting area from the areas available in the module; since we've only put one area in so far "hut_exterior" will be the only available option. Once the area has been selected we can then select the starting waypoint from the waypoints currently placed in the area. Note that the list will show waypoint tags rather than names. Again, we've only put in one so this will be easy. You can also set the player to appear at the origin of the map (coordinates 0,0,0), but this is generally a poor choice and available only as a default in case there are no waypoints defined yet.
Area transitions via doors
Adventures almost always have more than one area in them, so we'll create a second area to demonstrate travel between the two. The area "hut_interior" will use area layout ost102d, which is a cosy little room that represents the interior of the small hut present in the hut_exterior area.
- Doors are special placeables
- Doors can attach to "hooks" pre-built into the area layout
- Area transition doors use a different "appearance" than within-area doors
Next we will need to create some doors. We'll create a default door placeable using the "New Placable" command, reached in a similar way as the "New Area" command explained earlier (placeables will be covered in the Placeable tutorial, but the core game resources will come with a variety of default doors usable in many situations like this) and place it in the area near the empty doorframe built into the hut's exterior. For an area transition, use one of the "Area Transition" appearances for the door. To place the door, click on it in the palette; the mouse cursor will turn into a crosshair; then click in the area viewer near the doorframe.
As a side note, if you accidentally use one of the standard door appearances it won't work as an area transition: the door will simply swing open when clicked on instead. Each standard door appearance has a matching area transition door appearance in the resource database so this can be an easy mistake to make, but it's also easily correctable - just go back to the door's placeable resource and swap in the correct appearance, and all copies of that door in use throughout your game will be updated. The "Area Transition" doors are at the top under the Appearance list, e.g. "Area Transition, Ferelden Small" as apposed to "Door, Ferelden, Small".
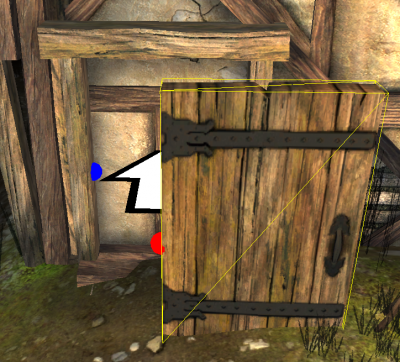
You may notice that when the door you placed in the area is selected a small blue sphere will appear at one edge in addition to the yellow wireframe bounding box. This is the door's "hook". Area layouts come with hidden "hooks" pre-installed to place doors on, and doors have matching hooks of their own. If you click on the blue sphere it will turn red, and all of the compatible door hooks built into the area's layout will appear. The following image illustrates this:
To hook a door up with its frame, simply click and drag the door's hook to a location very close to the matching frame hook. You don't need to get the positioning exact; if the two hooks are close enough together when you release the mouse button they'll automatically snap together. The door will be positioned and reoriented to fit correctly into the frame. Make sure you're still in the 'Standard Selection' mode (![]() ) for the snap to occur, if you're in the more advanced 3 Axis Movement tool, the snap will not happen.
) for the snap to occur, if you're in the more advanced 3 Axis Movement tool, the snap will not happen.
Note that door hooks are only there to make it easy to get exact matches on frames and walls that need a snug fit, to ensure that Artists and Designers don't have to spend a lot of time putting it in place. Doors will function just as well off of hooks as on them.
- Area transition effect is defined in the door's "Variables" property
Next, we'll tell the game engine that the door is an area transition door and that when the player clicks on it he will be transported to another area of the game. This is done by setting two of the door's variables. Select the door (either in the area's object palette or directly in the main display window) and right-click on it, selecting "properties" from the resulting menu. This will open the door's properties in the Object Inspector window. Select the "Variables" property and click on the ellipsis (![]() ) button. This will open up the variable browser for that particular instance of the door object.
) button. This will open up the variable browser for that particular instance of the door object.
There are two key variables in this list that we'll need to set:
- PLC_AT_DEST_AREA_TAG - tag of the destination area
- PLC_AT_DEST_TAG - tag of the destination waypoint within the destination area. This is a waypoint that you must add. It is NOT added automatically when you create the door.
Once we've set these the door will become an area transition door, and when the player interacts with it they'll be transported to the target area.
The destination area is "hut_interior". We'll create a waypoint just inside the hut's interior door, tagged "hut_door_interior", to serve as the place where the player appears.
Here is how the exterior door's variables should look:
And here is the interior door, with the destination waypoint:
The interior door is set up in the same manner, with a destination area of "hut_exterior" and a matching destination waypoint of "hut_door_exterior".
- Use invisible area transition "doors" when the transition is already built into the area layout art
If you want to create an area transition that doesn't look like a door, or is otherwise already represented by the level art, you can use an invisible 'door' instead. Therefore you have to create an invisible Placeable first. For details how to create a Placeable see the Placeable tutorial. The first defining point of a Placeable is the "Appearance". Appearances for these invisible placeables are named "Area Transition, Invisible". Chose one of them to your liking. If you want your area transition to show a meaningful name, you have this to add during the creation of the placeable under "Name". After you have created the placeable you can place it as you wish. Here is the yellow show box around the placeables important, because you will not see it otherwise. Now set its variables the same way as was done for the visible door.
The player won't see this 'door' in the game, but when he moves the mouse pointer over it it will change to signify that an area transition lies there and it can be right-clicked to be activated just like a visible door.
Area transitions via triggers
- Triggers use variables with a different prefix for setting their area transition effect
Finally, you can also create an area transition that triggers automatically when the player walks into a predefined area. This is done using triggers. (![]() ) You'll first have to create a trigger resource, much like how you had to create a placeable door earlier, but trigger resources are much simpler and for area transitions you won't need to change any of the defaults. Create a default trigger with "New -> Trigger" (either by right-clicking the resource palette or from the File menu) and give it an informative name such as "trigger_area_transition".
) You'll first have to create a trigger resource, much like how you had to create a placeable door earlier, but trigger resources are much simpler and for area transitions you won't need to change any of the defaults. Create a default trigger with "New -> Trigger" (either by right-clicking the resource palette or from the File menu) and give it an informative name such as "trigger_area_transition".
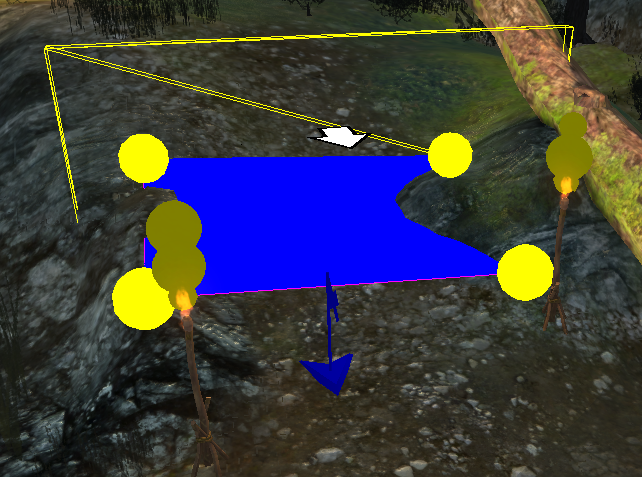
Go back to your area map, select the trigger from the resource palette, and then click on the map to define the corner points of the area the trigger will occupy. Double-click the last vertex to complete the polygon. A trigger can have any number of vertices, and vertices can be moved, added, or deleted after the trigger is created so don't worry if you don't get it exactly right. Note that the blue plane the trigger uses to show the enclosed area will pass through the ground and may not be entirely visible in the toolset, but it extends infinitely upward so the trigger will still take effect if the player enters its boundaries.
To set the trigger's destination, you'll find a familiar pair of variables in the trigger's default variable table:
- TRIGGER_AT_DEST_AREA_TAG - tag of the destination area
- TRIGGER_AT_DEST_TAG - tag of the destination waypoint within the destination area
(Note the prefix "TRIGGER" instead of "PLC")
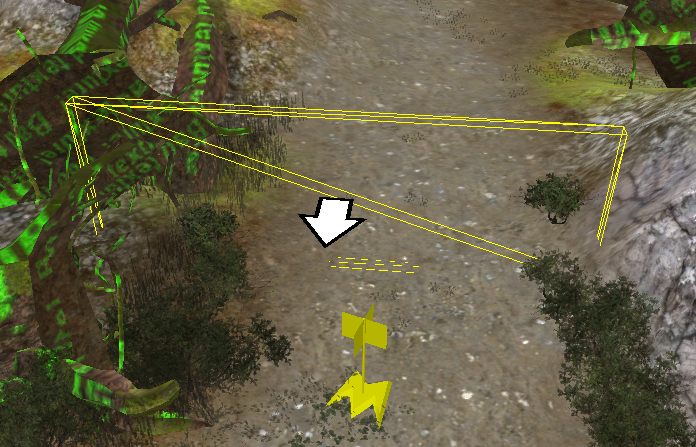
Below is an example where we've placed both a trigger and an invisible door across a pathway. Note that this is redundant, only one or the other is really needed. For most purposes a placeable area transition is probably best. (It is worth noting that placeable area transitions prompt a popup asking the player if they want to transition when bumped, but not when clicked upon - effectively acting as either a door or a trigger.) The waypoint shown is the arrival spot for the player when coming in from the other side; note how it's placed outside the trigger area, allowing the player to immediately back up and retreat through the area transition if he chooses.
Grouping Placeables
- Two or more placeables can be grouped together using Associations.
Often the placeables within an area are related. For example, a firepit placeable probably has an associated sound emitter. The toolset needs to be told that these two objects are related.
- Create a new Placeable and change its "Appearance" to "Firepit (Dialog)", then place it in your area. Remember that if you can't see the new placable, make sure you have the correct module open.
- Next, click on the musical note icon in the Palette for "Sounds".
- In the folder tree, go to global_amb_fade > 3D_placeables > 3d_emitter and select the amb_ext_smfire1_lp and place the emitter in your area.
- Right-click on the firepit to bring up the menu and choose "Add Associated object." The cursor changes to a cross-hair.
- Click on the sound emitter placeable.
Now when you drag the firepit placeable around the area, the sound emitter will automatically follow. Use the "Managed Links" menu item if you want to remove an association. Note that associations are uni-directional; you can still move the sound emitter without moving the firepit. Examples of other useful associations: a table and all of the items on top of the table, a table surrounded by chairs, etc.
Sound
Sounds are placed using the Area Editor. For more details see Sound.
