Difference between revisions of "Adding custom level tutorial"
Ladyofpayne (Talk | contribs) (→3d Max) |
Ladyofpayne (Talk | contribs) (→3d Max) |
||
| Line 147: | Line 147: | ||
6 - Use button '''Attach''', choose '''Match Material to material ID''' and attach DAO model to your model. | 6 - Use button '''Attach''', choose '''Match Material to material ID''' and attach DAO model to your model. | ||
| − | |||
| − | |||
| − | |||
Revision as of 12:10, 26 June 2016
Author: Ladyofpayne
- 3ds max (gmax) no older than 2011 year - Eshme Import/Export DAO Tools doesn't work with new versions.
- Eshme Import/Export DAO Tools - Script for 3s max
- Dragon Age Origins and Dragon Age Toolset - install it in the same folder as the game.
- Adobe Photoshop and Nvidia DDS Plugin for textures.
- mesh lightmap fixes - Install this project.
- Engine won't work with models bigger than 45 000 polygons and 30 000 vertexes. Even if it works still make sure your model isn't too complex - Lightmapping render can be failed.
Before we begin extract all DAO resources and keep it somewhere. You will need them.
You can use also the toolset to extract the model and textures, but fisrt you need to know the name of what you are looking for, in the tooset go File->Open file-> /packages/core/data/modelmeshdata.erf there you have some strings to help you find the models:
armours: arm_ +armour type; gloves: glv_; boots: boo_; clothes: cth_; robes: rob_; helmets:hlh_; weapons: w_+ weapon type; shield:w_shd; hair: har_; props:prp_;placeabes:plc_; creature: c_; npc creatures: cn_; children: kn_;
for races and genders you have human/elf/dwarf/qunari followed by the gender female/male, so human male: hm_; dwarf female: df_; etc.
- in the modelmeshdata.erf you need extract the .msh files the _0 files are the model you see in game when using the armour/cloth, the _2 and _3 files are the low level of detail (LOD) models, when other NPCs are using them and they are far away from you.
- in the .../core/data/modelmeshhierarchy.erf you need extract the .mmh and .phy files.
- in the .../core/data/materialobjects.erf you need to extract the .mao file.
- in the files .../core/data/textures.erf (props, placeables) and/or .../core/textures/high/textures.erf (characters and armours) you need to extract the .dds files, in those files the letter for the races in the file's name are changed to p, so human male, dwarf male, elf male, qunari male are all: pm_, because they all use the same texture.
Contents
Script Settings
Watch where you install Eshme script - program files(x86) for 32 programs at 64 bit computers. Eshme script and the game have to be in one folder of program files.
Take Eshme Import/Export: Startup, YAGG and DAOTools -> put into C(your disc):/Program Files/Autodesk/3dsmax/Scripts -> scripts
If your installation is correct them when you first open 3d man you will see window with the settings
In Game Path HAVE to be folder of the game C:\Program Files (x86)\Dragon Age, in Export Path folder Override in folders C:\Program Files (x86)\Dragon Age\packages\core\override.
Next sctar of 3d max you can begin your work in 3 d Max -> Run Script.
Textures
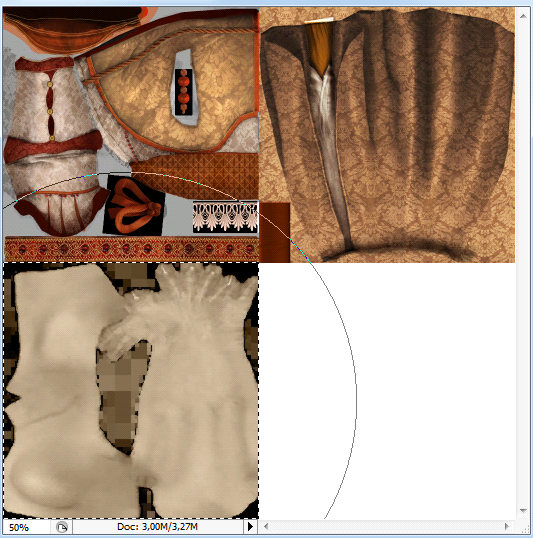
Size of the texture have to be :4 1024 -> 2048 -> 4096 -> 8192. You will need 3 type of them and you probably need to connect textures because DAO engine works only with one material at one model. Put them all in one file and make the same posistion for each part of every type:
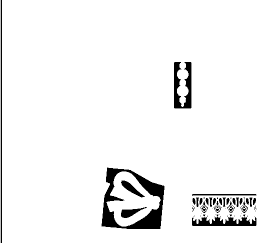
1) Diffuse map. Has "_d" letter in the name. What your model will looks like. Create Alpha channel and make it white inless you have parts than need to have "holes" in it. Then it will looks like that:
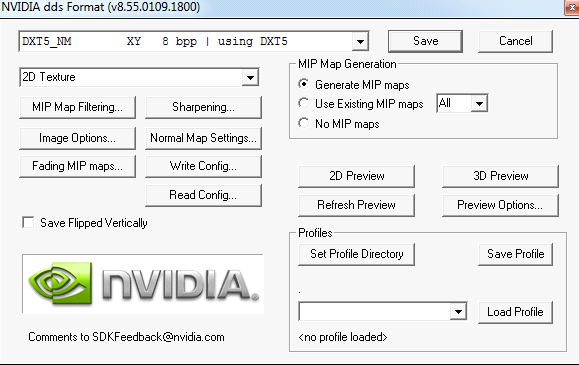
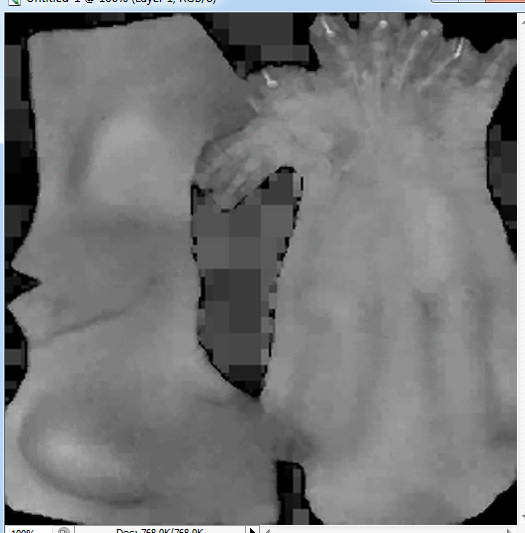
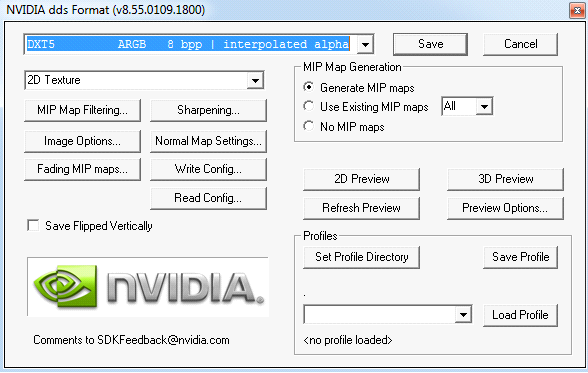
2) Normal map. Has "_n" letter in the name. It is grey texture. Just save your Diffuse map with this settings:
How it has to looks like:
3) Spectacular map. Has "_s" letter in the name and necessary for the lightmapping. Just take duffise texture the modify it image-> adjustments ->brightness brightness:45, contrast: 95 and copy its blue channel to alpa. The texture is ready.
Save you textures. Normal map settings is listed above. Diffuse and Spectacular settings:
4) All textures put into C:\Users\User\Documents\BioWare\Dragon Age\AddIns\your module ID\core\data\your_folder. Each model has to be organised and be in it's own folder. Make sure each model has all 3 types of textures and each type has it's letter. Example: prp_namemodel_0d, prp_namemodel_0n, prp_namemodel_0s.
Materials
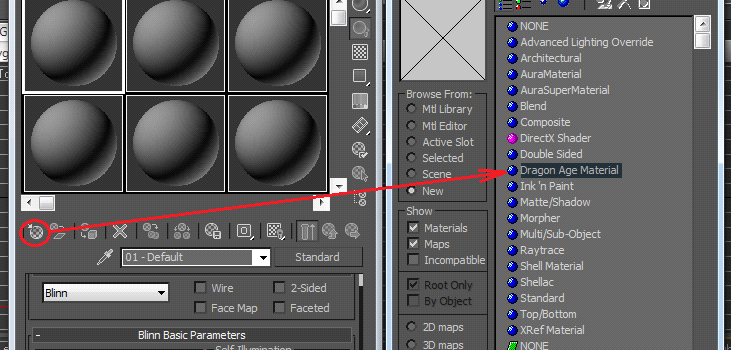
Select your model and on the panel above use Rendering-> Material editor-> Compact material editor Then click on Get Material and choose from the list Dragon Age Material.
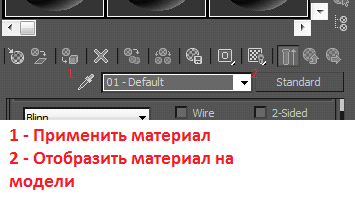
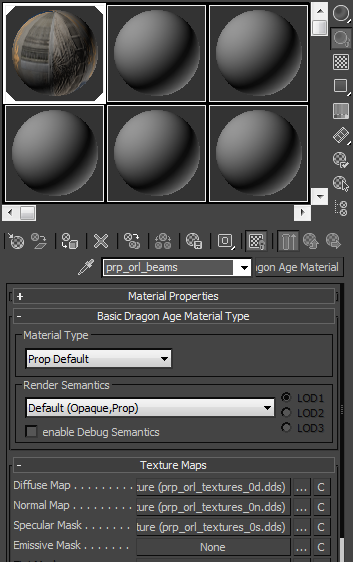
In Material Type choose Prop Default, in Render Semantics – Default (Opaque Prop)\ Trasparent if you have any transparency. Select your texture in Texture Maps - diffuse, normal and specular. Select your model and click on Assign Material to Selection (1) and use Show Map in Viewport (2). Now give your material proper name without _0 in the end. Example: if your model texture is named is prp_orl_bed_0d name the material prp_orl_bed.
More than one texture
Necessary step if you connect more then one texture for a model. But even if your model has only one texture it is better to make sure evertything is correct.
Select your model and then open Modifiers-> UV Coordinates- > Unwrap UVW
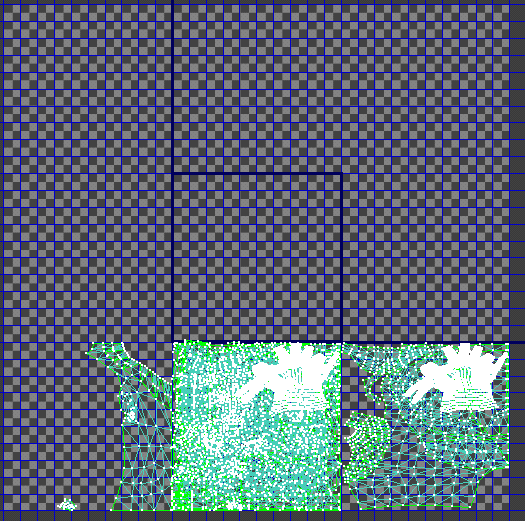
You will see something like this:
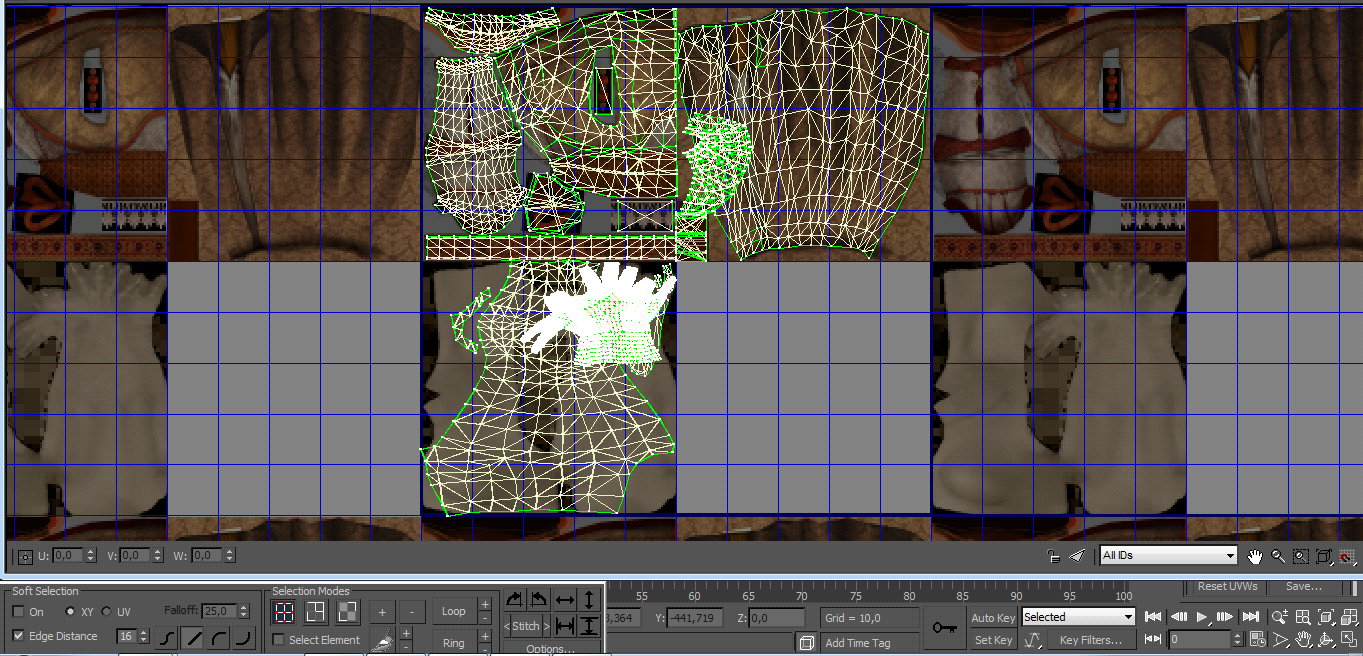
Geen lines are coordinates of textures on the model. Dragon age: Oginins engine work with only one material and can "see" everything ONLY inside the bolder square form the picture. WChoose as background texture if your model and now move all green lines so it will cover it like is has to be. You can move materials one by one by choosing them in All ID's. You can change scale of coordinates, rotate them and do all manipulations you see necessary to make your coordinates fit to texture inside the square just like this:
Save and close Unwrap UVW.
3d Max
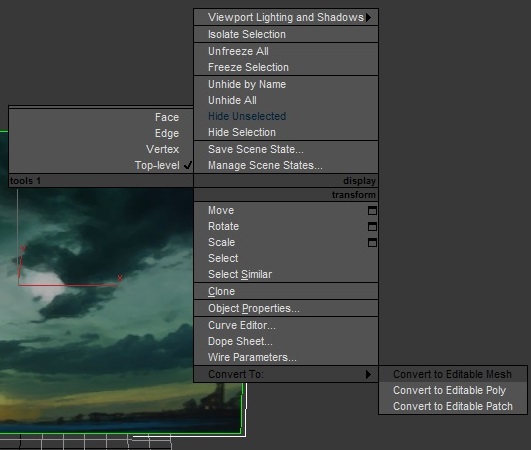
After you finish working with the materials and the textures you can work with the model now. If your model looks rough change it by Right click -> convert to Editable Poly-> Vertex-> Select all (CTRL+ A)-> Weld. Before next step finish all fixes: Unwrap UVW, material and textures. If you move to next step without fixing you have to redo it from the beginning later.
1 - Right click on a model and select "Convert into editable poly"> In modifier list choose and add 2 Unwrap UVW to your model. In the second one you have to change map channel to 2 - this is the channel needed for lighmapping.
2 - For the rest part you need to look for this video becaue I cannot describe how this part supposed to work but you have to follow my instructions while you working with the materials. Dragon Age Modding: Creating Props using 3ds max
3 - While you using Runscript-> manage models -> look for your models and make sure they have those settings. Change collision Walkable\ Non walkable if this object lies on the floor.
Mesh:
Collision:
There is a difference between making new Props and walls and ceiling. For the Props all you have to do is repeat those steps and name it with prefix prp. Note that new floor is considered to be props too. Example: prp_yourmodel_0d.
For Props I make an example for floor but that will suit for every model you want to add - chairs, chest, etc. EXCEPT for celing and walls.
For Ceiling and Walls there is the different methond. Instead of creating a new matproject I will use already existed group and I have to "sacrifice" this group from DAO- if you add new models into DAO group you make sure you won't use original models from this group because they change how they looks. The most important thing is that name of the textures and material (mao file in exported folder) has to be exacly the same as DAO files you choose to replace. I take TTI and TFI group because they were used in Circle of Magi only. You can use any other just make sure there are all DAO models you needed - walls, columns, ceiling, etc.
1 - Import your floor you want to port. Then import model from DAO from the section "Models that work correct" from "Props".
CEILING and WALLS only: import model ONLY from group you choose to replace. EXAMPLE: I will add new ceiling so I import tti_top01_01.
In this case port fca_floor01_0. Then change size of your model so it will fit into DAO original. Delete all parts that you don't needed from DAO model but NEVER delete part with collision. Change the size of collision if you want and remeber - you don't have collision to cover your whole model, you need it cover only part on the ground so your character won't walk through the model.
2 - Attach material to your model and check Unwrap UVW map like I described it in section "Material" and "More than one texture". When you finish move to the next step.
3 - Select DAO model and on the panel in the right select "Edit normals" right click-> Cut. NEVER delete it because you will need it later.
4 - Now make Right click on a model and select "Convert into editable mesh".
5 - Choose Polygon editor on right panel.
Select all polygons by CTL+ A -> make one unselected by ALT. It doesn't matter which one you choose but it has to be visible and you must have easy acess to it ->
Delete all polygons except THE ONE you choose -> make button Polygon editor inactive
6 - Use button Attach, choose Match Material to material ID and attach DAO model to your model.
8 - Select your model. In modifier list choose and add Unwrap UVW to your model - > right click on on modifiers list and Paste the "Edit normals", you deleted in Step 3.
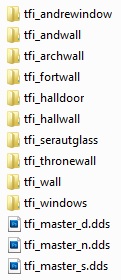
9 - Run script-> export and name your files with _0 in the end. EXAMPLE: prp_yourmodel_0. Ceiling and Walls: name of your files that are NOT mao and textures must have prefix of DAO group you used and unique name. Example: tfi_yourname_0. Since you use textures for the whole group you folders for each model has to be in one big folder for your group. Like this:
Models for scaling
You can test the collision by pressing button "Fade cutaway" and see which models disappear - those don't have collision. You can change it by set Override Cutaway: false if you use model without collision. Now press "Fade cutaway" - the model will be in level now. You don't have collision to cover your whole model- you need it cover only part on the ground so your character won't walk through the model.
Level
- "wallfull1_0" - Both. Wall with collision. Use it when you need wall.
- "wallfulldoor1_0" - Both. Door arch with collision. Use it when you need an arch without door.
- "support1_0" - Both. Two columns with collision. Use it when you need column- collision is cylindric form.
- tti_top01_01 - TTI ONLY.Celing without collision. Use it when you need an item on the ceiling without collision.
Props
- prp_painting_01_0 - painting on a wall with collision.
- prp_chestornat01_0 - chest with collision.
- prp_chair_01_0 - chair with collision.
- prp_table_01_0 - table with collision.
- prp_tevbookshelf1_0 - bookshelf with collision.
- prp_vase_01_0 - vase with collision.
- prp_bed01_0 - bed with collision.
- prp_statandraste_0 - statue andraste with collision.
- prp_cand04_0 - chandelier from above no collision.
- prp_dwfrug2_0 - rug on the floor.
- fca_floor01_0 - floor with collision.
Export
All files have to be in folder in C:\Users\User\Documents\BioWare\Dragon Age\AddIns\your module ID\core\data. Each model has to be organised and be in it's own folder.
Lightmapping
Always leave colour intensity at 1. This number looks perfect in game.
If Render Lightmap fails you can find a model, that cause trouble, by isolating it. Change in Object inspector-> Lightmapping-> False. This can happen if your model too complex or too big. Don't make more than 3 character lights- there will be problems. Light Probe is final part in lightning your room. If you deside to change something in any of previous lights you have to create new light probe.
1. Ambient light. This ambient light will light the level but not the characters.
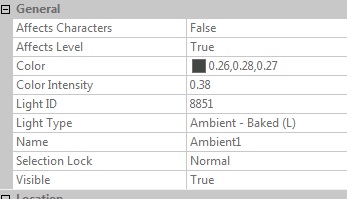
Right-click on "New Room" in top-left list > Insert > New Light anywhere in the room. Raise it up off the floor a little (e.g. Z = 2). In Object Inspector > "Light Type" Ambient - Baked > Colour 1,1,0.86
2. Character lights. You need them to light your characters. Copy and paste previous light or make a new one.
In Object Inspector > "Light Type" Point - Static > Affects Characters TRUE > Affects Level FALSE > Colour 0.70,0.70,0.65 > Point Radius 10000. Copy and paste until you have 3 static character lights and arrange them in a circle outside all of the rooms to make the characters be lighted from each side.
3. OPTIONAL:Additional lights. Add static or animated lights for tourches, fireplaces where necessary or wanted. EXAMPLE: Fireplace. Choose model fxe_fire_med_p and change it's scale (Object inspector) to 0.6. For light from windows use fxe_sunbeam_s_p. For candle - fxe_fire_cnd_p.
4. EXTERIOR ONLY: Skip this step if it is interior. Select the Terrain in the Resource Tree and Add sunlight by using Button above with big +. Change fields with unique Layout name (export name) and Name (name of the location) -> click on Define Area drag (Left click -> drag) green square untill it covers all your area - this defines walkable space -> click on Set Sunlight and drag mouse until light will be as you wish.
5. Light Probe. "New Room" in top-left list > Insert > New Light Probe. Position doesn't matter at all. For location itself ONE lightproble is needed.NOTE: Each water mesh must have its own light probe 1 meter above.
6. Make sure you make your area Selected and click on button "Render Lightmap".
Export
1. Save your .LVL files in C:\Users\User\Documents\BioWare\Dragon Age\AddIns\your Module_ID\core\env. Make sure .ERF and .ERF.BACK are here too after you press "Do All Local post".
2. Add minimap. Right click, then select Minimap > Minimap Selection Tool. The default green box appears. Right click on the area again, Minimap > Post Minimap to Local. It's possible to handcraft or refine the minimap, as detailed under Custom minimaps.
3. Press Button "Render lightmaps".
4. Press button "Set Start point" for Pathfinding -> Press button "Generate pathfinding". NOTE: Pathfinding is not possible for two overlapping height levels. Also generation fails if you put the start point in collision (non-walkable part) so watch carefully where do you put it.
5. Press button "Do All Local post" - this will export your level and you can use it in your area.
Useful links
- Installing the toolset - very important for program troubleshooting. NVIDIA_PhysX section- if you have pathfinding generation problems.
- Bug: Water plane missing in-game - how to fix this bug and make your water appear in the game.
- Lighting Tutorial - Lightmapping troubleshooting.
- Level Editor Tutorial and Level tutorial - General advises.
- Adding custom armor tutorial - How to add your own armor.
- Adding custom shield tutorial - How to add your own shield.
- The .lvl files from DAO the Single player and core resource source files project, if you wish to modify the layouts in the level editor.
- 3D converter
