Difference between revisions of "Add A New Class Tutorial/zh"
(Created page with 'zh:建立新職業 == New class starter kit == This kit has all the .xls spreadsheets you need to add a new class. These have been pre-programmed to follow the tutorial I ...') |
|||
| Line 1: | Line 1: | ||
[[zh:建立新職業]] | [[zh:建立新職業]] | ||
| − | == | + | == 新職業開始套件 == |
| − | + | 你需要一個套件內含.xls的電子表格,這樣才能製作新職業。點擊下面網址可以下載已製作完成得套件。 | |
| + | (譯者注 原作者給的檔案和教學不符 建議完全照教學作) | ||
| + | 關於.xls的製作、轉換以及GDA等,此篇教學都有講到,只要你跟者我的腳步。 | ||
| − | + | 你仍然需要在toolkit裡編輯腳本並且建立UTC模型。 | |
| − | + | 你仍然需要為你的模組建立GDA檔案。 | |
| − | + | 前往 我的文件/bioware/dragonage/addins/modulename | |
| − | + | 將GDA檔放於 我的文件/bioware/dragonage/addins/modulename/core/override 資料夾裡 | |
| − | + | 你可以在此網站下載 [http://www.damods.com/forums/index.php?action=downloads;sa=view;down=131 here] (你需要註冊) | |
| − | + | == 編輯2da檔 == | |
| − | + | 你要編輯的2DA檔案。 | |
| − | + | ||
| − | + | ||
*[[2da_base.xls]] | *[[2da_base.xls]] | ||
*[[abi_base.xls]] | *[[abi_base.xls]] | ||
| − | *[[ALclassname_default.xls]] ( | + | *[[ALclassname_default.xls]] (例 ALshaman_default.xls) 複製自 ALWizard_default.xls |
*[[background.xls]] | *[[background.xls]] | ||
*[[cla_base.xls]] | *[[cla_base.xls]] | ||
*[[guitypes.xls]] | *[[guitypes.xls]] | ||
| − | === | + | === 開啟 2da_base.xls === |
| − | + | 切換頁面為M2DA_base(可以使用TAB鍵切換) | |
| + | 在最下面空白處添加 | ||
ID above 100000 ALShaman_default ALShaman_default | ID above 100000 ALShaman_default ALShaman_default | ||
| − | + | 保存你的檔案 | |
| − | === | + | === 開啟guitypes.xls === |
| − | + | 在底部添加: | |
ID Label StringId Ability ProgressBar CombatTraining SpecialGraphic TintColor Orphanage Flags BlendTree | ID Label StringId Ability ProgressBar CombatTraining SpecialGraphic TintColor Orphanage Flags BlendTree | ||
500 Class: Shaman 8000000 5000 0 0 1 0x9B0F00 0 0 **** | 500 Class: Shaman 8000000 5000 0 0 1 0x9B0F00 0 0 **** | ||
| − | + | 保存你的檔案 | |
| − | === | + | === 開啟CLA_base.xls === |
| − | + | 將以下資料一一填入ID為3的下一列(即ID為3的下一列統統往下移動一列,中間空出的一列放資訊) | |
4 Shaman 8000000 8000001 **** 8000002 8000003 classico_spirithealer CLASS_Shaman 2 95 1 100 5 2 2 2 2 2 0 0 0 55 50 1 5 1 3 0.3 4035 **** 1 Shaman **** | 4 Shaman 8000000 8000001 **** 8000002 8000003 classico_spirithealer CLASS_Shaman 2 95 1 100 5 2 2 2 2 2 0 0 0 55 50 1 5 1 3 0.3 4035 **** 1 Shaman **** | ||
| − | + | 儲存你的檔案 | |
| − | === | + | === 開啟background.xls === |
| − | + | 在 backgrounds 頁面: 你必須要在Mage和Skill 1間插入一個區塊,如圖 | |
[[Image:Background.jpg]] | [[Image:Background.jpg]] | ||
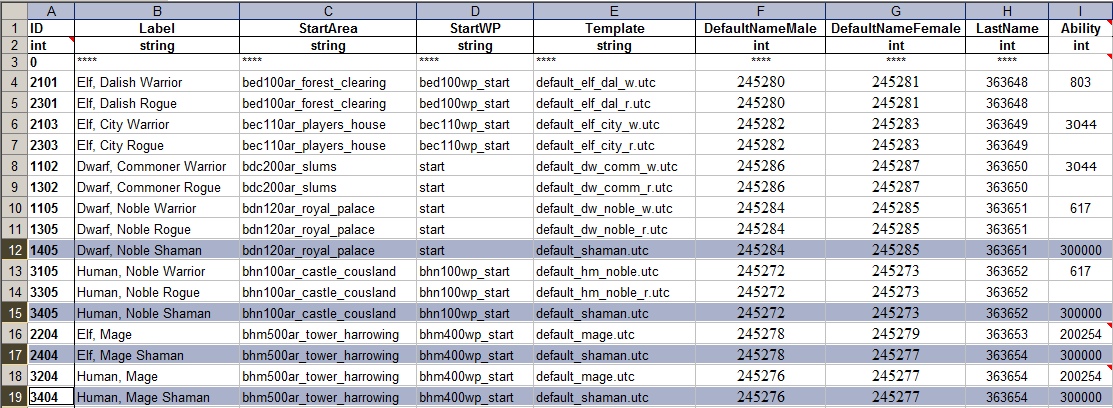
| − | + | 在background_defaults頁面裡有多個區域要追加,請看圖 | |
[[Image:Class tut bgdef.jpg]] | [[Image:Class tut bgdef.jpg]] | ||
| − | + | ID是如何工作? 1 = dwarf, 4 = shaman,5 = noble,設定是很簡單的。 | |
| − | + | 在第12,15,17,19列你要照圖追加我推薦你直接複製然後修改。 | |
:10 ==> 12 | :10 ==> 12 | ||
| Line 68: | Line 69: | ||
:18 ==> 19 | :18 ==> 19 | ||
| − | + | 關於template string裡的deault_shaman.utc,是稍後要在toolset裡製作的基本模型。 | |
| − | + | 至於Ability的int是遊戲裡的職業預設能力,以我為例是直接用沒有被使用過的數字。 | |
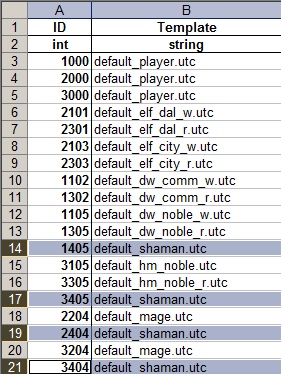
| − | + | 在chargen_preload頁面,你必須加入一些區塊如圖: | |
[[Image:Class tut chardef.jpg]] | [[Image:Class tut chardef.jpg]] | ||
| − | + | 注意 ID的數值必須必須和background_defaults頁面的數值一樣,否則會使遊戲崩潰。 | |
| − | + | ||
| − | + | ||
| − | + | 儲存你的檔案 | |
| − | + | === 開啟 abi_base.xls === | |
| − | + | 在ABI_Base頁面 將以下內容添加到底部 | |
| − | abilitytype - | + | 有多行是重要的東西必須要瞭解 |
| + | abilitytype - 定義能力類型。 近戰,法術,技能等等---> 是直接連結到abilitytype.xls | ||
| − | prereqability | + | prereqability – 定義有此能力的必須條件。要建立新職業就必須修改已存在的職業。 |
| − | guitypes - | + | guitypes - 職業的參考 ---> 連接到guitypes.xls |
| − | + | 在第119列的下一列 ==> 4034 HIDDEN_DOG下方插入新列並個別輸入以下資訊 | |
5000 HIDDEN_SHAMAN 0 0 380405 330716 hidden 2 0 0 0 0 0 0 0 1 0 0 12 0 0 0 0 3 1.5 0 0 0 0 0 0 0 0 0 0 0 0 0 0 1 7 0 2 33 0 0 0 0 | 5000 HIDDEN_SHAMAN 0 0 380405 330716 hidden 2 0 0 0 0 0 0 0 1 0 0 12 0 0 0 0 3 1.5 0 0 0 0 0 0 0 0 0 0 0 0 0 0 1 7 0 2 33 0 0 0 0 | ||
| Line 98: | Line 98: | ||
| − | + | 將以下內容一一複製到頁面底部(總共要製作四個新列) | |
| Line 111: | Line 111: | ||
------------------------------------------------- | ------------------------------------------------- | ||
| − | + | 接下來是棘手的問題,請確保接下來都遵從教學,否則你就要和你的模組說再見。 | |
| − | + | 選擇第三列到最後一列(即第三列到最後一列反白) | |
| − | + | 到 DATA(資料) --> SORT BY COLUMN S (guitypes)(行排序依照guitypes 以我為例是依欄位S作排序)。現在應該是依照guitype排序完畢。 | |
| − | + | 現在我們要將mage的法術自我們新職業的法術裡分開。 | |
| − | + | 在guitype 裡數值介在1~4的,看相對映的 prereqability數值,若為0就改成4023 | |
| − | + | 從現在開始特殊能力只有在職業為mage時出現。 (這也就意謂者我們要為新職業製作獨立的技能。) | |
| − | + | 現在已經確保不同職業,技能不會重複。 | |
| − | + | 選擇第三列到最後一列(即第三列到最後一列反白) | |
| − | + | 到 DATA(資料) --> SORT BY COLUMN S (ID)(行排序依照ID 以我為例是依欄位A作排序)。 | |
------------------------------------------------- | ------------------------------------------------- | ||
| − | + | 現在到 passive_abilities頁面 | |
| − | + | 在最下方的新列一一填入 | |
9000 HIDDEN_SHAMAN 1 2 4 2 6 1 str +2,mag +2,con +1 | 9000 HIDDEN_SHAMAN 1 2 4 2 6 1 str +2,mag +2,con +1 | ||
| − | + | 儲存你的檔案 :) | |
| − | === | + | === 開啟 ALShaman_default.xls === |
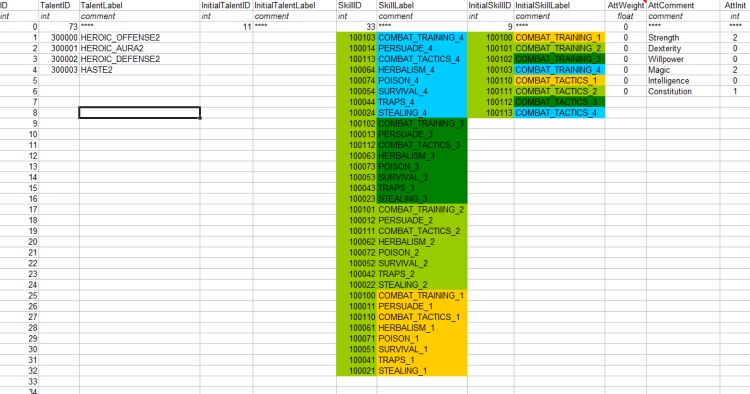
| − | + | 改成如圖 | |
[[Image:Class tut alshaman.jpg]] | [[Image:Class tut alshaman.jpg]] | ||
| − | == | + | == 將2DA檔轉成GDA == |
| − | + | 在C:下建立一個叫做2DA的資料夾,在裡面建立一個叫做override的資料夾。 | |
| − | + | 在你的C:\2da 把以下檔案放進入: | |
* [[2da_base.xls]] | * [[2da_base.xls]] | ||
| Line 156: | Line 156: | ||
* [[ALShaman_default.xls]] | * [[ALShaman_default.xls]] | ||
| − | + | 去你的toolset資料夾將 ExcelProcessor.exe也放進去 我們是靠 ExcelProcessor作轉換 | |
| + | (以我為例是在遊戲目錄裡的\tools\ResourceBuild\Processors) | ||
| − | + | 然後我們製作簡單的批次檔來轉換。 | |
| − | + | 開啟記事本,將以下代碼複製貼上去,存檔 檔名取為convert.bat 並執行convert.bat | |
:C:\2DA\ExcelProcessor.exe 2DA_base.xls -outdir=C:\2DA\override\ | :C:\2DA\ExcelProcessor.exe 2DA_base.xls -outdir=C:\2DA\override\ | ||
| Line 168: | Line 169: | ||
:C:\2DA\ExcelProcessor.exe ABI_base.xls -outdir=C:\2DA\override\ | :C:\2DA\ExcelProcessor.exe ABI_base.xls -outdir=C:\2DA\override\ | ||
| − | + | 注意:若系統為Vista或是Windows 7,請以管理者執行convert.bat(即RUN AS ADMINISTRATOR) | |
| − | + | 現在你為你的模組製作好GDA檔了。 | |
| − | == | + | == 建立模組 == |
| − | + | 現在我們要在Toolset裡編輯資料 | |
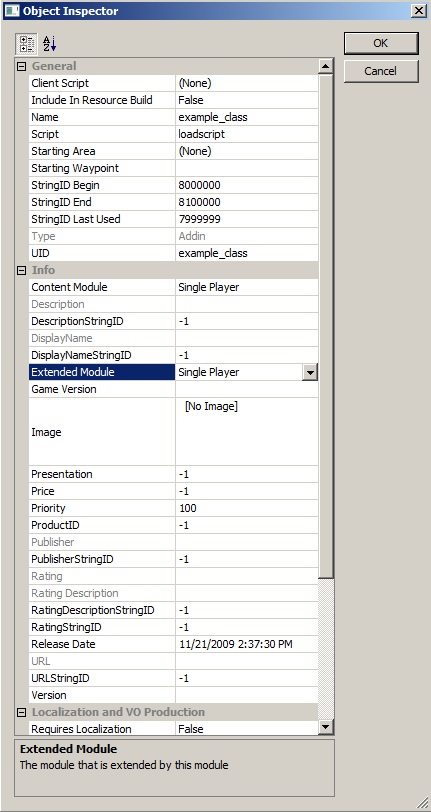
| − | + | 建立新模組如圖 | |
| − | ''' | + | '''請確認你的STRING數值 |
| + | 是介於8,000,000 ~ 8,300,000 | ||
| + | 如果不在此範圍,STRING就不會工作 | ||
| + | BIOWARE聲明這是SQL的問題 ''' | ||
[[Image:Class tut module1.jpg]] | [[Image:Class tut module1.jpg]] | ||
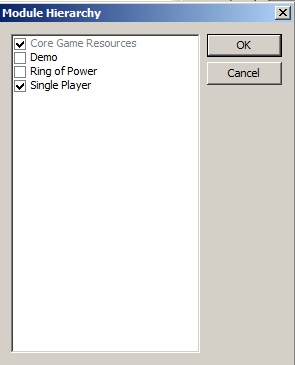
| − | + | 模組建立後,開啟模組選擇heirarchy並檢查single player是否有打勾。 | |
[[Image:Class tut hier.jpg]] | [[Image:Class tut hier.jpg]] | ||
| − | + | 模組建立完畢,現在要將GDA放在適當override區域。 | |
| − | + | 開啟我的文件/bioware/dragonage/addins/modulename | |
| − | + | 將GDA檔放在我的文件/bioware/dragonage/addins/modulename/core/override資料夾裡面 | |
| − | == | + | == 編輯腳本== |
| − | + | 你現在必須要編輯一些腳本。 | |
| − | === | + | === 編輯2da_constants_h檔案 === |
| − | + | 在核心(Core)腳本裡找到2da_constants_h檔案 | |
| − | + | 對2DA_CONSTANTS_H按滑鼠右鍵,選擇CHECK OUT | |
| − | + | 打開,依照下方代碼尋找區域並修改成一樣: | |
<dascript> | <dascript> | ||
| Line 215: | Line 219: | ||
</dascript> | </dascript> | ||
| − | + | 和 | |
<dascript> | <dascript> | ||
| Line 240: | Line 244: | ||
</dascript> | </dascript> | ||
| − | + | 編輯完畢就在頂端按滑鼠右鍵選SAVE然後點選CHECK IN | |
| − | + | 然後在頂端點擊"EXPORT WITHOUT DEPENDENT RESOURCES" | |
| − | === | + | === 編輯 gen00pt_class_race_gend 檔案 === |
| − | + | 在 _Global ==> plot scripts 找到gen00pt_class_race_gend檔案。 | |
| − | + | 對gen00pt_class_race_gend按滑鼠右鍵,點擊CHECK OUT | |
| − | + | 打開,找到區塊並依照下列代碼修改: | |
<dascript> | <dascript> | ||
case GEN_CLASS_MAGE: | case GEN_CLASS_MAGE: | ||
| Line 274: | Line 278: | ||
</dascript> | </dascript> | ||
| − | + | 編輯完畢就在頂端按滑鼠右鍵選SAVE然後點選CHECK IN | |
| − | + | 然後在頂端點擊"EXPORT WITHOUT DEPENDENT RESOURCES" | |
| − | === | + | === 編輯 sys_chargen_h === |
| − | + | 找出sys_chargen_h檔案,位在_Systems ==> _Includes | |
| − | + | 對sys_chargen_h按滑鼠右鍵,選CHECK OUT | |
| − | + | 打開,找到Starting skills區塊修改成下: | |
<dascript> | <dascript> | ||
| Line 308: | Line 312: | ||
</dascript> | </dascript> | ||
| − | + | 然後到starting ability區域並修改 | |
<dascript> | <dascript> | ||
| Line 338: | Line 342: | ||
</dascript> | </dascript> | ||
| − | + | 到"// Undo Class and Race selection" 區域建第四個CharGen_ClearAbilityList | |
<dascript> | <dascript> | ||
| Line 348: | Line 352: | ||
</dascript> | </dascript> | ||
| − | + | 到 "// enabling proper tactics presets" 添加ValidForClass4部份 | |
<dascript> | <dascript> | ||
| Line 359: | Line 363: | ||
</dascript> | </dascript> | ||
| − | + | 編輯完畢就在頂端按滑鼠右鍵選SAVE然後點選CHECK IN | |
| − | + | 然後在頂端點擊"EXPORT WITHOUT DEPENDENT RESOURCES" | |
| − | === | + | === 編輯sys_rewards_h === |
| − | + | 找出 sys_rewards_h檔案,在 _Systems ==> _Includes | |
| − | + | 對sys_rewards_h按滑鼠右鍵選擇CHECK OUT | |
| − | + | 開啟並在代碼500附近依下方代碼修改: | |
<dascript> | <dascript> | ||
| Line 387: | Line 391: | ||
</dascript> | </dascript> | ||
| − | + | 編輯完畢就在頂端按滑鼠右鍵選SAVE然後點選CHECK IN | |
| − | + | 然後在頂端點擊"EXPORT WITHOUT DEPENDENT RESOURCES" | |
| − | === | + | === 編輯sys_chargen檔案 === |
| − | + | 找出sys_chargen檔案,在_Systems裡 | |
| − | + | 對sys_chargen按滑鼠右鍵選CHECK OUT | |
| − | + | 開啟,改變這一行: | |
<dascript> | <dascript> | ||
| Line 402: | Line 406: | ||
</dascript> | </dascript> | ||
| − | + | 到special handling區塊並修改如下: | |
<dascript> | <dascript> | ||
| Line 432: | Line 436: | ||
</dascript> | </dascript> | ||
| − | + | 到tactics區域依下方代碼添加: | |
<dascript> | <dascript> | ||
// associate some tactics preset table | // associate some tactics preset table | ||
| Line 446: | Line 450: | ||
</dascript> | </dascript> | ||
| − | + | 編輯完畢就在頂端按滑鼠右鍵選SAVE然後點選CHECK IN | |
| − | + | 然後在頂端點擊"EXPORT WITHOUT DEPENDENT RESOURCES" | |
| − | == | + | == 製作 UTC 模板(TEMPLATE)檔案 == |
| − | + | 返回Toolset請跟者下方教學: | |
| − | + | 點擊 "creature"標籤 (紅頭圖標)(就在右方的Palette Window) | |
| − | + | 展開_Core_Creatures | |
| − | + | 在展開_Do NOT TOUCH | |
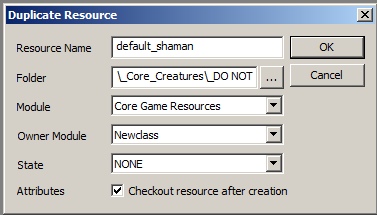
| + | 對default_mage按右鍵選擇duplicate 如圖製作: | ||
[[Image:Class tut dfs1.jpg]] | [[Image:Class tut dfs1.jpg]] | ||
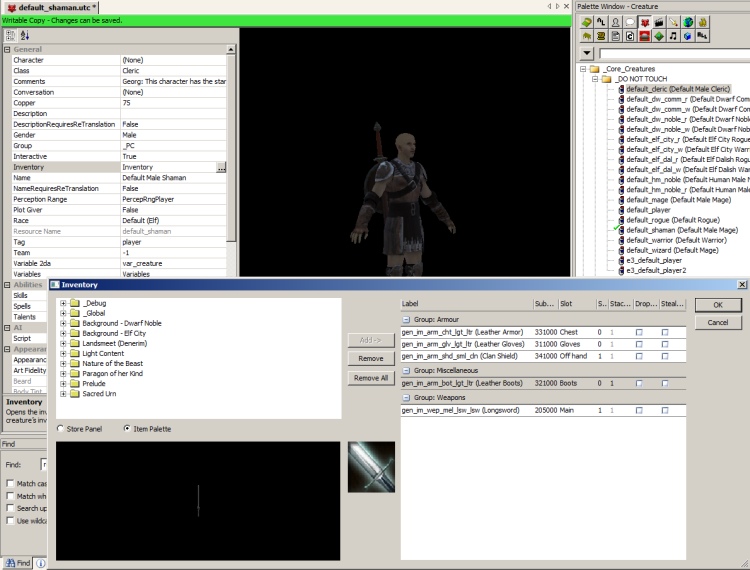
| − | + | 現在要編輯數值並給予基本武器和裝甲如圖: | |
Class: Shaman (from dropdown) | Class: Shaman (from dropdown) | ||
| Line 467: | Line 472: | ||
[[Image:Class tut dfs2.jpg]] | [[Image:Class tut dfs2.jpg]] | ||
| − | + | 編輯完畢就在頂端按滑鼠右鍵選SAVE然後點選CHECK IN | |
| − | + | 然後在頂端點擊"EXPORT WITHOUT DEPENDENT RESOURCES" | |
| − | == | + | == 建立一些字串 == |
| − | + | 開啟String editor然後按右鍵選擇insert | |
| − | + | 你要設成如下 | |
:Table = module talk base | :Table = module talk base | ||
| Line 488: | Line 493: | ||
:8000006 - Shaman Female Name | :8000006 - Shaman Female Name | ||
| − | + | 完成後就關閉String editor | |
| − | == | + | == 全部放在一起 == |
| − | + | 點擊上方功能列的Tool->EXPORT | |
| − | "EXPORT WITHOUT DEPENDENT RESOURCES" | + | 按"EXPORT WITHOUT DEPENDENT RESOURCES" |
| − | "GENERATE MODULE XML" | + | 按"GENERATE MODULE XML" |
| − | "GENERATE MANIFEST XML" | + | 按"GENERATE MANIFEST XML" |
| − | "EXPORT TALK TABLE" | + | 按"EXPORT TALK TABLE" |
| − | == | + | == 清除垃圾資料 == |
| − | + | 不要忽略此部份 | |
| − | + | 到我的文件/bioware/dragonage/packages/core/override/toolset | |
| − | + | 將此資料夾內的東西複製到 | |
| − | + | 我的文件/bioware/dragonage/addins/modulename/core/override/toolset | |
| − | + | 應該會有以下檔案: | |
| − | + | 2da_constant_h.nss | |
| − | + | gen00pt_class_race_gend.nss | |
| − | + | sys_chargen_h.nss | |
| − | + | sys_rewards_h.nss | |
| − | + | sys_chargen.nss | |
| + | sys_chargen.ncs | ||
| − | + | 將我的文件/bioware/dragonage/packages/core/override/toolset裡的東西全部殺掉 | |
| − | == | + | == 嘗試結果 == |
| − | + | 開啟你的遊戲並選擇新遊戲 | |
| − | * | + | *小心*如果出現任何錯誤訊息都將會損害遊戲本體 |
| − | + | 點選 MALE ==> HUMAN ==> SHAMAN ==> MAGI | |
| − | + | 你可以看到你的新人物 | |
| − | + | 如果有任何意外發生請從頭依教學檢查是否有錯誤 | |
| − | + | 請確保你沒有遺漏 ";" 或 "{ }",如果缺少會摧毀遊戲。 | |
| − | == | + | == 危險焦點 == |
| − | + | 我的法術沒有出現在創造人物的視窗裡,求助!! | |
| − | * | + | * 你沒有排序你修改過得ability檔案裡的ID行。如果ID有排序就會出現。 |
| − | * | + | * 你可能沒有賦予新能力給你的新職業 "5000" 在prereqability行裡面 |
| − | + | 當我要點選MALE ==> HUMAN ==> SHAMAN ==> MAGI 時,我的新職業沒有出現 | |
| − | * | + | * 很顯然你沒有輸出你的default_shaman.utc模型 |
| − | * | + | * 檢查background檔案,確保 template是使用default_shaman.utc |
| − | * | + | * 嘗試重新啟動你的電腦 |
[[Category:Character generation]] | [[Category:Character generation]] | ||
[[Category:Tutorials]] | [[Category:Tutorials]] | ||
Revision as of 10:56, 6 December 2009
Contents
新職業開始套件
你需要一個套件內含.xls的電子表格,這樣才能製作新職業。點擊下面網址可以下載已製作完成得套件。 (譯者注 原作者給的檔案和教學不符 建議完全照教學作) 關於.xls的製作、轉換以及GDA等,此篇教學都有講到,只要你跟者我的腳步。
你仍然需要在toolkit裡編輯腳本並且建立UTC模型。
你仍然需要為你的模組建立GDA檔案。
前往 我的文件/bioware/dragonage/addins/modulename
將GDA檔放於 我的文件/bioware/dragonage/addins/modulename/core/override 資料夾裡
你可以在此網站下載 here (你需要註冊)
編輯2da檔
你要編輯的2DA檔案。
- 2da_base.xls
- abi_base.xls
- ALclassname_default.xls (例 ALshaman_default.xls) 複製自 ALWizard_default.xls
- background.xls
- cla_base.xls
- guitypes.xls
開啟 2da_base.xls
切換頁面為M2DA_base(可以使用TAB鍵切換) 在最下面空白處添加
ID above 100000 ALShaman_default ALShaman_default
保存你的檔案
開啟guitypes.xls
在底部添加:
ID Label StringId Ability ProgressBar CombatTraining SpecialGraphic TintColor Orphanage Flags BlendTree 500 Class: Shaman 8000000 5000 0 0 1 0x9B0F00 0 0 ****
保存你的檔案
開啟CLA_base.xls
將以下資料一一填入ID為3的下一列(即ID為3的下一列統統往下移動一列,中間空出的一列放資訊)
4 Shaman 8000000 8000001 **** 8000002 8000003 classico_spirithealer CLASS_Shaman 2 95 1 100 5 2 2 2 2 2 0 0 0 55 50 1 5 1 3 0.3 4035 **** 1 Shaman ****
儲存你的檔案
開啟background.xls
在 backgrounds 頁面: 你必須要在Mage和Skill 1間插入一個區塊,如圖
在background_defaults頁面裡有多個區域要追加,請看圖
ID是如何工作? 1 = dwarf, 4 = shaman,5 = noble,設定是很簡單的。
在第12,15,17,19列你要照圖追加我推薦你直接複製然後修改。
- 10 ==> 12
- 13 ==> 15
- 16 ==> 17
- 18 ==> 19
關於template string裡的deault_shaman.utc,是稍後要在toolset裡製作的基本模型。 至於Ability的int是遊戲裡的職業預設能力,以我為例是直接用沒有被使用過的數字。
在chargen_preload頁面,你必須加入一些區塊如圖:
注意 ID的數值必須必須和background_defaults頁面的數值一樣,否則會使遊戲崩潰。
儲存你的檔案
開啟 abi_base.xls
在ABI_Base頁面 將以下內容添加到底部
有多行是重要的東西必須要瞭解 abilitytype - 定義能力類型。 近戰,法術,技能等等---> 是直接連結到abilitytype.xls
prereqability – 定義有此能力的必須條件。要建立新職業就必須修改已存在的職業。
guitypes - 職業的參考 ---> 連接到guitypes.xls
在第119列的下一列 ==> 4034 HIDDEN_DOG下方插入新列並個別輸入以下資訊
5000 HIDDEN_SHAMAN 0 0 380405 330716 hidden 2 0 0 0 0 0 0 0 1 0 0 12 0 0 0 0 3 1.5 0 0 0 0 0 0 0 0 0 0 0 0 0 0 1 7 0 2 33 0 0 0 0
將以下內容一一複製到頁面底部(總共要製作四個新列)
300000 HEROIC_OFFENSE2 380003 379523 367458 379231 spl_ico_heroic_offense 2 1 0 0 0 20 0 5000 0 0 0 500 3 0 3 1 4 spell_singletarget.ncs 5 90215 244 247 0 0 2 0 0 0 0 0 0 90109 128 1 7 0 2 33 0 0 0 0
300001 HEROIC_AURA2 380000 379520 367458 379214 spl_ico_heroic_aura 2 1 0 0 0 30 0 300000 0 4 15 500 3 0 3 1 4 spell_singletarget.ncs 5 90213 244 247 0 0 0 0 0 0 0 0 0 90110 128 1 7 0 2 33 0 0 0 0
300002 HEROIC_DEFENSE2 380001 379521 367458 379256 spl_ico_heroic_defense 2 1 0 0 0 40 0 300001 0 4 20 500 3 0 3 1 4 spell_singletarget.ncs 10 90214 244 247 0 0 2 0 0 0 0 0 0 90111 128 1 7 0 2 33 0 0 0 0
300003 HASTE2 380005 379525 398957 379229 spl_ico_agility 2 0 0 0 0 0 60 300002 0 4 30 500 1 1 18 1 2 spell_modal.ncs 30 90216 244 247 0 0 2 0 0 0 0 0 0 90112 192 1 7 0 2 33 0 0 0 10
接下來是棘手的問題,請確保接下來都遵從教學,否則你就要和你的模組說再見。
選擇第三列到最後一列(即第三列到最後一列反白)
到 DATA(資料) --> SORT BY COLUMN S (guitypes)(行排序依照guitypes 以我為例是依欄位S作排序)。現在應該是依照guitype排序完畢。
現在我們要將mage的法術自我們新職業的法術裡分開。
在guitype 裡數值介在1~4的,看相對映的 prereqability數值,若為0就改成4023 從現在開始特殊能力只有在職業為mage時出現。 (這也就意謂者我們要為新職業製作獨立的技能。) 現在已經確保不同職業,技能不會重複。
選擇第三列到最後一列(即第三列到最後一列反白)
到 DATA(資料) --> SORT BY COLUMN S (ID)(行排序依照ID 以我為例是依欄位A作排序)。
現在到 passive_abilities頁面
在最下方的新列一一填入
9000 HIDDEN_SHAMAN 1 2 4 2 6 1 str +2,mag +2,con +1
儲存你的檔案 :)
開啟 ALShaman_default.xls
改成如圖
將2DA檔轉成GDA
在C:下建立一個叫做2DA的資料夾,在裡面建立一個叫做override的資料夾。
在你的C:\2da 把以下檔案放進入:
去你的toolset資料夾將 ExcelProcessor.exe也放進去 我們是靠 ExcelProcessor作轉換 (以我為例是在遊戲目錄裡的\tools\ResourceBuild\Processors)
然後我們製作簡單的批次檔來轉換。 開啟記事本,將以下代碼複製貼上去,存檔 檔名取為convert.bat 並執行convert.bat
- C:\2DA\ExcelProcessor.exe 2DA_base.xls -outdir=C:\2DA\override\
- C:\2DA\ExcelProcessor.exe background.xls -outdir=C:\2DA\override\
- C:\2DA\ExcelProcessor.exe CLA_base.xls -outdir=C:\2DA\override\
- C:\2DA\ExcelProcessor.exe ALShaman_Default.xls -outdir=C:\2DA\override\
- C:\2DA\ExcelProcessor.exe guitypes.xls -outdir=C:\2DA\override\
- C:\2DA\ExcelProcessor.exe ABI_base.xls -outdir=C:\2DA\override\
注意:若系統為Vista或是Windows 7,請以管理者執行convert.bat(即RUN AS ADMINISTRATOR)
現在你為你的模組製作好GDA檔了。
建立模組
現在我們要在Toolset裡編輯資料
建立新模組如圖
請確認你的STRING數值 是介於8,000,000 ~ 8,300,000 如果不在此範圍,STRING就不會工作 BIOWARE聲明這是SQL的問題
模組建立後,開啟模組選擇heirarchy並檢查single player是否有打勾。
模組建立完畢,現在要將GDA放在適當override區域。
開啟我的文件/bioware/dragonage/addins/modulename
將GDA檔放在我的文件/bioware/dragonage/addins/modulename/core/override資料夾裡面
編輯腳本
你現在必須要編輯一些腳本。
編輯2da_constants_h檔案
在核心(Core)腳本裡找到2da_constants_h檔案
對2DA_CONSTANTS_H按滑鼠右鍵,選擇CHECK OUT
打開,依照下方代碼尋找區域並修改成一樣:
const int ABILITY_TALENT_HIDDEN_DUELIST = 4030;
const int ABILITY_TALENT_HIDDEN_RANGER = 4029;
const int ABILITY_TALENT_HIDDEN_REAVER = 4019;
const int ABILITY_TALENT_HIDDEN_ROGUE = 4020;
const int ABILITY_TALENT_HIDDEN_SHALE = 4033;
const int ABILITY_TALENT_HIDDEN_TEMPLAR = 4021;
const int ABILITY_TALENT_HIDDEN_WARRIOR = 4022;
const int ABILITY_TALENT_HIDDEN_WARRIOR = 5000;
const int ABILITY_TALENT_HURLOCK_PROPERTIES = 90080;
const int ABILITY_TALENT_INDOMITABLE = 28;
和
//Class Constants
const int CLASS_WARRIOR = 1;
const int CLASS_WIZARD = 2;
const int CLASS_ROGUE = 3;
const int CLASS_SHAMAN = 4;
const int CLASS_SHAPESHIFTER = 5;
const int CLASS_SPIRITHEALER = 6;
const int CLASS_CHAMPION = 7;
const int CLASS_TEMPLAR = 8;
const int CLASS_BERSERKER = 9;
const int CLASS_REAVER = 10;
const int CLASS_ARCANE_WARRIOR = 11;
const int CLASS_ASSASSIN = 12;
const int CLASS_BLOOD_MAGE = 13;
const int CLASS_BARD = 14;
const int CLASS_RANGER = 15;
const int CLASS_DUELIST = 16;
const int CLASS_SHALE = 17;
const int CLASS_DOG = 18;
const int CLASS_MONSTER_ANIMAL = 19;
編輯完畢就在頂端按滑鼠右鍵選SAVE然後點選CHECK IN
然後在頂端點擊"EXPORT WITHOUT DEPENDENT RESOURCES"
編輯 gen00pt_class_race_gend 檔案
在 _Global ==> plot scripts 找到gen00pt_class_race_gend檔案。
對gen00pt_class_race_gend按滑鼠右鍵,點擊CHECK OUT
打開,找到區塊並依照下列代碼修改:
            case GEN_CLASS_MAGE:
            {
                nResult =   ( GetCreatureCoreClass(oListener) == CLASS_WIZARD );
                break;
            }
            case GEN_CLASS_WARRIOR:
            {
                // DEBUG START
                nResult =   ( GetCreatureCoreClass(oListener) == CLASS_WARRIOR );
                break;
            }
            case GEN_CLASS_ROGUE:
            {
                nResult =   ( GetCreatureCoreClass(oListener) == CLASS_ROGUE );
                break;
            }
            case GEN_CLASS_SHAMAN:
            {
                nResult =   ( GetCreatureCoreClass(oListener) == CLASS_SHAMAN );
                break;
            }
編輯完畢就在頂端按滑鼠右鍵選SAVE然後點選CHECK IN
然後在頂端點擊"EXPORT WITHOUT DEPENDENT RESOURCES"
編輯 sys_chargen_h
找出sys_chargen_h檔案,位在_Systems ==> _Includes
對sys_chargen_h按滑鼠右鍵,選CHECK OUT
打開,找到Starting skills區塊修改成下:
    // -------------------------------------------------------------------------
    // Starting Skills
    // -------------------------------------------------------------------------
    if (nClass == CLASS_WARRIOR)
    {
        _AddAbility(oChar, 100100);
    }
    else if (nClass == CLASS_ROGUE)
    {
        _AddAbility(oChar, ABILITY_SKILL_POISON_1);
    }
    else if (nClass == CLASS_WIZARD)
    {
        _AddAbility(oChar, ABILITY_SKILL_HERBALISM_1);
    }
    else if (nClass == CLASS_SHAMAN)
    {
        _AddAbility(oChar, ABILITY_SKILL_HERBALISM_1);
    }
}
然後到starting ability區域並修改
        // ---------------------------------------------------------------------
        // Load the starting ability for the background
        // ---------------------------------------------------------------------
        int nAbility = GetM2DAInt(TABLE_STARTING_EQUIPMENT,"Ability", nIdx);
        _AddAbility(oCreature, nAbility);

    }
    else
    {
        string sTemplate = "default_player.utc";
        switch (nClass)
        {
            case CLASS_WARRIOR: sTemplate = "default_warrior.utc";
                break;
            case CLASS_ROGUE:   sTemplate = "default_rogue.utc";
                break;
            case CLASS_WIZARD:  sTemplate = "default_wizard.utc";
                break;
            case CLASS_SHAMAN:  sTemplate = "default_shaman.utc";
                break;
        }

        LoadItemsFromTemplate(oCreature, sTemplate, TRUE);
    }
}
到"// Undo Class and Race selection" 區域建第四個CharGen_ClearAbilityList
            // Note: This wipes the ability list clear
            CharGen_ClearAbilityList(oChar,1);
            CharGen_ClearAbilityList(oChar,2);
            CharGen_ClearAbilityList(oChar,3);
            CharGen_ClearAbilityList(oChar,4);
到 "// enabling proper tactics presets" 添加ValidForClass4部份
            nForClass1 = GetM2DAInt(TABLE_TACTICS_USER_PRESETS, "ValidForClass1", nCurrentRow);
            nForClass2 = GetM2DAInt(TABLE_TACTICS_USER_PRESETS, "ValidForClass2", nCurrentRow);
            nForClass3 = GetM2DAInt(TABLE_TACTICS_USER_PRESETS, "ValidForClass3", nCurrentRow);
            nForClass4 = GetM2DAInt(TABLE_TACTICS_USER_PRESETS, "ValidForClass4", nCurrentRow);
            if(nCoreClass == nForClass1 || nCoreClass == nForClass2 || nCoreClass == nForClass3 || nCoreClass == nForClass4)
                AddTacticPresetID(oCreature, nCurrentRow);
編輯完畢就在頂端按滑鼠右鍵選SAVE然後點選CHECK IN
然後在頂端點擊"EXPORT WITHOUT DEPENDENT RESOURCES"
編輯sys_rewards_h
找出 sys_rewards_h檔案,在 _Systems ==> _Includes
對sys_rewards_h按滑鼠右鍵選擇CHECK OUT
開啟並在代碼500附近依下方代碼修改:
const int SPEC_WIZARD_SHAPESHIFTER = 5;
const int SPEC_WIZARD_SPIRITHEALER = 6;
const int SPEC_WIZARD_ARCANE_WARRIOR = 11;
const int SPEC_WIZARD_BLOOD_MAGE     = 13;

const int SPEC_WARRIOR_CHAMPION = 7;
const int SPEC_WARRIOR_TEMPLAR = 8;
const int SPEC_WARRIOR_BERSERKER = 9;
const int SPEC_WARRIOR_REAVER = 10;

const int SPEC_ROGUE_ASSASSIN = 12;
const int SPEC_ROGUE_BARD = 14;
const int SPEC_ROGUE_RANGER   = 15;
const int SPEC_ROGUE_DUELIST  = 16;
編輯完畢就在頂端按滑鼠右鍵選SAVE然後點選CHECK IN
然後在頂端點擊"EXPORT WITHOUT DEPENDENT RESOURCES"
編輯sys_chargen檔案
找出sys_chargen檔案,在_Systems裡
對sys_chargen按滑鼠右鍵選CHECK OUT
開啟,改變這一行:
到special handling區塊並修改如下:
// special handling for aluvian
                if (nQuickStart == 0 )
                {
                    Log_Trace(LOG_CHANNEL_CHARACTER,"sys_chargen","Setting default values for player character");

                    int nRandClass = abs((GetLowResTimer()%3)+1);

                    if(nRandClass == CLASS_ROGUE || nRandClass == CLASS_WARRIOR || nRandClass == CLASS_SHAMAN)
                    {
                        _RunChargen(RACE_HUMAN, nRandClass, oChar, BACKGROUND_NOBLE );
                        WR_SetPlotFlag(PLT_GEN00PT_BACKGROUNDS, GEN_BACK_HUMAN_NOBLE, TRUE);
                    }
                    else // mage
                    {
                        _RunChargen(RACE_HUMAN, nRandClass, oChar, BACKGROUND_MAGI );
                        WR_SetPlotFlag(PLT_GEN00PT_BACKGROUNDS, GEN_BACK_CIRCLE, TRUE);
                    }


                    Chargen_SetNumTactics(oChar);
                    SetCanLevelUp(oChar,Chargen_HasPointsToSpend(oChar));

                    SendEventModuleChargenDone("", "");

                }
到tactics區域依下方代碼添加:
                // associate some tactics preset table
                int nPresetTable;
                if(GetCreatureCoreClass(oChar) == CLASS_WARRIOR)
                    nPresetTable = 1; // tank
                else if(GetCreatureCoreClass(oChar) == CLASS_ROGUE)
                    nPresetTable = 2; // damage dealer
                else if(GetCreatureCoreClass(oChar) == CLASS_SHAMAN)
                    nPresetTable = 1; // damage dealer
                else // mage
                    nPresetTable = 5; // nuker
編輯完畢就在頂端按滑鼠右鍵選SAVE然後點選CHECK IN
然後在頂端點擊"EXPORT WITHOUT DEPENDENT RESOURCES"
製作 UTC 模板(TEMPLATE)檔案
返回Toolset請跟者下方教學:
點擊 "creature"標籤 (紅頭圖標)(就在右方的Palette Window)
展開_Core_Creatures 在展開_Do NOT TOUCH 對default_mage按右鍵選擇duplicate 如圖製作:
現在要編輯數值並給予基本武器和裝甲如圖:
Class: Shaman (from dropdown) Name: Default Male Shaman
編輯完畢就在頂端按滑鼠右鍵選SAVE然後點選CHECK IN
然後在頂端點擊"EXPORT WITHOUT DEPENDENT RESOURCES"
建立一些字串
開啟String editor然後按右鍵選擇insert
你要設成如下
- Table = module talk base
- Owner = module name
- TYPE = GUI
- 8000000 - Shaman
- 8000001 - Shamans
- 8000002 - Shamans commune with spirits to get thier other worldly powers.
- 8000004 - Shaman
- 8000005 - Shaman Male Name
- 8000006 - Shaman Female Name
完成後就關閉String editor
全部放在一起
點擊上方功能列的Tool->EXPORT
按"EXPORT WITHOUT DEPENDENT RESOURCES"
按"GENERATE MODULE XML"
按"GENERATE MANIFEST XML"
按"EXPORT TALK TABLE"
清除垃圾資料
不要忽略此部份
到我的文件/bioware/dragonage/packages/core/override/toolset
將此資料夾內的東西複製到
我的文件/bioware/dragonage/addins/modulename/core/override/toolset
應該會有以下檔案: 2da_constant_h.nss gen00pt_class_race_gend.nss sys_chargen_h.nss sys_rewards_h.nss sys_chargen.nss sys_chargen.ncs
將我的文件/bioware/dragonage/packages/core/override/toolset裡的東西全部殺掉
嘗試結果
開啟你的遊戲並選擇新遊戲
- 小心*如果出現任何錯誤訊息都將會損害遊戲本體
點選 MALE ==> HUMAN ==> SHAMAN ==> MAGI
你可以看到你的新人物
如果有任何意外發生請從頭依教學檢查是否有錯誤
請確保你沒有遺漏 ";" 或 "{ }",如果缺少會摧毀遊戲。
危險焦點
我的法術沒有出現在創造人物的視窗裡,求助!!
- 你沒有排序你修改過得ability檔案裡的ID行。如果ID有排序就會出現。
- 你可能沒有賦予新能力給你的新職業 "5000" 在prereqability行裡面
當我要點選MALE ==> HUMAN ==> SHAMAN ==> MAGI 時,我的新職業沒有出現
- 很顯然你沒有輸出你的default_shaman.utc模型
- 檢查background檔案,確保 template是使用default_shaman.utc
- 嘗試重新啟動你的電腦

