Difference between revisions of "Follower tutorial"
(Created page with '== Simple Follower Creation == Follow these steps to create a follower that - Levels up with a default package - Can be chosen from the party picker - Can gain XP This guide a...') |
|||
| Line 71: | Line 71: | ||
[[File:partypickerm2da.jpg]] | [[File:partypickerm2da.jpg]] | ||
| + | The '''ID''' for your follower must be '''12 or higher'''. 11 is the highest value used in the base 2DA. 12 is fine for standalone modules, add-ins will probably want to use an arbitrarily high number to avoid potential conflicts. | ||
| + | |||
| + | The '''Label''' should be the follower's name as you wish it to appear on the party picker. | ||
| + | |||
| + | The '''Tag''' must be your follower's tag. | ||
| + | |||
| + | All other values are non-functioning defaults and should be specified as in the image above unless you know explicitly what you're doing. | ||
| + | |||
| + | |||
| + | The second spreadsheet should be named '''party_picker_''' (note middle underscore). Once again append your unique suffix (in this example party_picker_fofbc.xls with party_picker_fofbc as its worksheet). | ||
| + | |||
| + | Set up your columns and data like so: | ||
| + | [[File:party_pickerm2da.jpg]] | ||
== Advanced Follower Creation == | == Advanced Follower Creation == | ||
Revision as of 03:50, 6 January 2010
Contents
Simple Follower Creation
Follow these steps to create a follower that
- Levels up with a default package - Can be chosen from the party picker - Can gain XP
This guide assumes you know how to create a creature and are comfortable with basic scripting.
Create the creature
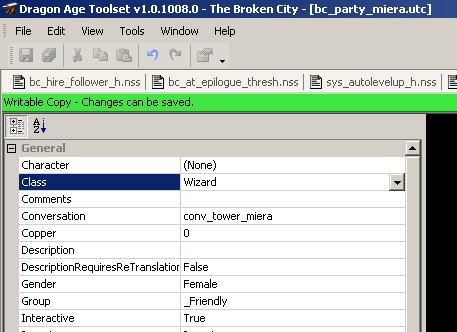
Create a creature to act as your follower. Set its name, appearance, gender, head morph, conversation, inventory etc as you want them to behave in-game.
Set an appropriate Tag (you'll be using it a lot). I suggest "party_charname".
Make sure you choose a Class. For most followers this should be Rogue, Warrior or Wizard.
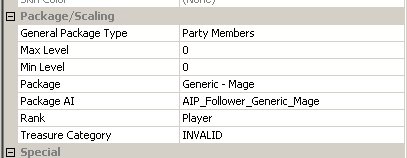
Under Package/Scaling set:
General Package Type to be Party Members
Package to be an appropriate value (probably "Generic - Wizard" or similar)
Package AI (there should only be one choice)
Rank to be Player
Save and export your character as normal.
Override char_stage
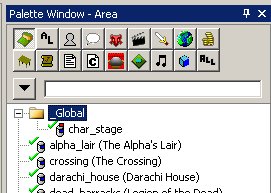
In your resource palette, open char_stage under the Global folder:
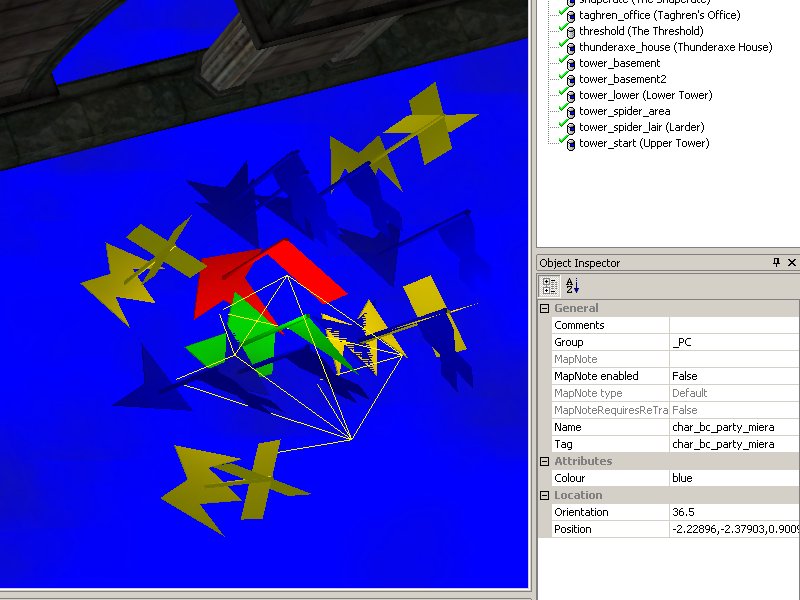
Create a new waypoint for your follower to appear on the party picker. This waypoint must have a tag in the form of "char_" followed by the exact tag of your follower.
In this example the tag of my follower is bc_party_miera so her waypoint tag must be char_bc_party_miera
For a standalone module (such as in this example), put your waypoint wherever you please. The illustrated one is directly on top of Morrigan's. For an add-in to the main campaign, you should position your wp appropriately relative to the core party members.
Save and export the area.
Move the char_stage.are and char_stage.lst files from your core export folder to your module's export folder (probably from \Documents\Bioware\Dragon Age\packages\core\override\toolsetexport to \Documents\Bioware\Dragon Age\AddIns\yourModule\module\override\toolsetoverride). This ensures that the modification to the character stage only takes effect if your module is installed and enabled, which will help manage compatibility problems. Make sure those files are included when you package your module for distribution.
Create m2DAs for the Party Picker
You will need to create two Excel spreadsheets.
The first should be named (both worksheet and file) partypicker_ with a unique suffix. In this example, my first spreadsheet is named partypicker_fofbc.xls with a worksheet name of partypicker_fofbc - the suffix being the acronym of my module.
Set up your columns as follows:
The ID for your follower must be 12 or higher. 11 is the highest value used in the base 2DA. 12 is fine for standalone modules, add-ins will probably want to use an arbitrarily high number to avoid potential conflicts.
The Label should be the follower's name as you wish it to appear on the party picker.
The Tag must be your follower's tag.
All other values are non-functioning defaults and should be specified as in the image above unless you know explicitly what you're doing.
The second spreadsheet should be named party_picker_ (note middle underscore). Once again append your unique suffix (in this example party_picker_fofbc.xls with party_picker_fofbc as its worksheet).
Set up your columns and data like so:


