Difference between revisions of "Exterior Level Manual"
m (→Creating a Level: Minor reformat on image table) |
|||
| Line 19: | Line 19: | ||
{| border="1" | {| border="1" | ||
| Basic | | Basic | ||
| − | |||
|- | |- | ||
| [[File:newLevelBasic.png]] | | [[File:newLevelBasic.png]] | ||
| + | |- | ||
| + | | Advance | ||
| + | |- | ||
| [[File:newLevelAdvance.png]] | | [[File:newLevelAdvance.png]] | ||
|} | |} | ||
Revision as of 02:27, 19 November 2009
In Depth Exterior Level Technical Overview
Rough Draft of tutorial that explores in depth the various parts of creating/editing exterior levels. Possibly will break into seperate pages describing the various parts in even more painful detail ;)
Contents
Introduction
While good information exists on creating exterior levels, much of it is fragmented. The goal of this article is to provide a very through technical overview of the Level Editor in exterior mode. Every single button and command that is related to the process of creating an exterior level will be covered. What this article is not is a how-to for creating a level. This is strictly for covering the commands and options. If all you want is a quick-and-dirty guide for making levels, this is not it. For those still reading, let's get to mastering this tool.
Assumptions
I do hold some basic assumptions of knowledge, and wish to get those out in open now. I assume that:
- You know how to Create a Module
- Set the active Module
- Have the correct python version (which is 2.5.4) and have the correct win32 extensions installed
- Understand the difference between Level, Area, and Map
Creating a Level
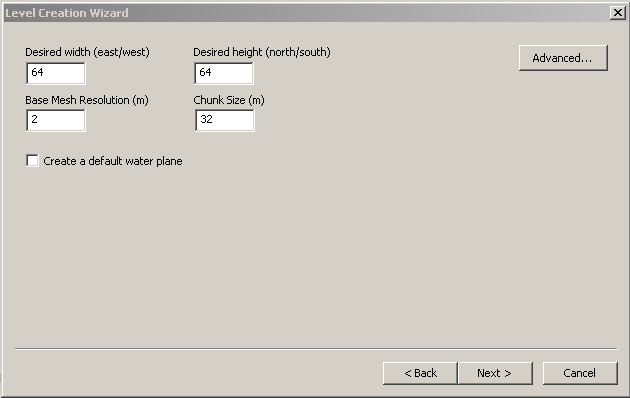
To create a level, you go to File->New->Level. By default terrain will be selected, so click on Next, and we're at our first important screen. We have two versions to pick from:
| Basic |

|
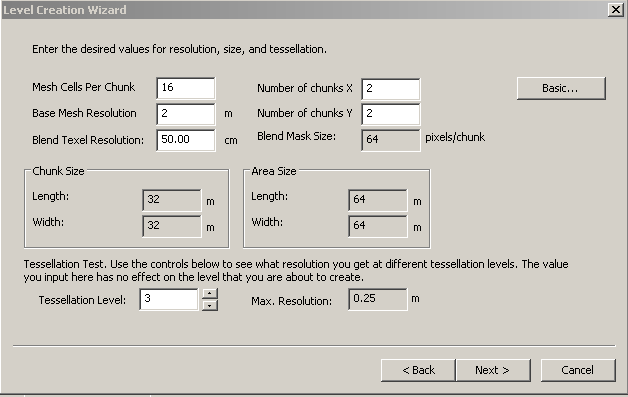
| Advance |

|
The main difference between the two, other than more options, is that changing a field in the Basic version won't affect the numbers in the other fields. In the Advance version, this can happen depending on what you changed. To change back and forth between the two, click on the Basic/Advanced button. BUG: You must click on the Basic button twice to go back into basic mode.
What do the Basic options mean
- Desired Width - How wide do you want this area to be in meters?
- Desired Height - How long do you want this area to be in meters?
- Base Mesh Resolution - I believe this measures the base of the mesh triangle. In meters.
- Chunk Size - How large or small do you want your terrain chunks? Chunks are explained later in the article. In Meters.
- Default Water Plane - Do you want a default water plane? I would recommend against this, as it creates the water plane up in the sky, and doesn't even match the terrain size you create. Just as easy to manually add it in when you're ready for water.
What do the Advanced options mean
Notice that in advanced mode, Chunk Size and Area Size aren't directly editable. Instead you alter the other values, and that determines how big the chunks are and how large the area is.
- Mesh Cells Per Chunk - How many cells or triangles will a chunk contain?
- Base Mesh Resolution - Size of the triangle in meters. Resolution * Cells Per Chunk = Chunk Size
- Blend Texel Resolution - In cm, and I'm not sure what this does yet.
- Number of chunks X - How many chunks long is your area? Chunk Size * This = Area Length
- Number of chunks Y - How many chunks wide is your area? Chunk Size * This = Area Width
- Blend Mask Size - Unsure, controlled by Blend Texel Resolution. Can be changed later.
- Tessellation Level - How many levels of tessellation can be done to the terrain mesh. Max Resolution shows the smallest possible triangle.
Saving the .lvl file
Talk about save locations and stress that the level only exists on the hard drive.
Camera Controls
A page to exaustive control list Cover 3dsMax controls and WASD controls, plus zooming
The Basic Steps All Levels Need
- Add Export Area
- Add Start Point
- Add Ambient Light
- Render Lightmaps
- Post All Local
The Basic Steps Explained
So, take take all of the basic steps in detail:
Export Area
Detailed documentation can be found here. Need to explore setting multiple export areas, this is unknown at this time. The important parts are the Layout Name, Name, and Define Area. Skydome can be changed which is how you get the Fade.
Not sure on mini-map. Anyone get this working yet?
Start Point
Only thing this is used for is pathfinding. Add it after the area(s), and only one per area is needed. No other use for this that I know of.
Ambient Lighting
Sunlight is broken, so you must add an ambient light. Steps for doing so.
Render Lightmaps
Basic trouble shooting, describe what to toggle on/off to see true lighting. Mention that it is probably a good idea to work with fully lit on and lightmaps off while building. Personal preference though.
Post All Local
Not sure what exactly this does. I believe it generates and places the .ARL file into a path in My Documents. This path is read by the toolset when selecting area layouts.
Terrain Mesh Editing
What this covers
Icons
- Deform
- Plateau
- Smooth
- Tessellate
Deform Tool
What it does and how options affect it
Plateau Tool
What it does and how options affect it
Smooth Tool
What it does and how options affect it
Tessellate Tool
What it does and how options affect it
Texture Editing
General idea behind textures. You can only have 8. No more than three textures blended together.
Adding a Texture to the Pallete
Explain how to add a texture to the pallete. Explain the differences between diffuse, normal, and specular
Texture Paint Tool
What it does and how options affect it
Texture Smooth Tool
What it does and how options affect it
Relax Map Tool
What it does and how options affect it
Water
Skip for now