Backgrounds tutorial
PAGE UNDER CONSTRUCTION
Contents
Introduction
This tutorial shows you how to modify the character backgrounds that can be selected during character generation. This is likely only of use if you are creating your own module or campaign as there would be no point to changing the background in the single player campaign unless you were also going to make extensive additions to support the new backgrounds (e.g a completely new origin story). So the example we will use for this tutorial is a new stand alone module in which we completely replace the existing backgrounds. Changing backgrounds is especially useful if your module is set in a different lore to the main Dragon Age game or if you simply want to reduce the scope of the number of different backgrounds.
We will also demonstrate some important principals that can be followed when modifying other core rules such as available races or classes. Most importantly we will add the new backgrounds in a way that doesn’t require any editing of core resources. By leaving the core resources alone we make our changes compatible with future patches which might otherwise overwrite our work. Furthermore keeping the core resources in tact allows us to make different modifications to different modules within the same toolset.
It is recommended that the reader should have some experience with scripting or coding in order to carry out the operations involved. The more you are relying on just copy pasting these instructions the more likely you are to make mistakes that you won’t know how to fix.
The module
Any basic module will do for the purposes of this tutorial. If you want to create a test module for this tutorial then just create a simple module with a single area and a starting location. See LINK for more information about creating modules. Make sure that the only thing selected in the module’s hierarchy is Core game resources. This will ensure that the module is a stand alone module rather than an add-in to the single player campaign or some other module. For the purposes of this tutorial we will assume the module is called Backgrounds demo and I will prefix my resources with bdm_ to be sure that they are distinct from any that are already in existence.
We are going to completely replace the existing backgrounds with 3 new ones of our own. You can use new backgrounds in your module however you see fit. You could create entire origin stories for each one like in the single player campaign (possibly a major undertaking depending on length) or you can just use them to influence dialogue and plot options in the main part of your game.
For our demo we are creating a module in which the player starts off in a small human village (we will not be creating the details of this module so this is just for the purpose of an example). There is a wizard in this village who plays a pivotal role in the story. We allow the player to start as the wizard’s apprentice (if they are a mage) or as his servant (if they are human or elven and not a mage) or as a wandering traveller who has come to visit the wizard (if they are not human and not a mage). So the three backgrounds will be:
- Servant
- Apprentice
- Traveller
Creating the background strings
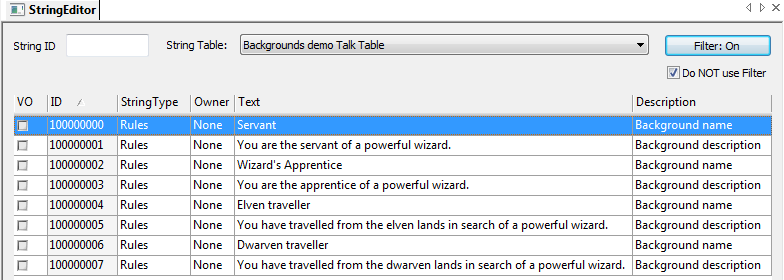
Before we start modifying the 2DA files we are going to create some strings. Open the string editor in the toolset and create the following strings in your ‘Backgrounds demo’ talk table:
Your string IDs might be different to these so be sure to reference the right string ID in the instructions that follow. Simply replace these string Ids with your own.
IMPORTANT! There is currently a bug in the game that causes it to crash if a background description ID has a value greater than 109912680. To get around this you can go into your module’s properties and change the start and end IDs for strings to be less than that. After that the string editor will generate IDs in a range that won’t crash. You can always put those values back again after you create the background descriptions (that way you have less to alter once Bioware fix this). Hopefully Bioware will fix this bug soon as the official string range for non-Bioware / certified modules is over 610000000.
You may have noticed that we have given two different names and descriptions for the traveller background depending on the PC’s race. We will say more about that in the following section.
Modifying the 2DAs
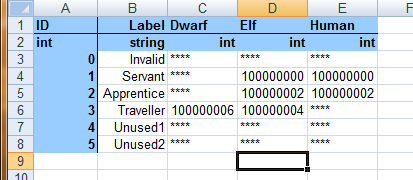
The next thing we need to do is to modify the worksheets in Backgrounds.xls. Be sure to make a copy of the spreadsheet first so that you leave the original intact. See LINK for general information about editing 2DA files. The first worksheet is called ‘backgrounds’; modify it to look like the following:
Note that since 2DAs combine together to form M2DAs, and we don’t want the existing backgrounds in our game, we have overwritten the last two slots as unused1 and unused2, even though we won’t be using them. The name and desc string refs on this tab will be overwritten by the race specific ones on the names tab so we can leave those blank (AFAIK these string refs are not used providing the ones on the names tab are provided - also the tooltip string ref seems not to be used anywhere – if you prefer you can set these to something just to be safe).
The three race columns determine which backgrounds can be selected by which race and the 3 class columns determine which background can be selected by which class. So, as you can see from the picture our Servant background is accessible to elf or human warriors and rogues, the Apprentice background can be selected by elf or human mages and the Traveller background by elf or dwarf warriors and rogues.
The last three tabs indicate a starting ability for each background by race. Note that by default these columns are not hooked up into the character generation script (instead they are hard coded in the script) and are not used, but we will correct that later on when we do the scripting. You have to be careful here because the columns relate to the race Ids, so 1=dwarf, 2=elf and 3=human, which is in a different order to the other race columns in this table. The number in the column is an ability ID as given in ABI_base.xls. For this demo we have just given the same skill for each race for a given background. Servants get combat tactics, Apprentices get persuade and Travellers get survival.
The next tab table to modify is background_names.
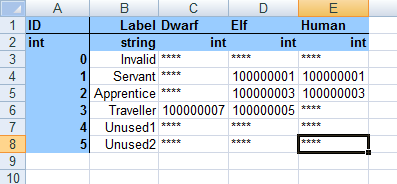
Make sure that the Ids here match the Ids in your string table. Note that for Apprentices and Servants we use the same strings regardless of race, but for the Traveller background we use different strings. This is to illustrate how you can divide a single background up into multiple names and descriptions. Internally they are both stored as the same background ID but during character generation a different name, description and icon can be shown to the player. In the single player game this was done with the Noble background by splitting it into human and dwarf Noble variations.
NOTE – you must be careful when splitting a single background into different parts for each race. You must make both the names and descriptions different! If you don’t make the descriptions different then the engine will not recognise them as different even if they have different names.
Now modify the background_desc table as follows
Again note the distinct descriptions for the Traveller background Now for the background_icons table. For this demo we will just use some of the existing icons but you may want to create your own icons to add here.
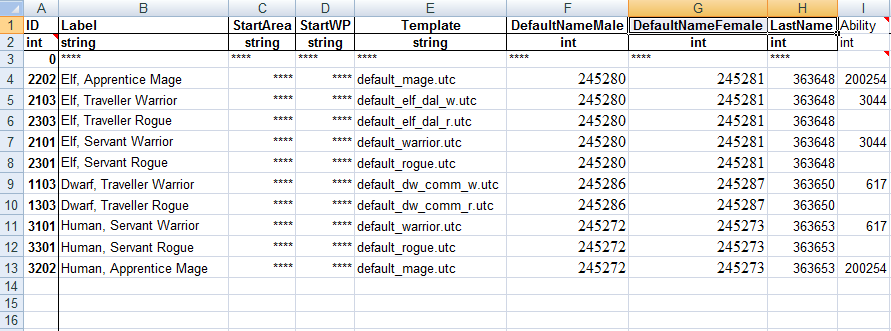
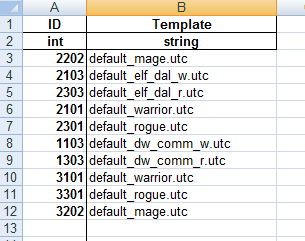
The background_defaults table must have an entry for each race, background and class combination that is allowed. The ID column must be calculated as follows:
1000 * raceID + 100 * classID + backgroundID
The label column should give a description of the row (AFAIK this is not used anywhere). For this simple demo we will have each background combination spawn in the same place (the module default start location) but if you wanted different origins to spawn in different places then you can use the next two columns to specify this (AFAIK you have to write your own scripts to accomplish this though).
In the template column you can put the name of a creature resource that you want to use as a template for this race/background/class combination. In the picture you can see that we have just used some default templates that shipped with the toolset but you can easily create your own. Note that only the inventory is copied across to the PC so if you want to create your own templates you do not need to alter anything on the creature except for their inventory.
The name columns take string Ids. If you want to add your own names then you’ll have to create new strings in the string editor.
Finally we have the ability column. As with the skill columns in the backgrounds table these IDs correspond to entries in the ABI_base.xls file. It should be noted that race, class and background are all possible sources of starting abilities so before you decide what to put in this column you should familiarise yourself with what skills are already being added in different parts of character generation in order to ensure that you don’t duplicate an ability somewhere.
The final table is the chargen_preload table. The two columns here should exactly match the entries from the ID and Template columns of the previous table.
Compiling and fixing the GDAs
Now compile backgrounds.xls and place the resulting GDAs into your AddIns\module_name\module\override directory. Never place anything in your AddIns\module_name\core\override directory or it will affect other modules than the one you are editing.
Unfortunately there is a bug that prevents large string IDs from compiling correctly so until BioWare fix this bug you will have to edit the GDA files in the toolset. Open up the two GDA files that contain your new string IDs and check to see if the correct string IDs from your spreadsheet are there. Most probably you will have to edit some of them to match. Once you are certain you have done this accurately, save and close the GDA files.
Creating the backgrounds plot
The background plot is used for keeping track of a PC’s background and can be used to affect conversation options.
The single player game uses a plot called gen00pt_backgrounds to keep track of the PC background. You can find it in the \_Glabal\Generic folder of the plots tab if you want to take a look. We will create a similar plot for our custom backgrounds. Create a new plot and call it bdm_000pt_backgrounds (My naming convention is to use 000 to indicate a resource that isn’t tied to any particular area – feel free to use your own convention but remember to update any references later in the tutorial). Add main plot flags as indicated in the picture below:
You could also add some defined flags if you wanted. Defined flags can be used to return some combination of the main flags such as TRAVELLER or add some extra condition like FEMALE_APPRENTICE or ELVEN_APPRENTICE. Defined flags are beyond the scope of this tutorial however.
