Lighting
| Level editor topics |
|---|
|
There are many different types of lighting and light combinations that can be placed in the editor.
There are also many tools used to create lighting and generate lighting and even visualize lighting in the editor. The goal with the editor is to give the artist the same experience as he/she would see in the game. This will help them to be able to create the levels and tweak lighting quickly without having to stop to see it in-game.
Contents
Lights
Lights for the game are split into two categories based on what they affect: levels and characters. Character lights will affect the player, NPCs, and creatures. The level lights will affect static geometry and designer placeables.
The game supports several different light types, with the purpose of balancing quality vs performance. To understand the use of the light types, one must first know the general lighting equation:
Diffuse = DynamicAmbient + F(DynamicLights, DynamicShadows) + ( LightmapRGB + LightmapShadowMap * F(StaticLights , DynamicShadows) )
Where F is the function which calculates light contribution given the dynamic shadow map.
Light Effect:
- Baked: This is lighting that only affects things in the level layout. The player will not be lit by this. Its contribution to the lighting scene is encoded in the lightmap RGB.
- Dynamic: This only affects the Player Character. The dynamic lights will light all geometry without regard for baked shadow maps. They still however, respect the dynamically generated shadowmap.
- Static: This is lighting that is both baked and dynamic. The most “expensive” of the light types. Static lights are those that don’t move. This provides the opportunity to bake in the shadow contribution of that light into the lightmap. Multiple static lights will mix together in this baked-shadow map. No RGB contribution from the light will go into the lightmap when rendering lightmaps. During run-time, the game will calculate the RGB color of the static light and then only apply it in areas that are uncovered by the baked-shadow map. Characters and placeable props are fully lit by the static lights.
- Animated: Animated lights are those that don’t move about, but do have animation properties on their light intensity. These lights are baked into the shadow map.
Light Type:
- Point: The light originates from a spot. “Light Size” corresponds to the size of the object casting off light. “Num Samples” is the number of shadow render passes – the higher the number the “crisper” the shadows.
- Ambient: This is ever-present light that affects everything. Ambient lights affect an entire level, even when there are multiple rooms. You can only use one ambient light per level.
- Spot: This is directional light. To move the location of the light right click on the icon at the end of the effect. You will then see arrows that allow you to move it around.
Only dynamic lights will affect placeables placed in the design tool. So a designer chest will not be lit properly next to a chest placed in the art tool. That’s a limitation of the engine. Any object that is animated has to be placed in the designer tool (nothing placed in the art tool can ever, ever move).
Lights from different rooms only are applied if they are visible from your current room. Even an ambient light isn’t applied if the room it’s placed in isn’t visible to that room.
Character lights
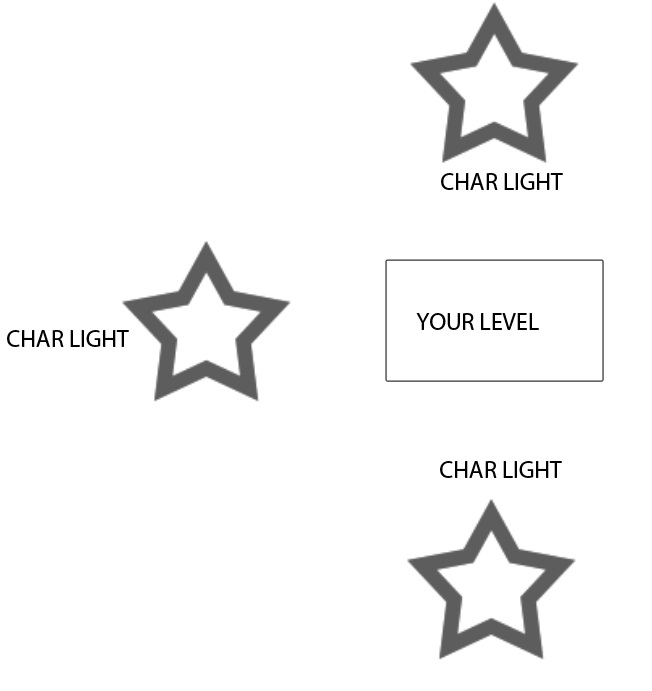
You will needed 3 character lights around your level in the circle. Like this:
Sunlight
When you are working with a terrain or exterior level, you can set the sunlight properties in the Level editor by clicking on the Exportable Area Properties button in the toolbar (next to the ![]() ).
).
Clicking on the Exportable Area Properties button will cause an Area Properties window to pop up. Scrolling down the window you will see a section titled Layout Sunlight. In this section Color controls the color of the sunlight and Color Multiplier controls the brightness.
The direction of the sunlight can be set by either typing values into the Direction field, or by clicking the Set Sunlight button in the Exportable Area Properties window and moving the red arrow surrounded by a blue circle that will appear in the bottom left hand corner of your screen. The arrow is pointing in the sunlight direction.
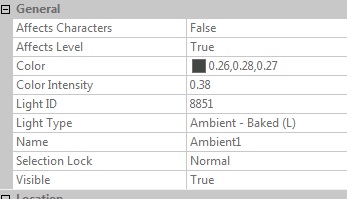
The default shadows cast by sunlight are pitch black and very dark. If you do not like this default, you can change the color of the shadows by adding an Ambient - Baked light source that has the color you desire for your shadows. The default light color (grey - 0.50, 0.50. 0.50) works well, but you may change it to whatever you like.
Light probes
Light probes are used to generate the appearance of nearby reflective surfaces and the illuminance values for characters. A light probe consists of an imaginary sphere that is textured with a pre-rendered view of its surroundings in every direction; reflective objects will use the texture of the nearest light probe to produce an approximation of what a reflection should look like. Light probes are particularly important where water planes are used.
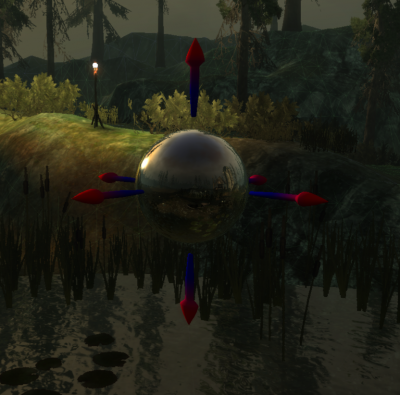
The following example shows a light probe with the reflection texture rendered onto it (to make the light probe's texture visible you need to have "view models fully lit" turned off and "display light maps" turned on). The water below the light probe is using the probe's texture to determine its reflection.
If you make any changes to the level that would make a visible difference to what a light probe "sees" you'll have to re-render the light probes to update the reflection texture. This command is under the menu "Tools -> Render -> Render light probes", or you can click the toolbar button ![]()
Light probes show up as a sphere with arrows pointing in each +/- axis direction. The only editable property that is unique is the High LOD Model Radius.
High LOD Model Radius: This is a setting that will flip all the models within this radius (in meters) of the light probe to high LOD before rendering it. It is only really useful in outdoor levels as indoors everything defaults to high Level Of Detail.
The tool for rendering light probes will render all the light probes within the current level. First what it does is switch the editor lighting to look exactly like it does in the game. Then it renders the light probes. Be patient, this can take a moment or two.
In general, you should render lightmaps first before rendering light probes because otherwise, the probes would not reflect the final in-game lightmapped appearance of the level.
Once the light probes have been rendered they will be packaged up with the level.
Delete all the lightmap files
My Documents\\\\BioWare\\\\Dragon Age\\\\Toolset\\\\LvlWorkspace\\\\lightmaps\\\\LAYOUT
My Documents\\\\BioWare\\\\Dragon Age\\\\Toolset\\\\ProbeLightMaps\\\\LAYOUT
My Documents\\\\BioWare\\\\Dragon Age\\\\Toolset\\\\resourcepostintermediatewin32\\\\processed\\\\addins\\\\MODULE\\\\layouts\\\\win32\\\\layouts\\\\LAYOUT
My Documents\\\\BioWare\\\\Dragon Age\\\\Toolset\\\\resourcepostintermediatewin32\\\\processed\\\\addins\\\\MODULE\\\\layouts\\\\win32\\\\modelhierarchies\\\\LAYOUT
My Documents\\\\BioWare\\\\Dragon Age\\\\Toolset\\\\resourcepostintermediatewin32\\\\processed\\\\addins\\\\MODULE\\\\layouts\\\\win32\\\\textures\\\\dds\\\\LAYOUT
(path of your level file)\\\\LAYOUT.erf
(path of your level file)\\\\LAYOUT.bak.erf
C:\\\\DOCUME~1\\\\Mike\\\\LOCALS~1\\\\Temp\\\\DALightmap\\\\LAYOUT (you can use Run... and type %TEMP% and hit OK)
(if you have posted to local) My Documents\\\\BioWare\\\\Dragon Age\\\\addins\\\\MODULE\\\\core\\\\override\\\\toolsetexport\\\\LAYOUT
Advanced lighting
You can add light by right click > insert > new Light. I will take the settings of the light from DAO levels.
For any level first light you need to add is always ambient.
1) Ambient light. This type of light is the general one- the main light of your level, it gives the color for your shadows.
2) Character lights. For all characters in the area you need 3 of them in each level.
Not finished. Don't touch it.
Room-based lights
Each light placed in a room-based level is automatically attached to the parent room during export. This ensures that only those lights that are under a room affect the geometry in that room.
To specify lights in other rooms that can affect the selected room, the artist can bring up the Room Properties dialog and add references to additional lights in adjacent rooms.
Lighting is very much a matter of taste, so there isn't necessarily a right way to do it. One rule-of-thumb approach is
- Use one set of lights for characters (only). Use the remaining lights for the level (only).
- For characters, place 3-4 static lights in a circle outside all of the rooms, to ensure that faces are never in darkness. Normally, you only need one set of these lights for the entire level.
- Adjust the ambient light until the level looks roughly right. This can't be done dynamically - you have to go through the slow process of light rendering iteratively, so you might want to start with a very small test level.
- If necessary, add baked lights to flood large areas.
- Add static lights for features (e.g. fires). Once these lights have been rendered, you can fine-tune them in the toolset dynamically.
Bloom and Other Effects
Bloom is activated the same way any other effect is activated. In order to activate the Bloom effect:
- Interiors:
- Select the interior AREA you want it to be applied to.
- Under the Effect section, modify the Buffer Effect Name text field to “da_bloom”.
- Exteriors:
- Select the exterior area you want to apply the effect to and bring up it's Exportable Area Properties.
- Under the Effect section, modify the Buffer Effect Name text field to “da_bloom”.
If you do not immediately see bloom effects take place, you might have visualization off, be sure to have it on to preview your bloom
Light mapping
If the filename of your level file is <filename>.lvl, then the editor saves a <filename>.erf file in the same directory as <filename.lvl>. This ERF file contains the last set of lightmaps that the editor obtained from the lightmapper. When you share the LVL file with other artists you should also include the ERF so that the other artists can use your rendered lightmaps without having to render lightmaps themselves.
Under the "options" menu for the level editor are the following three settings. These are what they should be in a default installation:
- Lightmapper Command
- $(TOOLSET)\lightmapper\EclipseRay.exe LightMapper.py --terse -cpus=2
- Lightmapper Command Working Folder
- $(TOOLSET)\lightmapper\
- Lightmapper Texture Folder
- $(TEMP)\DALightmap\
- Note: There appears to be a bug with the 64-bit version of ActiveState Python 2.5 for Windows that prevents the lightmapper from functioning. Install the 32-bit version as described in the lightmapper section of the installation instructions. If you don't have Python installed you'll receive a standard Windows error message indicating that "EclipseRay.exe has stopped working."


