Follower tutorial/ru
| Инструкция по добавлению спутников |
| Начало / Русская DA Builder Wiki / Поделиться ВКонтакте
|
Эта инструкция покажет вам, как создать спутника и присоединить его к отряду.
Contents
- 1 Простой способ создания спутника
- 2 Создание спутника для продвинутых
- 3 Common Follower Problems & FAQ
- 3.1 Why don't my followers gain XP?
- 3.2 When I choose followers from the Party Picker, they spawn into the area but do not join.
- 3.3 My followers don't have skill trees!
- 3.4 My followers don't have a class
- 3.5 Dog talents don't work
- 3.6 Isn't there an easier way to do this?
- 3.7 What if there are more than three potential followers?
Простой способ создания спутника
Простой способ создания спутника обеспечит нам:
- автолевел по дефолтным установкам;
- возможность его выбора в локации выбора персов, далее именуемом ЛВП (party picker);
- получение спутником очков опыта.
Этот урок покажет вам, как создать спутника особенно не напрягаясь, с лёгким уровнем знаний тулсета и основ написания скриптов.
Применяйте этот способ только в том случае, если вы уверены, что во время приёма персонажа, ваша активная партия не будет полностью укомплектована (ГГ и 3 спутника).
Возможность приёма в партию более трёх спутников имеется, однако вначале всё же надо выучить основы, так как в случае приёма более трёх спутников в активную партию могут возникнуть проблемы.
Создание существа
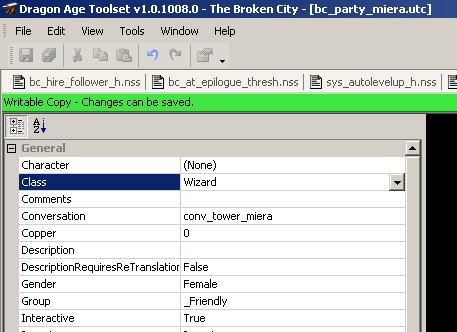
Создайте существо, который вскоре станет вашим спутником. Укажите имя, расу, пол, морф головы, диалог, инвентарь и т.д. на своё усмотрение.
Задайте Тэг существа, что-то наподобие "party_charname".
Убедитесь, что вы указали Класс. Основные классы – Rogue, Warrior и Wizard.
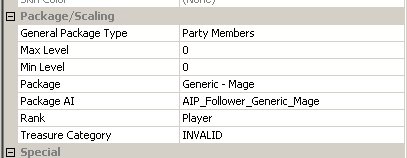
General Package Type укажите как Party Members
Package зависит от класса, в нашем случае "Generic - Wizard"
Package AI (тут только один вариант)
Rank укажите как Player
Всё, сохраняем и экспортируем.
Расширение локации выбора персов
В официальной компании локация выбора персов имеет специальную локацию, именуемую «char_stage». Так как вы расширяете основную компанию, либо пишете новую, нужно создать подобную же сцену с местом для вашего спутника и обеспечить возможность использования в игре обоих сцен.
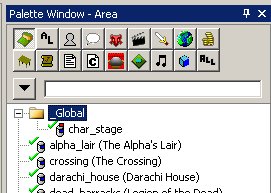
In your resource palette, right-click char_stage under the Global folder and select Duplicate to make a copy of the stage with a new resource name, e.g. my_char_stage. In the resource properties, ensure that both Module and Owner Module are set to your module, and the folder of your choice.
На панели ресурсов в отделе Area найдите локацию «char_stage», это и есть локация выбора персов. Сделайте её дубликат, указав новое имя, например «my_char_stage». В свойствах ресурса в полях Module and Owner Module укажите ваш модуль и папку, в которой хотите поместить дубликат.
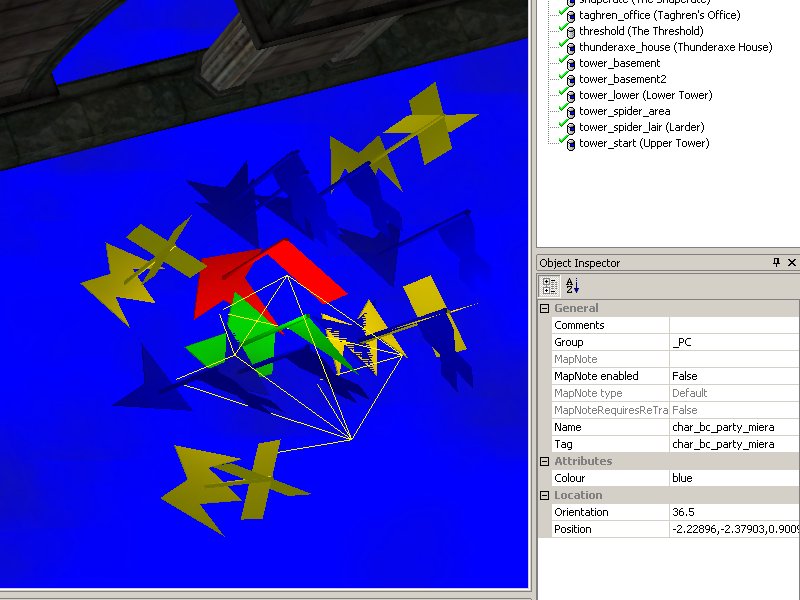
Откройте новый ресурс и разместите точку появления (waypoint) вашего спутника. Тэг этой точки должен начинаться с префикса "char_", после которого вы указываете Тэг вашего спутника. Смотрим скрин и повторяем.
В данном случае тэг моего спутника «bc_party_miera», а точка появления «char_bc_party_miera». Для отдельной компании можете устанавливать точки появления как вам угодно. Если же вы делаете расширение основной компании обязательно учитывайте расположение основных спутников ГГ, а также спутников, появляющихся в сторонних модах.
- Если честно, то не в курсе, как эта схема работает со сторонними модами - kelamor
Расположение спутников из сторонних модов, а также их тэги можно посмотреть по адресу Спутники из сторонних модов (en).
Всё, сохраняем и экспортируем.
Нижеследующее добавляем в скрипт вашего модуля:
case EVENT_TYPE_MODULE_GETCHARSTAGE:
{
   // Overlay the existing stage with my stage
   // "my_char_stage" is the resource name of the overlay area
   // "partypicker" is the name of the default GDA
   SetPartyPickerStage("my_char_stage", "partypicker");
   break;
}
Комментарии скрипта на русском:
  // Применение расширенной локации выбора персов
  // "my_char_stage" имя расширенной локации выбора персов
  // "partypicker" название дефолтного GDA-файла
Создание m2DA-файлов для PartyPicker'a
Нам необходимо создать таблицу с двумя листами, можно создать две отдельные таблицы.
- Я использовал Microsoft Office, так как в нём нет проблем с компиляцией в GDA-файл. Использование Open Office грозит какими-то проблемами, при желании можете поюзать поиск. Автор ссылается на то, что можно использовать GDApp, но вроде как тяжко это - kelamor
Название первого листа должно начинаться с «partypicker_», суффикс укажите соответственно вашему модулю, в моём случае это «fofbc».
Ниже приведён пример таблицы:
ID должен быть уникальным и не совпадать с основными спутниками и спутниками сторонних модов, как минимум это 12 и выше. В столбце Label укажите имя спутника, которого вы хотите видеть в локации выбора. Столбец Tag должна содержать тэг спутника.
Другие значения определяют поведение спутника при найме/отмене найма спутника. Оставьте всё как есть, если вы не в курсе, какие значения указать.
ПРИМЕЧАНИЕ - АНИМАЦИЯ ВЫБОРА
Изменение анимации производится путём указания ID анимации, который вы можете найти в файле anim_base.gda.
Не все анимации из указанного файла будут работать, так как некоторые требуют специальных условий. Вот несколько анимаций, которые вы можете использовать:
819 - talk cursing
629 - reading a book (doesn't work, since it probably requires a book object)
844 - hands behind back (848 and 849 are Enter and Exit versions respectfully)
850 - chest pounding salute
811 - fist pounding
277 - dance
247 - cast area spell
500 - vfx cast
600 - surprised
603 - praying
607 - head bow
609 - standing at attention
651,652 - crouch pray (Enter and exit)
808 - point forward
825 - nodding
840 - hand chop or frustration
905,906 - crouch (Enter, Exit)
919,920 - sit on ground (enter, exit)
965 - kneel down loop
972 - wipe nose
976,977 - squat (Enter, Exit)
986 - wipe eyes
998,999 - hands clasped (Enter, exit)
3029 - inspect nails
3031,3032 - playful (enter, exit)
3054,3056 - slouch (enter, exit) 255 - in-place fly
ПРИМЕЧАНИЕ - ВИЗУАЛЬНЫЕ ЭФФЕКТЫ ВЫБОРА
Столбец VFX содержит ID визуальных эффектов, содержащиеся в файле «vFx_base.gda». Здесь всё посложнее, так как ID в «vFx_base.gda» ссылается на значение «BlendTree» в нём же. Найдите ID эффекта и посмотрите столбец «BlendTreeName» (12 столбец) и введите оба значение в соответствующие столбцы вашего спутника в нашей таблице.
Вот некоторые:
ID --- BLENDTREENAME --- EFFECT
6039 --- fxm_energy_up_p --- Lady of the Forest pillar of light
6040 --- fxm_power_in_p --- Branka - power in
3054 --- fxc_lotf_c --- Lady of the Forest - swirling leaves
3009 --- fxc_succubus_c --- Succubus crust
1549 --- fxa_hly_imp_c --- Holy Impact crust
1076 --- fxa_spi_aur_mht_c --- Spirit - Aura Might crust
Второй лист именуется «party_picker_» с тем же суффиксом. Отредактируйте столбцы как указано ниже.
ID и Тэг должны совпадать с указанными в первом листе. Третий столбец оставьте как есть.
Теперь скомпилируйте вашу таблицу. Для этого:
- скопируйте файл ExcelProcessor.exe из папки Папка установки Dragon Age\tools\ResourceBuild\Processors (или где вы установили игру);
- перетащите файл таблицы (надеюсь нигде не использовали кириллицу?) на ExcelProcessor. Если всё нормально то в той же папке должны появиться два GDA-файла;
- поместите оба файла в папку вашего модуля, обычно это \Documents\Bioware\Dragon Age\AddIns\yourModule\module\override\toolsetexport вашего модуля.
- В принципе у меня работает и в основной папке packages\override и в папке core\override модуля - kelamor
Создание и назначение основного скрипта модуля
Для того, чтобы при выборе спутника в локации выбора он добавился в партию, необходимо обработать событие EVENT_TYPE_PARTYMEMBER_ADDED в скрипте вашего модуля. Создайте скрипт и назначьте его основным скриптом для вашего модуля (смотри после текста скрипта).
Полный текст скрипта, с учётом описанного ранее события EVENT_TYPE_MODULE_GETCHARSTAGE:
#include "utility_h"

void main()
{
    event ev = GetCurrentEvent();
    int nEventType = GetEventType(ev);
    switch(nEventType)
    {

         case EVENT_TYPE_MODULE_GETCHARSTAGE:
        {
        // Overlay the existing stage with my stage
        // "my_char_stage" is the resource name of the overlay area
        // "partypicker" is the name of the default GDA
        SetPartyPickerStage("my_char_stage", "partypicker");
        break;
        }

        case EVENT_TYPE_PARTYMEMBER_ADDED:
        {
            object oFollower = GetEventObject(ev, 0);
            SetLocalInt(oFollower, CREATURE_REWARD_FLAGS, 0);  //Allows the follower to gain XP
            AddCommand(oFollower, CommandJumpToLocation(GetLocation(GetHero())));   //Ensures follower appears at PC's location.
            SetFollowerState(oFollower, FOLLOWER_STATE_ACTIVE);  //Adds follower to the active party
            break;
        }

    }
}
С русскими комментами:
#include "utility_h"

void main()
{
    event ev = GetCurrentEvent();
    int nEventType = GetEventType(ev);
    switch(nEventType)
    {

         case EVENT_TYPE_MODULE_GETCHARSTAGE:
        {
        // Применение расширенной локации выбора персов
        // "my_char_stage" имя созданной вами локации выбора персов
        // "partypicker" название дефолтного GDA-файла
        SetPartyPickerStage("my_char_stage", "partypicker");
        break;
        }

        case EVENT_TYPE_PARTYMEMBER_ADDED:
        {
            object oFollower = GetEventObject(ev, 0);
            SetLocalInt(oFollower, CREATURE_REWARD_FLAGS, 0);  //Позволяет спутнику получать экспу
            AddCommand(oFollower, CommandJumpToLocation(GetLocation(GetHero())));   //Обеспечивает появление спутника в локации, в которой находится ГГ
            SetFollowerState(oFollower, FOLLOWER_STATE_ACTIVE);  //Добавляет спутника в активную партию
            break;
        }

    }
}
SetLocalInt(oFollower, CREATURE_REWARD_FLAGS, 0) фикс бага, который не позволял спутнику получать экспу. Если вашему спутнику экспа не нужна - можно закомментить.
Обратите внимание, что вам не нужно перехватывать соответствующее событие для члена партии, PartyPicker успешно сделает всё сам.
Сохраните скрипт и экспортируйте его.
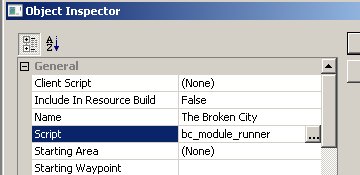
Теперь необходимо назначить скрипт для вашего модуля. Если вы не знаете, как это сделать, то в меню File выберите Manage Modules, далее выберите ваш модуль и нажмите Properties. Далее смотрите по скрину:
Назначить основным для вашего модуля можно любой скрипт, который вы создаёте. Смотрите Scripting tutorial/ru и Character generation для получения большей информации. Данная возможность используется, если вы хотите, чтобы ваш модуль реагировал и обрабатывал события, происходящие в игре.
Создание скрипта найма и завершение первой части работы
Итак, у нас почти всё готово, чтобы нанять нашего нового спутника :)
Создайте скрипт, обрабатывающий процедуру найма спутника (наиболее удобный и логичный способ запустить его - диалог). Скрипт достаточно прост:
#include "utility_h"

void main() {

        object oFollower = GetObjectByTag("bc_party_miera"); //Use CreateObject() if the creature isn't present in the module yet

        UT_HireFollower(oFollower);   //Hires the follower

        SetPartyPickerGUIStatus(2);

        ShowPartyPickerGUI();  //Shows the Party Picker; necessary for the follower to gain XP

}
С русскими комментами:
#include "utility_h"

void main() {

        object oFollower = GetObjectByTag("bc_party_miera"); //Используйте CreateObject() если спутника нет рядом с ГГ

        UT_HireFollower(oFollower);   //Нанимаем спутника

        SetPartyPickerGUIStatus(2);

        ShowPartyPickerGUI();  //Вызываем PartyPicker (необходимо для того, чтобы спутник получал экспу)

}
Убедитесь, что вы указали тэг вашего спутника :)
Этот скрипт вызывает PartyPicker после найма спутника. Это необходимо, если вы хотите, чтобы нанятый спутник получал экспу. Вы не можете поместить описанный ранее код, фиксящий баг с экспой, в этот скрипт, так как он должен исполняться после вызова PartyPicker'a (этот баг плавает где-то в скрипте player_core, который выполняется после этого скрипта).
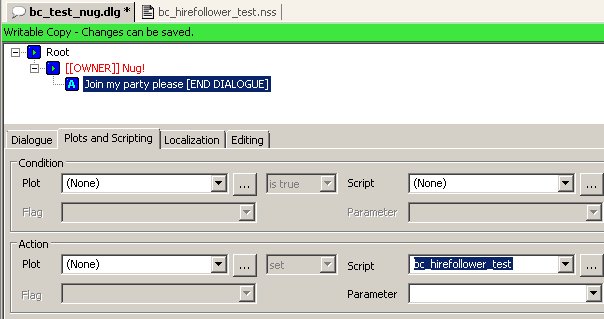
Итак, как и говорилось ранее, наиболее удобный и логичный способ вызвать скрипт найма - диалог, для чего выбранной линии в диалоге необходимо назначить действие, а именно - вызов нашего скрипта. Если вы не знаете, как сделать это, то смотрите скрин и следуйте дальнейшим инструкциям:
Создайте диалог, выберите линию, для который вы хотите назначить действие, выберите закладку Plots and Scripting. В секции Action нажмите кнопку выбора и укажите созданный вами скрипт.
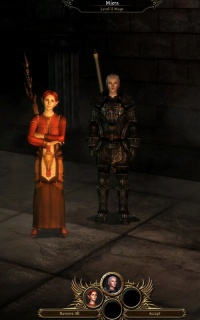
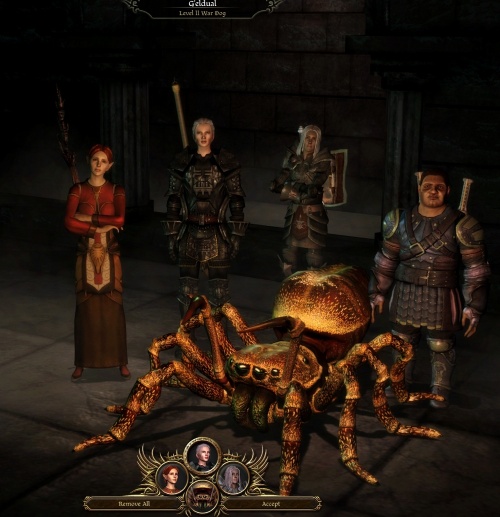
Если вы сделали всё правильно, то в игре, после соответствующего диалога, вы увидите следующее:
- Конечно если я всё правильно перевёл... Хотя у меня всё работает :) - kelamor
Создание спутника для продвинутых
В отличие от предыдущего способа, следуя нижеприведенным указаниям вы получите:
- автолевел по уникальному шаблону;
- выбор класса и специализации посредством скрипта;
- выбор начального статуса спутника (в активной партии или нет);
- возможность указания стартового и минимального уровней спутника;
- задание очков специализации;
- возможность установки флагов в Plot-файле при найме.
Подготовка ресурсов
Создайте сущность, локацию выбора персов и m2DA-файлы как указано в предыдущем уроке.
Создание Plot-файла
- Plot-файл, файл, в котором с использованием флагов(True/False) хранится информация о текущем состоянии заданий, квестов, отношений и т.п. Я его называю файл-схема - kelamor
Использование файл-схем не обязательно, но очень удобно. В данном случае мы будем сохранять в файл-схеме информацию о том, находится ли наш спутник в активной партии или в лагере. Это позволит сделать диалоги более интерактивными, а также позволит регулировать некоторые аспекты игры, например появление на рынке Денерима конкретного NPC только в случае наличии в активной партии нашего нового спутника.
Создайте файл-схему (Plot) с подходящими флагами. Не надо что-либо вводить в поле текста журнала:
PARTY_MIERA_IN_PARTY - флаг, указывающий находится ли наш спутник в активной партии PARTY_MIERA_JOINED - флаг, указывающий вступил ли спутник в наш отряд
Смотрите FAQ для получения информации об альтернативных способах в случае наличия в партии более трёх потенциальных спутников.
Изменения в скрипт модуля, связанные с применениям файл-схемы
Измените скрипт вашего модуля, чтобы дать ему возможность использовать файл-схему:
#include "utility_h"
#include "wrappers_h"
#include "plt_bc_create_party"   //make sure you include your own plot, not mine

void main()
{
    event ev = GetCurrentEvent();
    int nEventType = GetEventType(ev);
    switch(nEventType)
    {

        case EVENT_TYPE_MODULE_GETCHARSTAGE:
        {
        // Overlay the existing stage with my stage
        // "my_char_stage" is the resource name of the overlay area
        // "partypicker" is the name of the default GDA
        SetPartyPickerStage("my_char_stage", "partypicker");
        break;
        }

        case EVENT_TYPE_PARTYMEMBER_ADDED:
        {
            object oFollower = GetEventObject(ev, 0);
            SetLocalInt(oFollower, CREATURE_REWARD_FLAGS, 0);
            SetFollowerState(oFollower, FOLLOWER_STATE_ACTIVE);

            AddCommand(oFollower, CommandJumpToLocation(GetLocation(GetHero())));   //Ensures follower appears at PC's location.

            if (GetTag(oFollower) == "bc_party_miera") {               //You must explicitly test for your follower's tag.
                WR_SetPlotFlag(PLT_BC_CREATE_PARTY, PARTY_MIERA_IN_PARTY, TRUE);     //Make sure you use your own flags!
            }

            break;
        }

        case EVENT_TYPE_PARTYMEMBER_DROPPED:
        {
              object oFollower = GetEventObject(ev, 0);

              if (GetTag(oFollower) == "bc_party_miera") {
                WR_SetPlotFlag(PLT_BC_CREATE_PARTY, PARTY_MIERA_IN_PARTY, FALSE);     //As above, but set false.
              }

        }

    }
}
С русскими комментами:
#include "utility_h"
#include "wrappers_h"
#include "plt_bc_create_party"   //Убедитесь, что указан ваш файл-схема. Префикс "plt_" обязателен и указывает игре, что это файл схема (Plot-файл)

void main()
{
    event ev = GetCurrentEvent();
    int nEventType = GetEventType(ev);
    switch(nEventType)
    {

        case EVENT_TYPE_MODULE_GETCHARSTAGE:
        {
        // Применение расширенной локации выбора персов
        // "my_char_stage" имя созданной вами локации выбора персов
        // "partypicker" название дефолтного GDA-файла
        SetPartyPickerStage("my_char_stage", "partypicker");
        break;
        }

        case EVENT_TYPE_PARTYMEMBER_ADDED:
        {
            object oFollower = GetEventObject(ev, 0);
            SetLocalInt(oFollower, CREATURE_REWARD_FLAGS, 0);
            SetFollowerState(oFollower, FOLLOWER_STATE_ACTIVE);

            AddCommand(oFollower, CommandJumpToLocation(GetLocation(GetHero())));   //Обеспечивает появление спутника в локации, в которой находится ГГ

            if (GetTag(oFollower) == "bc_party_miera") {               //Проверяет по тэгу, рядом ли новый спутник
                WR_SetPlotFlag(PLT_BC_CREATE_PARTY, PARTY_MIERA_IN_PARTY, TRUE);     //Если спутник рядом, то устанавливаем флаг. Убедитесь, что вы указали свои значения!
            }

            break;
        }

        case EVENT_TYPE_PARTYMEMBER_DROPPED:
        {
              object oFollower = GetEventObject(ev, 0);

              if (GetTag(oFollower) == "bc_party_miera") {
                WR_SetPlotFlag(PLT_BC_CREATE_PARTY, PARTY_MIERA_IN_PARTY, FALSE);     //Если не берём спутника в партию, то сбрасываем флаг.
              }

        }

    }
}
Создание шаблона автолевела
Вы можете пропустить этот шаг, если вы будете использовать только дефолтные шаблоны разбойника, мага или воина, но я не рекомендую это. Лучше сделайте свой шаблон и подгоните его под свои нужды, так как дефолтные расходуют очки, по правде говоря, коряво.
Идите в папку «Папка установки Dragon Age\tools\Source\2DA». Здесь вы найдёте файлы типа ALCharacter.xls (такие как ALAlistair.xls, ALLeliana.xls, ALRogue_Default.xls и т.д.). Это и есть шаблоны автолевела.
Откройте шаблон наиболее близкого для вашего спутника характера, например Морриган или Винн для мага, Лелиана или Зевран для разбойника и т.д. Сохраните копию этого файла как ALYourcharacter.xls в той директории, где вы ранее проводили компиляцию в GDA-файл. Не забудьте переименовать файл (в моём случае это ALMiera.xls с листом, поименованным также ALMiera).
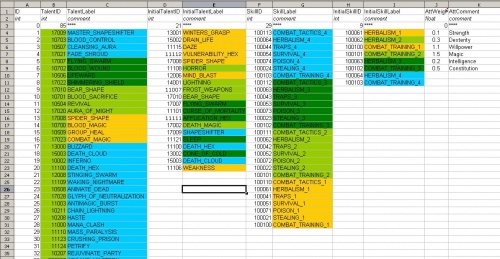
Вы увидите следующую картинку:
В столбцах B и C перечислены умения/заклинания, доступные для этого персонажа. Не изменяйте их.
В столбцах F и G перечислены таланты, доступные для этого персонажа. Не изменяйте их.
Оставшиеся столбцы мы можем поредактировать:
- Я так думаю, что всё же изменять столбцы B, C, F, G можно, главное не напартачить - kelamor
Порядок распределения очков по характеристикам
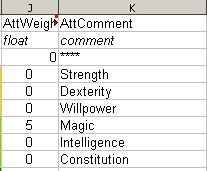
Столбец J определяет, как примерно при автоповышении уровня будут повышаться характеристики персонажа. Так, если Ловкость (Dexterity) установлена в 1.5, а Интеллект (Intelligence) в 1, то в игре на каждые 2 очка Хитрости (Cunning), вы увидите 3 очка Ловкости (обратите внимание, что «Интеллект» в тулсете, это та же самая «Хитрость» в игре).
Отредактируйте столбец J по вашему разумению. Мы же делаем волшебника, и в данном случае, если у вас включено автоповышение уровня, у вас будет расти только магия:
Georg Zoeller, который из Биоварей, по этому поводу пишет, «Данное значение определяет весомость каждой характеристики. Значение 1.0 повышает характеристику на 1 пункт на уровень, 0.5 – на 1 пункт на два уровня, и т.д.
В базовых шаблонах имеется ещё столбец L, называемый «AttInit.», правда изменение его значений не влияет на спутников, использующих эти шаблоны.
Приоритеты по умениям/заклинаниям
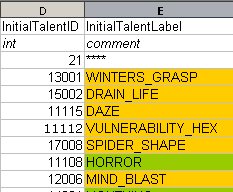
Столбцы D и E, это умения/заклинания, которые приобретает персонаж при повышении уровня, начиная сверху вниз.
Столбцы H и I, это таланты персонажа, которые приобретаются им по тому же принципу что и умения/заклинания.
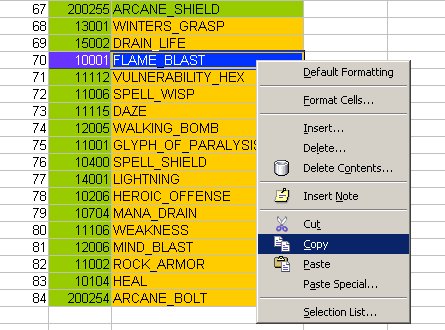
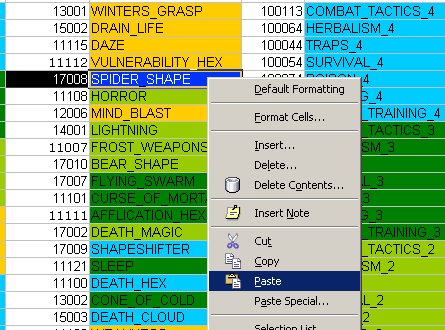
Изменения вносятся тупо, копипастом, то есть из столбца, где указаны нужные нам умения/заклинания/таланты, которые доступны данному персу, копируем ячейки, содержащие ID и само название умения/заклинания/таланта, и вставляем в столбец назначения. Таким образом мы формируем столбцы D и E, H и I.
Смотрим по нижеприведённым скринам:
Среди доступных заклинаний находим Flame Blast и копируем обе ячейки (B и C).
Теперь в столбцах D и E выбираем ячейки, которые надо заменить и заменяем их.
Таким образом сформируйте список приоритетов по вашему желанию. Приоритетных умения/заклинаний/талантов должно быть не меньше чем у персонажа, шаблон которого вы скопировали, так как в случае, если их не будет хватать, очки опыта будут тупо теряться.
Отнеситесь к этому шагу ответственно, не забывайте о том, если в правом столбце вы пропишете способность специализации, которой не будет у вашего перса, она (способность) всё-равно будет добавлена, что не есть айс.
M2DA-файлы
Игре надо помочь найти ваши шаблоны, а для этого нам надо расширить M2DA_base.gda.
Создайте таблицу MS Excel. Название таблицы и листа на ней сделайте таким - M2DA_base_ваш суффикс.
- Я в качестве суффикса всегда выбираю аббревиатуру своего мода - kelamor
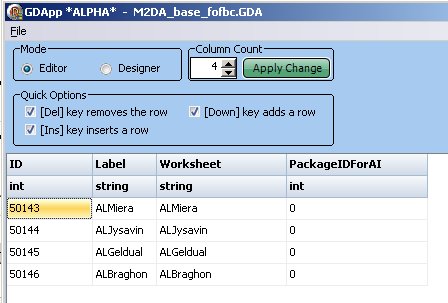
Создайте столбцы и поля в соответствии со скрином и вашими потребностями:
Этот GDA-файл является расширением 2DA_base. Столбец Worksheet – название созданного нами ранее шаблона.
Не забывайте про то, что ID должен быть уникальным.
PackageIDForAI оставьте равным 0, так как для спутника он бесполезен.
Когда закончите, скомпилируйте описанным ранее способом обе таблицы и поместите появившиеся на выходе файлы GDA в папку «module/override» вашего модуля.
РАБОТА АВТОЛЕВЕЛА ПОСЛЕ ТОГО, КАК СПУТНИК ПРИЗВАН В ПАРТИЮ:
Откройте файл packages.xls. В этом файле есть столбец LevelupTable, посредством которого и происходит связь с шаблоном автолевела после призыва. Например строка Лелианы под номером 81. Столбец LevelupTable в этой строке имеет значение 258. Если теперь проверить файл 2DA_base, то вы увидите, что строка 258 указывает на шаблон Лелианы (ALLeliana) (в принципе можно покопать и packages_base.gda).
Новая подключаемая функция системы найма персов
В случае использования стандартной функции можно поиметь много проблем, например нет дерева навыков и т.п. Поэтому я написал нижеприведённый инклюд.
Создайте новый скрипт. Я назвал его hireCustomFollower_h.
#include "sys_chargen_h"
#include "wrappers_h"
#include "utility_h"
#include "sys_rewards_h"
#include "approval_h"
#include "sys_autolevelup_h"

/*  Jye Nicolson 5-Jan-2010
This function set duplicates the full functionality chain of UT_HireFollower, with the following exceptions:

-  Followers can gain XP
-  Autolevel status can be set (default off)
-  Followers can be set to any starting state (default Available) and will still be properly initalised and added to the party pool
-  Autolevel tables for non-core followers can be explicitly set.
-  Class and Specialisation can be chosen via script
-  Followers without specialisations are granted a spec point by default.

It should only ever be called once each for characters you intend to be full followers.
Much of the protective code handling summoned creatures etc. in player_core is not present here.

Calling the function:

Simple:

hireCustomFollower(oFollower, CLASS_WARRIOR);

Change the class to CLASS_WIZARD or CLASS_ROGUE as appropriate.
This will hire your follower and make them available.
They will auto level up with a default package, and receive a free spec point.

Best Practice:

hireCustomFollower(oFollower, CLASS_WARRIOR, PLT_YOUR_PARTY_PLOT, YOUR_FOLLOWER_JOINED_FLAG, ABILITY_TALENT_HIDDEN_CHAMPION);

Where the plot and flag are those for your module (remember to create the plot and include it on the calling script), and ABILITY_TALENT_HIDDEN etc is the desired spec.

You should also have a custom ALTable set up.
See wiki for details, and remember to edit it in to GetCustomFollowerALTable below or pass it directly as an argument to hireCustomFollower.


Full argument list:

void hireCustomFollower (
        object oFollower,   //Pass your follower object, mandatory

        int nForceClass,    //Pass a Class constant here, usually CLASS_ROGUE, CLASS_WARRIOR, CLASS_WIZARD.  Mandatory due to a bug.

        string sPlot = "",   //It's recommended you have a plot flag to be set when the follower joins.  Pass the plot constant here.  Remember to #include in calling script

        int nPlotFlag = "",  //And then pass the flag constant.  Will be set to TRUE if available.

        int nForceSpec = 0,  //This is the ID of the Specialisation you want.  Note they are NOT classes, but abilities.  The full list is:
                             //ABILITY_SPELL_HIDDEN_ARCANE_WARRIOR, ABILITY_SPELL_HIDDEN_BLOODMAGE, ABILITY_SPELL_HIDDEN_SHAPESHIFTER, ABILITY_SPELL_HIDDEN_SPIRIT_HEALER
                             //ABILITY_SPELL_HIDDEN_BARD, ABILITY_TALENT_HIDDEN_ASSASSIN, ABILITY_TALENT_HIDDEN_DUELIST, ABILITY_TALENT_HIDDEN_RANGER
                             //ABILITY_TALENT_HIDDEN_BERSERKER, ABILITY_TALENT_HIDDEN_CHAMPION, ABILITY_TALENT_HIDDEN_REAVER, ABILITY_TALENT_HIDDEN_TEMPLAR
                             //I recommended forcing a spec, particularly if your ALTable includes abilities from one.

        int nALTable = 0,    //This is the ID of an ALTable from 2DA_base.GDA or your module's m2DA_base_*.GDA  I recommended the latter, but you can edit that into GetCustomFollowerALTable below rather than passing it.

        int bInvokePicker = FALSE,  //Sets whether the party picker should be opened on hiring.  I think it's cleaner to call the picker outside this script, particularly if you have multiple hires at once.

        int nInitialState = FOLLOWER_STATE_AVAILABLE,  //This sets whether the follower joins the active party or not.  Options are:
                                                       //FOLLOWER_STATE_ACTIVE (put them in the active party)
                                                       //FOLLOWER_STATE_LOCKEDACTIVE (force them into the active party and keep them there, remember to change this later.
                                                       //FOLLOWER_STATE_AVAILABLE (make them available on the party picker (if you've set it up for them), but not in the active party)
                                                       //Plus some others you're unlikely to need at this time.  Defaults to AVAILABLE because having 4+ active followers is screwy.

        string sCurrPlot = "",  //If you set FOLLOWER_STATE_ACTIVE or FOLLOWER_STATE_LOCKEDACTIVE, the script will check to see if you passed this.
                                //It is recommended that you have a plot flag set for a given follower being in the active party, this makes conversation interjection etc. much easier.

        int nCurrPlotFlag = 0,  //This flag will be set if FOLLOWER_STATE_ACTIVE or FOLLOWER_STATE_LOCKEDACTIVE are true
                                //AND sCurrPlot has a value AND nCurrPlotFlag is > 0.
                                //ie if you added someone to the active party and have a plot flag to cope with it.

        int nAutolevel = 0,     //Sets the Autolevel flag on the character sheet.  0 is off, 1 is on, 2 forces it on and removes it so the player can't turn it off.


        bFreeSpecPoint = TRUE,  //This grants a specialisation point to the follower if they do not have a specialisation.
                                //It's important to set this false for classes that do not have specs, such as CLASS_DOG.

        int nTargetLevel = 0,   //If you want a specific level, set this.  Generally not worthwhile unless you set it higher than the player, since they'll just get XP from the party picker anyway.

        int nMinLevel = 0       //Set this if there's a specific level you don't want the follower to go below.  Probably only useful if the PC might be very low level but not necessarily so.

        )
*/
/* GetCustomFollowerALTable()
This function is where you put your custom table assignments.

You should explicitly test for the tag of your follower (not mine!) and assign a value to nTable from your m2DA extension to M2DA_base

See wiki for details on how to do this, or ignore it to get the default Warrior/Rogue/Wizard AL tables.

NOTE: you MUST explicitly set a table for non-Warrior/Rogue/Wizards, eg dogs.  Use TABLE_AL_DOG for a default Mabari.
*/

int GetCustomFollowerALTable(object oFollower) {
    int nTable = _GetTableToUseForAL(oFollower);

    if (GetTag(oFollower) == "bc_party_miera") {
        nTable = 50143;
    }

    if (GetTag(oFollower) == "bc_party_jysavin") {
        nTable = 50144;
    }

    if (GetTag(oFollower) == "bc_party_geldual") {
        nTable = 50145;
    }

    if (GetTag(oFollower) == "bc_party_braghon") {
        nTable = 50146;
    }

    return nTable;
}

// This just cleans up the main function a little

int GetCustomFollowerTargetLevel(object oFollower, object oHero, int nPackage, int nMinLevel = 0) {
            int nPlayerLevel = GetLevel(oHero);
            int nTargetLevel = 0;

            if((nPlayerLevel >= 13) || (nPlayerLevel == 1) || (!_UT_GetIsPlotFollower(oFollower))) {
               nTargetLevel = nPlayerLevel;
            } else {
               nTargetLevel = nPlayerLevel + 1;
            }

            if (nMinLevel == 0) {  //If nMinLevel is not specified, checks package 2DA for a value
              nMinLevel = GetM2DAInt(TABLE_PACKAGES, "MinLevel", nPackage);
             }
            if(nMinLevel > 0 && nMinLevel > nTargetLevel) {
               nTargetLevel = nMinLevel;
            }

            return nTargetLevel;

}

// Moving this black box out :)  I don't really understand it, but it should function if you have tactics set up in a package.

void InitCustomFollowerTactics(object oFollower, int nPackage) {
         int nTableID = GetM2DAInt(TABLE_PACKAGES, "FollowerTacticsTable", nPackage);
         if (nTableID != -1)
            {
             int nRows = GetM2DARows(nTableID);
             int nMaxTactics = GetNumTactics(oFollower);

             int nTacticsEntry = 1;
             int i;
             for (i = 1; i <= nRows && nTacticsEntry <= nMaxTactics; ++i)
                {
                        int bAddEntry = FALSE;
                        int nTargetType = GetM2DAInt(nTableID, "TargetType", i);
                        int nCondition = GetM2DAInt(nTableID, "Condition", i);
                        int nCommandType = GetM2DAInt(nTableID, "Command", i);
                        int nCommandParam = GetM2DAInt(nTableID, "SubCommand", i);

                        int nUseType = GetM2DAInt(TABLE_COMMAND_TYPES, "UseType", nCommandType);
                        if (nUseType == 0)
                        {
                            bAddEntry = TRUE;
                        }
                        else
                        {
                            bAddEntry = HasAbility(oFollower, nCommandParam);
                        }

                        if (bAddEntry)
                        {
                            SetTacticEntry(oFollower, nTacticsEntry, TRUE, nTargetType, nCondition, nCommandType, nCommandParam);
                            ++nTacticsEntry;
                        }
                    }
                }
}

/* InitCustomFollowerSpec:

This function tries to set the forced Specialisation.  If there is none, it checks the package for one.

If there isn't either of those, it grants a free spec point if bFreeSpecPoint is true.

*/

void InitCustomFollowerSpec(object oFollower, int nPackage, int nForceSpec, int bFreeSpecPoint) {
    // Find specialization, and optionally add a spec point if none is found.

        if (nForceSpec == 0) {

        int nSpecAbility = GetM2DAInt(TABLE_PACKAGES, "switch1_class", nPackage); // followers can have only 1 advanced class
         if(nSpecAbility > 0)
         {
          AddAbility(oFollower, nSpecAbility);
         } else {
             if (bFreeSpecPoint) {
                 SetCreatureProperty(oFollower, 38, 1.00);
             }
         }

        } else {

             AddAbility(oFollower, nForceSpec);

        }
}

/* hireCustomFollower()  (See doco at top of page)

I strongly suggest you reorder the parameters if you're adding many followers with advanced options.

Feel free to leave them alone if you only want to set class, plot, spec or don't mind long declarations.

Note nForceClass is currently compulsory due to flakiness with GetCreatureCoreClass()
*/

void hireCustomFollower(object oFollower, int nForceClass, string sPlot = "", int nPlotFlag = 0, int nForceSpec = 0,
int nALTable = 0, int bInvokePicker = FALSE, int nInitialState = FOLLOWER_STATE_AVAILABLE, string sCurrPlot = "",
int nCurrPlotFlag = 0, int nAutolevel = 0, int bFreeSpecPoint = TRUE, int nTargetLevel = 0, int nMinLevel = 0)
{

        object oHero = GetHero();

        /* #################  BEGIN BASIC FOLLOWER JOIN BLOCK   ###################

        This loosely replicates WR_SetFollowerState.


        */

        if (nForceClass == 0) {
            nForceClass = GetCreatureCoreClass(oFollower);           //This is not working.  Hence nForceClass mandatory.
        }


        SetGroupId(oFollower, GetGroupId(oHero));      //Puts the follower in the pc's Group.
        SetEventScript(oFollower, RESOURCE_SCRIPT_PLAYER_CORE);  //This makes them act like a player.
        SetFollowerState(oFollower, nInitialState);  //This sets whether they are available, in the active party etc.

        /* #################  END BASIC FOLLOWER JOIN BLOCK ##################### */


        /* #################  BEGIN PLAYER_CORE EVENT_TYPE_PARTY_MEMBER_HIRED EMULATION #################
         This replicates the EVENT_TYPE_PARTY_MEMBER_HIRED handler from player_core, stripped down for simplicity and allowing our custom options.


        */

        Chargen_EnableTacticsPresets(oFollower);    //I assume this is important.

        SetLocalInt(oFollower, FOLLOWER_SCALED, 1);  //This should prevent the follower being rescaled by player_core or what have you

        int nPackage = GetPackage(oFollower);  //Gets the package, which will be used to find a number of 2DA IDs.
        int nPackageClass = GetM2DAInt(TABLE_PACKAGES, "StartingClass", nPackage);  //I don't think this is used, even by player_core


        // set behavior according to package
        int nBehavior = GetM2DAInt(TABLE_PACKAGES, "FollowerBehavior", nPackage);

        if(nBehavior >= 0) {
            SetAIBehavior(oFollower, nBehavior);
        }

        Chargen_InitializeCharacter(oFollower);      //We initialise the follower and choose race/class.

        Chargen_SelectRace(oFollower,GetCreatureRacialType(oFollower));
        Chargen_SelectCoreClass(oFollower,nForceClass);


         if (nTargetLevel == 0) {   //This block picks a target level if not specified

              nTargetLevel = GetCustomFollowerTargetLevel(oFollower, oHero, nPackage, nMinLevel);
         }

         int nXp = RW_GetXPNeededForLevel(Max(nTargetLevel, 1));      //Here is where the XP is calculated and rewarded
         RewardXP(oFollower, nXp, FALSE, FALSE);

         // -------------------------------------------------------------
         // add hidden approval talents - (JN: I don't know how to set these yet, but when I figure it out this should make it work)
         // -------------------------------------------------------------
         int nIndex = Approval_GetFollowerIndex(oFollower);
         Approval_AddFollowerBonusAbility(nIndex, 0);

          //Handle Specialisation
          InitCustomFollowerSpec(oFollower, nPackage, nForceSpec, bFreeSpecPoint);

         // -------------------------------------------------------------
         // This spends all available attribute and stat points on the
         // creature according to the levelup table.  (JN:  this replicates AL_DoAutoLevelUp but with our choice of table)
         // -------------------------------------------------------------

         if (nALTable == 0) {
            nALTable = GetCustomFollowerALTable(oFollower);
         }

         AL_SpendAttributePoints(oFollower, nALTable, FALSE);
         AL_SpendSkillPoints(oFollower, nALTable, TRUE);
         AL_SpendSpecializationPoints(oFollower, nALTable);
         AL_SpendTalentSpellPoints(oFollower, nALTable, TRUE);

        // -------------------------------------------------------------------------
        // Update various UIs
        // -------------------------------------------------------------------------
        Chargen_SetNumTactics(oFollower);
        SetCanLevelUp(oFollower,Chargen_HasPointsToSpend(oFollower));

        // load tactics
         InitCustomFollowerTactics(oFollower, nPackage);

         /* #################  END PLAYER_CORE EVENT_TYPE_PARTY_MEMBER_HIRED EMULATION ################# */


         SetAutoLevelUp(oFollower, nAutolevel);         //This is the autolevel flag on the character sheet.

         //Set plot flags

         if (!((sPlot == "") || (nPlotFlag == 0))) {           //Joined Party
            WR_SetPlotFlag(sPlot, nPlotFlag, TRUE);
         }

         if ((nInitialState == FOLLOWER_STATE_ACTIVE) || (nInitialState == FOLLOWER_STATE_LOCKEDACTIVE)) {
            if (!((sCurrPlot == "") || (nCurrPlotFlag == 0))) {
                WR_SetPlotFlag(sCurrPlot, nCurrPlotFlag, TRUE);   //Currently in Party
            }
         }

        // Invoke picker if requested.

        if (bInvokePicker) {
             SetPartyPickerGUIStatus(2);
             ShowPartyPickerGUI();
        }
}
Да, я конечно понимаю, что это «много букав», но всё же он работает.
- Я проверил - kelamor
При необходимости вы можете подкорректировать этот скрипт под ваши нужды.
Функция GetCustomFollowerALTable()
В приведённом выше скрипте, вам необходимо изменить функцию GetCustomFollowerALTable().
Эта функция определяет ID шаблона автолевела в M2DA_base.
Найдите эту функцию в скрипте и введите ваши данные, точнее данные спутника:
Сохраните и экспортируйте. Игнорируйте сообщение об ошибке об отсутствии главной функции (void main()).
- Я эту функцию (void main()) прописываю, компилирую, если всё нормально, то комментирую её и потом экспортирую скрипт - kelamor
Новый скрипт найма перса и завершение второй части
Старый скрипт вызывал функцию UT_HireFollower(), переделаем его:
#include "plt_bc_create_party"   //Make sure you include your party handling plot
#include "hireCustomFollower_h"  // And include the function script - which will in turn include a bunch of stuff

void main() {

                    //Initialising my objects, not super-relevant to the example

                    object oHero = GetHero();
                    object oMiera = CreateObject(OBJECT_TYPE_CREATURE, R"bc_party_miera.utc", GetLocation(oHero));
                    object oJysavin = CreateObject(OBJECT_TYPE_CREATURE, R"bc_party_jysavin.utc", GetLocation(oHero));
                    object oBraghon = CreateObject(OBJECT_TYPE_CREATURE, R"bc_party_braghon.utc", GetLocation(oHero));
                    object oSpider = CreateObject(OBJECT_TYPE_CREATURE, R"bc_party_geldual.utc", GetLocation(oHero));

                    //Simplest hire call - adds to the party as a wizard.  Class is currently compulsory due to a bug.
                    hireCustomFollower(oMiera, CLASS_WIZARD);

                    //Add to the party and set joining plot flags
                    hireCustomFollower(oJysavin, CLASS_WARRIOR, PLT_BC_CREATE_PARTY, PARTY_JYSAVIN_JOINED);

                    //Add to the party, set plot flags, force a specialisation
                    hireCustomFollower(oBraghon, CLASS_ROGUE, PLT_BC_CREATE_PARTY, PARTY_BRAGHON_JOINED, ABILITY_TALENT_HIDDEN_ASSASSIN);

                    //More complex example - Follower added as a unique class (Dog), not granted a specialisation or spec point.
                    //Note unique classes must have an ALTable passed here or specified in GetCustomFollowerALTable() or they won't work
                    hireCustomFollower(oSpider, CLASS_DOG, PLT_BC_CREATE_PARTY, PARTY_GELDUAL_JOINED, 0, 0, FALSE, FOLLOWER_STATE_AVAILABLE, "", 0, 0, FALSE);

                    //Show the party picker to let the player choose from their new companions!
                    SetPartyPickerGUIStatus(2);
                    ShowPartyPickerGUI();
}
Пример показывает несколько простых способов вызова hireCustomFollower(). Описание других способов смотрите в начале скрипта hireCustomFollower_h.
Например:
hireCustomFollower(oFollower, CLASS, PLOT, PLOT_FLAG, SPECIALISATION). Так вы наймёте спутника, установите флаг, что он нанят, укажете его специализацию(если она прописана в шаблоне автолевела).
hireCustomFollower(oFollower, CLASS, PLOT, PLOT_FLAG, SPECIALISATION, 0, TRUE). Так вы дополнительно укажете ID шаблона автолевела и укажете, что необходимо вызвать локацию выбора персонажей(party_picker).
Константы специализаций также указаны в начале скрипта hireCustomFollower_h.
Итак, если всё нормально, то в результате наших трудов вы увидите следующее:
Common Follower Problems & FAQ
Why don't my followers gain XP?
There is a bug in UT_HireFollower. For now the best/easiest approach to take might be to make a copy of UT_HireFollower in an include file and rename it something like UT_HireFollower_Fixed, then make the following change:
WR_SetFollowerState(oFollower, FOLLOWER_STATE_ACTIVE, TRUE, 0, TRUE);
to
WR_SetFollowerState(oFollower, FOLLOWER_STATE_ACTIVE, TRUE, 0, bPreventLevelup);
(Note: Be aware if you use the name UT_HireFollower_Fixed you may end up finding your include file conflicting with someone else who has named it the same in their include.)
Alternately you need to clear a flag in a separate script to the one in which they're hired.
You must use the SetLocalInt(oFollower, CREATURE_REWARD_FLAGS, 0); statement in a script you can be sure will run soon after your hiring script.
When I choose followers from the Party Picker, they spawn into the area but do not join.
You need to intercept the EVENT_TYPE_PARTYMEMBER_ADDED event and set the follower to FOLLOWER_STATE_ACTIVE. See Simple Follower Creation earlier in this document.
My followers don't have skill trees!
If a follower hasn't been through an initial chargen/autolevel event (via player_core/sys_autolevel_h) then the skill tree doesn't show. You're probably trying to be clever and get around UT_HireFollower without going all the way (see monster function above ^_^).
My followers don't have a class
GetCreatureCoreClass() seems flaky under some conditions. It's best to explicitly set the class yourself; this is why class is currently a mandatory argument to hireCustomFollower()
Dog talents don't work
Symptoms: dog talents appear on the talents screen but remain greyed out on level up. Warrior talents appear in the quickslots.
Line 78 of packages_base in packages.xls (Dog) should have the LevelUpTable column set to 257 which is the ALDog table.
Isn't there an easier way to do this?
Possibly. There is a way of recruiting a follower by setting a plot flag. However I don't understand it, and I expect it still doesn't allow custom autolevel templates, full control over specialisations etc. There's still a fair bit of stuff hardcoded for the core followers, I'm not sure putting a custom follower through the same process as Al, Leli et al will have good results.
The next section answers this question, up to a point.
What if there are more than three potential followers?
This example handles larger numbers of followers, and doesn't force the player to use the party picker unless the party is already full.
The prefix zzz, used throughout, can be replaced with whatever prefix you are using for your resources.
If you're making a new campaign, to keep life simple, allocate a unique number to each follower. You could either use a creature variable or a script, e.g.
// Party member id (e.g. 1=Alicia, 2=Godwin...)
int zzzPartyMemberID(object oPartyMember)
{
  string sPartyMember = GetTag(oPartyMember);

  if (sPartyMember == "zzzcr_alicia") return 1;
  if (sPartyMember == "zzzcr_godwin") return 2;
  if (sPartyMember == "zzzcr_harold") return 3;
  if (sPartyMember == "zzzcr_lara"  ) return 4;
  return 0;
}
Make two separate plots, e.g. zzzpt_hired for when a follower is first recruited, and zzzpt_party to flag whether they're currently in the party. Use flag values that correspond to the unique follower id, e.g. ZZZPT_HIRED_GODWIN will be 2.
If you're modifying the official campaign, you won't be able to make this simplification - you'll need a set of plot flags for your new party members, similar to the official ones. The logic of what follows is still correct, it just means that instead of having one set of common code that works for everyone, you have to explicitly script each party member individually using their personal plot flags.
Follower conversation is now very simple. In Godwin's dialogue, the hiring line will be conditional - when ZZZPT_HIRED_GODWIN is clear - and it will set ZZZPT_HIRED_GODWIN. No conversation script is necessary. Instead, in the properties of the plot zzzpt_hired, we add a plot event script, as follows.
// PARTY HIRE PLOT SCRIPT
//
// This is called in conversation when a party member is hired for the first time.
// If the party is full, the party picker is displayed, which forces the PARTYMEMBER_ADDED
// module event.
//
// The flag value is never referenced, because the code is common for all party members.

#include "events_h"
#include "global_objects_h"
#include "utility_h"
#include "sys_rewards_h"
#include "log_h"
#include "utility_h"
#include "wrappers_h"
#include "plot_h"

#include "zzz_h"                  // A header containing the zzzPartyMemberID function
#include "plt_zzzpt_hired"
#include "plt_zzzpt_party"

int StartingConditional()
{
    event  eParms             = GetCurrentEvent();
    int    nType              = GetEventType(eParms);       // GET or SET
    string strPlot            = GetEventString(eParms, 0);  // Plot GUID
    int    nFlag              = GetEventInteger(eParms, 1); // Plot flag
    object oParty             = GetEventCreator(eParms);    // Plot table owner
    object oFollower          = GetEventObject(eParms, 0);  // Conversation owner (if any)
    int    nPlotType          = GetEventInteger(eParms, 5); // Plot type

    int    bIsTutorial        = GetM2DAInt(TABLE_PLOT_TYPES, "IsTutorial", nPlotType);
    int    bIsCodex           = GetM2DAInt(TABLE_PLOT_TYPES, "IsCodex", nPlotType);

    int    nResult            = FALSE;                      // return value for DEFINED GET
    object oPC                = GetPartyLeader();

    plot_GlobalPlotHandler(eParms); // any global plot operations, including debug info

    if (nType == EVENT_TYPE_SET_PLOT) // actions -> normal flags only
    {
        int nValue    = GetEventInteger(eParms, 2); // 0=Clear 1=Set
        int nOldValue = GetEventInteger(eParms, 3); // Current flag value

        if (nValue)
          {
            if (GetArraySize(GetPartyList(oPC)) < 4)
              {
                UT_HireFollower(oFollower);
                SetLocalInt(oFollower, CREATURE_REWARD_FLAGS, 0);
                AddCommand(oFollower, CommandJumpToLocation(GetLocation(GetHero())));
                SetFollowerState(oFollower, FOLLOWER_STATE_ACTIVE);
                WR_SetPlotFlag(PLT_ZZZPT_PARTY, zzzPartyMemberID(oFollower), TRUE);
              }
            else
              {
                WR_SetFollowerState(oFollower, FOLLOWER_STATE_AVAILABLE, FALSE);
                SetEventScript(oFollower, RESOURCE_SCRIPT_PLAYER_CORE);
                SendPartyMemberHiredEvent(oFollower, TRUE);
//                SetPartyPickerGUIStatus(PP_GUI_STATUS_USE);
//                ShowPartyPickerGUI();
              }
          }
     }
     else // EVENT_TYPE_GET_PLOT -> defined conditions only
     {
        switch(nFlag)
        {

        }
    }

    plot_OutputDefinedFlag(eParms, nResult);
    return nResult;
}
We still need to handle the party picker events in our module event script:
         // PARTY MEMBER ADDED - Allow XP gain. Come here, follow me, flag as party member.
         case EVENT_TYPE_PARTYMEMBER_ADDED:
         {
            object oFollower = GetEventObject(ev, 0);
            SetLocalInt(oFollower, CREATURE_REWARD_FLAGS, 0);
            AddCommand(oFollower, CommandJumpToLocation(GetLocation(GetHero())));
            SetFollowerState(oFollower, FOLLOWER_STATE_ACTIVE);
            WR_SetPlotFlag(PLT_ZZZPT_PARTY, zzzPartyMemberID(oFollower), TRUE);
            break;
         }
         // PARTY MEMBER DROPPED - flag as not party member.
         case EVENT_TYPE_PARTYMEMBER_DROPPED:
        {
            object oFollower = GetEventObject(ev, 0);
            WR_SetPlotFlag(PLT_ZZZPT_PARTY, zzzPartyMemberID(oFollower), FALSE);
        }
When we need to refer to a particular follower explicitly, we can still do so - for example, the flag ZZZPT_PARTY_GODWIN will tell use whether Godwin is currently in the party or not.
| Язык: | English • русский |
|---|
