Compiling 2DAs
In the "Dragon Age\tools\ResourceBuild\Processors" folder there is an executable named "ExcelProcessor.exe". This is the file that handles conversions of 2DAs from XLS to GDA format. Below are described 3 ways in which this file may be used.
Contents
Precautions
- Be sure the Excel document's format is correct. Excelprocessor may give hints on errors. See Article: 2DA
- Be sure your worksheet's name is correct. If you're extending an M2DA make sure you're using the correct prefix (see 2DA_base.xls).
- Be sure your worksheet's name is different from those already in use, unless you want to override an existing 2DA.
- The filename of the Excel document doesn't matter, it is solely the worksheet's name which does.
- Save and close the spreadsheet, Excelprocessor can't process files that are currently open in other programs.
Converting
3 convenient Methods are listed.
Drag & Drop Method
- Copy ExcelProcessor.exe and source .XLS files to a new directory (not explicitly neccessary, but advised)
- Select source .XLS files and drag them onto ExcelProcessor.exe
- Resulting .GDA files, will be located in your users folder, or in the internally "active" folder which differs from Situation, OS and Language used.
Command Line method
- Copy ExcelProcessor.exe to the source .XLS files' directory.
- Fire up command line, navigate into the directory where both the XLS files, and the ExcelProcessor can be found.
- Type: ExcelProcessor "filename.xls" (where filename is the name of the xls spreadsheet, and of course the double quotes aren't needed)
Example code:
C:\2DA\>ExcelProcessor guitypes.xls
Using a .BAT file
The following method adds some comfort:
- Create a folder called C:\2DA\
- There create a File called "2DACompile.BAT" and add following lines with Notepad.
cd /d %0\..
"C:\*DragonAgeInstallDir*\tools\ResourceBuild\Processors\ExcelProcessor.exe" %1
PAUSE
Note: Replace "C:\*DragonAgeInstallDir*" with where you installed your game.
- Drag and Drop the XLS file over the new BAT file. It doesnt need to be in the same directory.
- The GDA File will be placed into C:\2DA\
- The window will stay open ,so you can view eventual Error messages.
Alternativly you can place the BAT ("Batch") file on your desktop, in which case the GDA will also be put on the Desktop. If you prefer easier access and convert often. Just drag the XLS from wherever it is over it.
Adding 2DA export to the Windows XP file explorer
The following gets the most comfort, and adds a right click context menu item. But it is tricky to set up.
Setup:
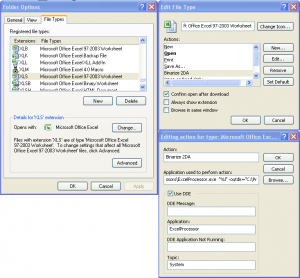
- Open Windows Explorer and click Tools | Folder Options.
- In the File Types tab, select the XLS extension from the list and click the Advanced button.
- Click the New button and put 'Binarize 2DA' in the Action field.
- Paste the following in the Application field and click OK (update the drive and folder names to match your client): "C:\*DragonAgeInstallDir*\Dragon Age\tools\ResourceBuild\Processors\ExcelProcessor.exe" "%1" -outdir="C:\Documents and Settings\YOURNAME\My Documents\BioWare\Dragon Age\packages\core\override"
- For the Steam version, use the following: "C:\Program Files\Steam\steamapps\common\dragon age origins\tools\ResourceBuild\Processors\ExcelProcessor.exe" "%1" -outdir="C:\Documents and Settings\YOURNAME\My Documents\BioWare\Dragon Age\packages\core\override"
Note that paths with spaces in them can cause Windows trouble, if your paths have spaces in them remember to wrap them in quotation marks.
Usage:
- Using Windows Explorer, navigate to your 2DA folder and select the Excel file(s) to process. Right click and select 'Binarize 2DA' from the context menu.
- Confirm a corresponding GDA file is created in your override folder for each Excel file processed.
Afterwards
Place the GDA(s) into the game's override directory. Which one, is determined the following:
- When it should be included into a custom Module, but extending Core M2DA's: (This is pretty much failproof)
My Documents\BioWare\Dragon Age\AddIns\yourmodulename\core\override\
- When it should be included into a custom Module, and 2DA's not available to Core:
My Documents\BioWare\Dragon Age\AddIns\yourmodulename\module\override\
- This is a cleaner solution, when packaging up the Module ,the files will be all in one place.
- Note: "My Documents" is different to each OS Version and OS language. "yourmodulename" is created with your custom Module.
For all other cases, when not making a Module copy them into: (this only makes sense when adjusting values of existing rows, and override without the toolset)
*DragonAgeInstalldir*\packages\core\override\
- Note: *DragonAgeInstalldir* is the Installation Directory you have chosen.
See also: Source directory priorities - for a more detailed list of priorities of each override folder.
Tip: You will need to restart the Toolset, or Game for the changes to take effect.
| Language: | English • русский |
|---|
